Go 中如何强制关闭 TCP 连接
默认关闭需要四次挥手的确认过程,这是一种”商量“的方式,而 TCP 为我们提供了另外一种”强制“的关闭模式。
如何强制性关闭?具体在 Go 代码中应当怎样实现?这就是本文探讨的内容。
默认关闭
相信每个程序员都知道 TCP 断开连接的四次挥手过程,这是面试八股文中的股中股。我们在 Go 代码中调用默认的 Conn.Close() 方法,它就是典型的四次挥手。
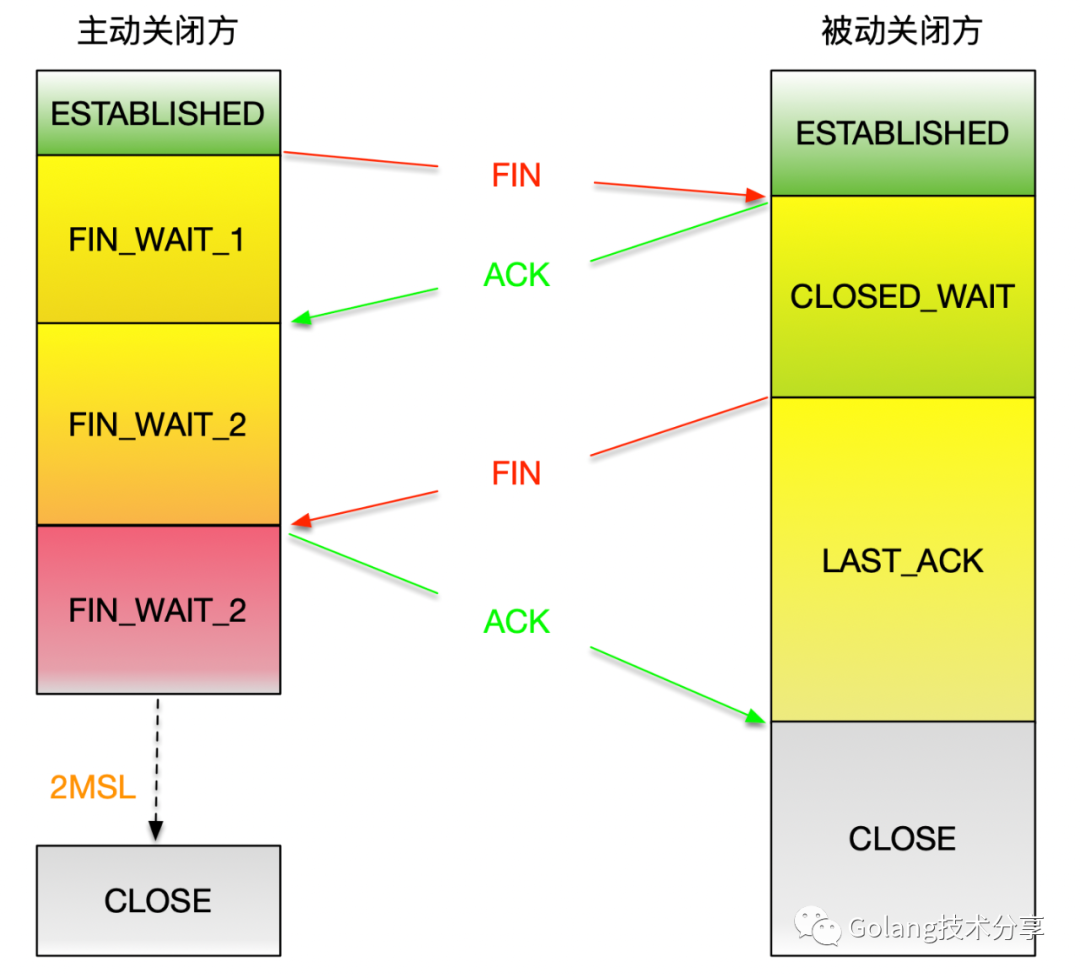
以客户端主动关闭连接为例,当它调用 Close 函数后,就会向服务端发送 FIN 报文,如果服务器的本端 socket 接收缓存区里已经没有数据,那服务端的 read 将会得到一个 EOF 错误。
发起关闭方会经历 FIN_WAIT_1 -> FIN_WAIT_2 -> TIME_WAIT -> CLOSE 的状态变化,这些状态需要得到被关闭方的反馈而更新。
强制关闭
默认的关闭方式,不管是客户端还是服务端主动发起关闭,都要经过对方的应答,才能最终实现真正的关闭连接。那能不能在发起关闭时,不关心对方是否同意,就结束掉连接呢?
答案是肯定的。TCP 协议为我们提供了一个 RST 的标志位,当连接的一方认为该连接异常时,可以通过发送 RST 包并立即关闭该连接,而不用等待被关闭方的 ACK 确认。
SetLinger() 方法
在 Go 中,我们可以通过 net.TCPConn.SetLinger() 方法来实现。
// SetLinger sets the behavior of Close on a connection which still
// has data waiting to be sent or to be acknowledged.
//
// If sec < 0 (the default), the operating system finishes sending the
// data in the background.
//
// If sec == 0, the operating system discards any unsent or
// unacknowledged data.
//
// If sec > 0, the data is sent in the background as with sec < 0. On
// some operating systems after sec seconds have elapsed any remaining
// unsent data may be discarded.
func (c *TCPConn) SetLinger(sec int) error {}
函数的注释已经非常清晰,但是需要读者有 socket 缓冲区的概念。
- socket 缓冲区
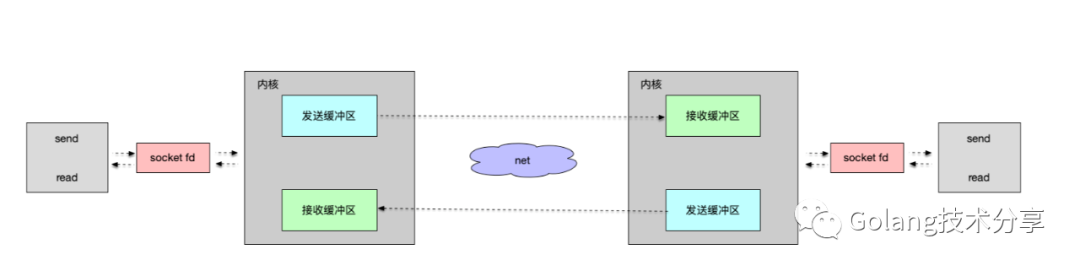
当应用层代码通过 socket 进行读与写的操作时,实质上经过了一层 socket 缓冲区,它分为发送缓冲区和接受缓冲区。
缓冲区信息可通过执行 netstat -nt 命令查看
$ netstat -nt
Active Internet connections
Proto Recv-Q Send-Q  Local Address          Foreign Address        (state)
tcp4       0      0  127.0.0.1.57721        127.0.0.1.49448        ESTABLISHED
其中,Recv-Q 代表的就是接收缓冲区,Send-Q 代表的是发送缓冲区。
默认关闭方式中,即 sec < 0 。操作系统会将缓冲区里未处理完的数据都完成处理,再关闭掉连接。
当 sec > 0 时,操作系统会以与默认关闭方式运行。但是当超过定义的时间 sec 后,如果还没处理完缓存区的数据,在某些操作系统下,缓冲区中未完成的流量可能就会被丢弃。
而 sec == 0 时,操作系统会直接丢弃掉缓冲区里的流量数据,这就是强制性关闭。
示例代码与抓包分析
我们通过示例代码来学习 SetLinger() 的使用,并以此来分析强制关闭的区别。
服务端代码
以服务端为主动关闭连接方示例
package main
import (
 "log"
 "net"
 "time"
)
func main() {
 // Part 1: create a listener
 l, err := net.Listen("tcp", ":8000")
 if err != nil {
  log.Fatalf("Error listener returned: %s", err)
 }
 defer l.Close()
 for {
  // Part 2: accept new connection
  c, err := l.Accept()
  if err != nil {
   log.Fatalf("Error to accept new connection: %s", err)
  }
  // Part 3: create a goroutine that reads and write back data
  go func() {
   log.Printf("TCP session open")
   defer c.Close()
   for {
    d := make([]byte, 100)
    // Read from TCP buffer
    _, err := c.Read(d)
    if err != nil {
     log.Printf("Error reading TCP session: %s", err)
     break
    }
    log.Printf("reading data from client: %s\n", string(d))
    // write back data to TCP client
    _, err = c.Write(d)
    if err != nil {
     log.Printf("Error writing TCP session: %s", err)
     break
    }
   }
  }()
  // Part 4: create a goroutine that closes TCP session after 10 seconds
  go func() {
   // SetLinger(0) to force close the connection
   err := c.(*net.TCPConn).SetLinger(0)
   if err != nil {
    log.Printf("Error when setting linger: %s", err)
   }
   <-time.After(time.Duration(10) * time.Second)
   defer c.Close()
  }()
 }
}
服务端代码根据逻辑分为四个部分
第一部分:端口监听。我们通过 net.Listen("tcp", ":8000")开启在端口 8000 的 TCP 连接监听。
第二部分:建立连接。在开启监听成功之后,调用 net.Listener.Accept()方法等待 TCP 连接。Accept 方法将以阻塞式地等待新的连接到达,并将该连接作为 net.Conn 接口类型返回。
第三部分:数据传输。当连接建立成功后,我们将启动一个新的 goroutine 来处理 c 连接上的读取和写入。本文服务器的数据处理逻辑是,客户端写入该 TCP 连接的所有内容,服务器将原封不动地写回相同的内容。
第四部分:强制关闭连接逻辑。启动一个新的 goroutine,通过 c.(*net.TCPConn).SetLinger(0) 设置强制关闭选项,并于 10 s 后关闭连接。
客户端代码
以客户端为被动关闭连接方示例
package main
import (
 "log"
 "net"
)
func main() {
 // Part 1: open a TCP session to server
 c, err := net.Dial("tcp", "localhost:8000")
 if err != nil {
  log.Fatalf("Error to open TCP connection: %s", err)
 }
 defer c.Close()
 // Part2: write some data to server
 log.Printf("TCP session open")
 b := []byte("Hi, gopher?")
 _, err = c.Write(b)
 if err != nil {
  log.Fatalf("Error writing TCP session: %s", err)
 }
 // Part3: read any responses until get an error
 for {
  d := make([]byte, 100)
  _, err := c.Read(d)
  if err != nil {
   log.Fatalf("Error reading TCP session: %s", err)
  }
  log.Printf("reading data from server: %s\n", string(d))
 }
}
客户端代码根据逻辑分为三个部分
第一部分:建立连接。我们通过 net.Dial("tcp", "localhost:8000")连接一个 TCP 连接到服务器正在监听的同一个 localhost:8000 地址。
第二部分:写入数据。当连接建立成功后,通过 c.Write() 方法写入数据 Hi, gopher? 给服务器。
第三部分:读取数据。除非发生 error,否则客户端通过 c.Read() 方法(记住,是阻塞式的)循环读取 TCP 连接上的内容。
tcpdump 抓包结果
tcpdump 是一个非常好用的数据抓包工具,在《Go 网络编程和 TCP 抓包实操》一文中已经简单介绍了它的命令选项,这里就不再赘述。
- 开启 tcpdump 数据包监听
tcpdump -S -nn -vvv -i lo0 port 8000
- 运行服务端代码
$ go run main.go
2021/09/25 20:21:44 TCP session open
2021/09/25 20:21:44 reading data from client: Hi, gopher?
2021/09/25 20:21:54 Error reading TCP session: read tcp 127.0.0.1:8000->127.0.0.1:59394: use of closed network connection
服务器和客户端建立连接之后,从客户端读取到数据 Hi, gopher? 。在 10s 后,服务端强制关闭了 TCP 连接,阻塞在 c.Read 的服务端代码返回了错误: use of closed network connection。
- 运行客户端代码
$ go run main.go
2021/09/25 20:21:44 TCP session open
2021/09/25 20:21:44 reading data from server: Hi, gopher?
2021/09/25 20:21:54 Error reading TCP session: read tcp 127.0.0.1:59394->127.0.0.1:8000: read: connection reset by peer
客户端和服务器建立连接之后,发送数据给服务端,服务端返回相同的数据 Hi, gopher? 回来。在 10s 后,由于服务器强制关闭了 TCP 连接,因此阻塞在 c.Read 的客户端代码捕获到了错误:connection reset by peer。
- tcpdump 的抓包结果
$ tcpdump -S -nn -vvv -i lo0 port 8000
tcpdump: listening on lo0, link-type NULL (BSD loopback), capture size 262144 bytes
20:21:44.682942 IP (tos 0x0, ttl 64, id 0, offset 0, flags [DF], proto TCP (6), length 64, bad cksum 0 (->3cb6)!)
    127.0.0.1.59394 > 127.0.0.1.8000: Flags [S], cksum 0xfe34 (incorrect -> 0xfa62), seq 3783365585, win 65535, options [mss 16344,nop,wscale 6,nop,nop,TS val 725769370 ecr 0,sackOK,eol], length 0
20:21:44.683042 IP (tos 0x0, ttl 64, id 0, offset 0, flags [DF], proto TCP (6), length 64, bad cksum 0 (->3cb6)!)
    127.0.0.1.8000 > 127.0.0.1.59394: Flags [S.], cksum 0xfe34 (incorrect -> 0x23d3), seq 1050611715, ack 3783365586, win 65535, options [mss 16344,nop,wscale 6,nop,nop,TS val 725769370 ecr 725769370,sackOK,eol], length 0
20:21:44.683050 IP (tos 0x0, ttl 64, id 0, offset 0, flags [DF], proto TCP (6), length 52, bad cksum 0 (->3cc2)!)
    127.0.0.1.59394 > 127.0.0.1.8000: Flags [.], cksum 0xfe28 (incorrect -> 0x84dc), seq 3783365586, ack 1050611716, win 6379, options [nop,nop,TS val 725769370 ecr 725769370], length 0
20:21:44.683055 IP (tos 0x0, ttl 64, id 0, offset 0, flags [DF], proto TCP (6), length 52, bad cksum 0 (->3cc2)!)
    127.0.0.1.8000 > 127.0.0.1.59394: Flags [.], cksum 0xfe28 (incorrect -> 0x84dc), seq 1050611716, ack 3783365586, win 6379, options [nop,nop,TS val 725769370 ecr 725769370], length 0
20:21:44.683302 IP (tos 0x0, ttl 64, id 0, offset 0, flags [DF], proto TCP (6), length 63, bad cksum 0 (->3cb7)!)
    127.0.0.1.59394 > 127.0.0.1.8000: Flags [P.], cksum 0xfe33 (incorrect -> 0x93f5), seq 3783365586:3783365597, ack 1050611716, win 6379, options [nop,nop,TS val 725769370 ecr 725769370], length 11
20:21:44.683311 IP (tos 0x0, ttl 64, id 0, offset 0, flags [DF], proto TCP (6), length 52, bad cksum 0 (->3cc2)!)
    127.0.0.1.8000 > 127.0.0.1.59394: Flags [.], cksum 0xfe28 (incorrect -> 0x84d1), seq 1050611716, ack 3783365597, win 6379, options [nop,nop,TS val 725769370 ecr 725769370], length 0
20:21:44.683499 IP (tos 0x0, ttl 64, id 0, offset 0, flags [DF], proto TCP (6), length 152, bad cksum 0 (->3c5e)!)
    127.0.0.1.8000 > 127.0.0.1.59394: Flags [P.], cksum 0xfe8c (incorrect -> 0x9391), seq 1050611716:1050611816, ack 3783365597, win 6379, options [nop,nop,TS val 725769370 ecr 725769370], length 100
20:21:44.683511 IP (tos 0x0, ttl 64, id 0, offset 0, flags [DF], proto TCP (6), length 52, bad cksum 0 (->3cc2)!)
    127.0.0.1.59394 > 127.0.0.1.8000: Flags [.], cksum 0xfe28 (incorrect -> 0x846e), seq 3783365597, ack 1050611816, win 6378, options [nop,nop,TS val 725769370 ecr 725769370], length 0
20:21:54.688350 IP (tos 0x0, ttl 64, id 0, offset 0, flags [DF], proto TCP (6), length 40, bad cksum 0 (->3cce)!)
    127.0.0.1.8000 > 127.0.0.1.59394: Flags [R.], cksum 0xfe1c (incorrect -> 0xcd39), seq 1050611816, ack 3783365597, win 6379, length 0
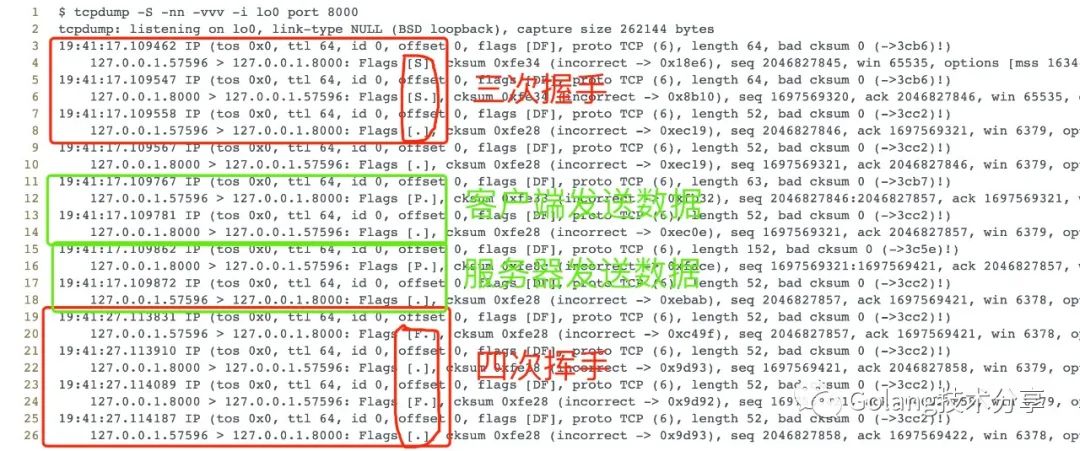
我们重点关注内容 Flags [],其中 [S] 代表 SYN 包,用于建立连接;[P] 代表 PSH 包,表示有数据传输;[R]代表 RST 包,用于重置连接;[.] 代表对应的 ACK 包。例如 [S.] 代表 SYN-ACK。
搞懂了这几个 Flags 的含义,那我们就可以分析出本次服务端强制关闭的 TCP 通信全过程。
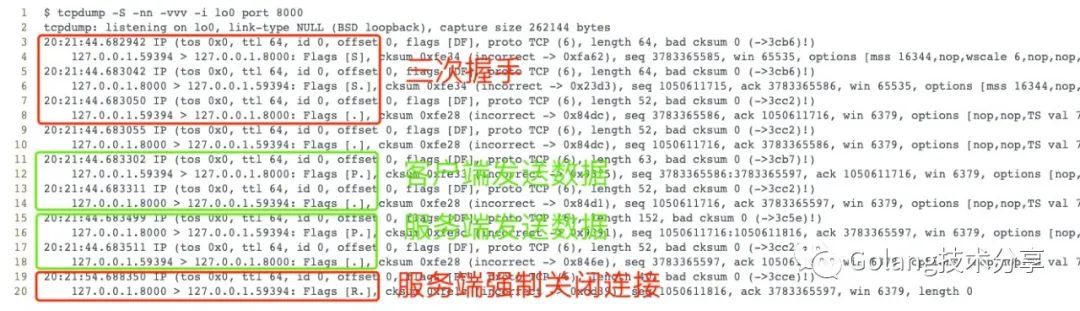
可以看到,当通过设定 SetLinger(0) 之后,主动关闭方调用 Close() 时,系统内核会直接发送 RST 包给被动关闭方。这个过程并不需要被动关闭方的回复,就已关闭了连接。主动关闭方也就没有了默认关闭模式下 FIN_WAIT_1 -> FIN_WAIT_2 -> TIME_WAIT -> CLOSE 的状态改变。
总结
本文我们介绍了 TCP 默认关闭与强制关闭两种方式(其实还有种折中的方式:SetLinger(sec > 0)),它们都源于 TCP 的协议设计。
在大多数的场景中,我们都应该选择使用默认关闭方式,因为这样才能确保数据的完整性(不会丢失 socket 缓冲区里的数据)。
当使用默认方式关闭时,每个连接都会经历一系列的连接状态转变,让其在操作系统上停留一段时间。尤其是服务器要主动关闭连接时(大多数应用场景,都应该是由客户端主动发起关闭操作),这会消耗服务器的资源。
如果短时间内有大量的或者恶意的连接涌入,我们或许需要采用强制关闭方式。因为使用强制关闭,能立即关闭这些连接,释放资源,保证服务器的可用与性能。
当然,我们还可以选择折中的方式,容忍一段时间的缓存区数据处理时间,再进行关闭操作。
这里给读者朋友留一个思考题。如果在本文示例中,我们将 SetLinger(0) 改为 SetLinger(1) ,抓包结果又会是如何?
最后,读者朋友们在项目中,有使用过强制关闭方式吗?欢迎留言交流。
