Ceph容器化部署一时爽,运维火葬场~
Rook 是一个开源的云原生存储编排工具,提供平台、框架和对各种存储解决方案的支持,以和云原生环境进行本地集成。
Rook 将存储软件转变成自我管理、自我扩展和自我修复的存储服务,通过自动化部署、启动、配置、供应、扩展、升级、迁移、灾难恢复、监控和资源管理来实现。Rook 底层使用云原生容器管理、调度和编排平台提供的能力来提供这些功能。
Rook 利用扩展功能将其深度集成到云原生环境中,并为调度、生命周期管理、资源管理、安全性、监控等提供了无缝的体验。有关 Rook 当前支持的存储解决方案的状态的更多详细信息,可以参考 Rook 仓库 的项目介绍。不过目前 Rook 已经很好地提供了对 Ceph 的支持。
Rook架构图
Rook通俗地理解,就是一个存储适配层,是一个框架。对上可以承接K8S的存储需求 ,对下实现对底层存储软件统一适配管控。
目前Rook支持多种存储集群的部署,主要包括:
- Ceph,它是一个高度可扩展的分布式存储解决方案,适用于块存储、对象存储和共享文件系统,具有多年的生产部署经验。
- NFS,它允许远程主机通过网络挂载文件系统,并与这些文件系统进行交互,就像在本地挂载一样。
- Cassandra,它是一个高度可用的NoSQL数据库,具有闪电般快速的性能、灵活可控的数据一致性和大规模的可扩展性。
以上这些存储系统都有独立的基于K8S的Openrator,能够实现all in K8S运行。真正达到云原生。
为什么要使用Rook
云原生是大势所趋,应用以容器化作为交付标准越来成为事实标准,存储类的应用也不例外。基础设施围绕基于K8S的“云”操作系统来建设,逐渐在技术圈内达成了共识。使用Rook进行存储管控, 可以解决以下问题:
- 本身有基于K8S的云原生基础设施,可以直接接入存储管理,实现统一化
- 能够快速部署一套云原生存储集群
- 平台化管理云原生存储集群,包括存储的扩容、升级、监控、灾难恢复等全生命周期管理
环境说明
测试试验环境:
- Kubernetes: v1.19.9
- Docker:20.10.11
- Rook:release-1.4
k8s环境可以通过minikube或者kubeadm进行部署, 这里我使用的是kainstall,在此强烈推荐好友@lework的kainstall,一个脚本完成生产级的k8s集群搭建(基于kubeadm的shell封装)
[root@k8s-master-node1 ~]# kubectl  get nodes -o wide
NAME               STATUS   ROLES    AGE    VERSION   INTERNAL-IP     EXTERNAL-IP   OS-IMAGE                KERNEL-VERSION          CONTAINER-RUNTIME
k8s-master-node1   Ready    master   244d   v1.19.9   172.16.8.80     <none>        CentOS Linux 7 (Core)   3.10.0-862.el7.x86_64   docker://20.10.5
k8s-master-node2   Ready    master   244d   v1.19.9   172.16.8.81     <none>        CentOS Linux 7 (Core)   3.10.0-862.el7.x86_64   docker://20.10.5
k8s-master-node3   Ready    master   244d   v1.19.9   172.16.8.82     <none>        CentOS Linux 7 (Core)   3.10.0-862.el7.x86_64   docker://20.10.5
k8s-worker-node1   Ready    worker   244d   v1.19.9   172.16.8.83     <none>        CentOS Linux 7 (Core)   3.10.0-862.el7.x86_64   docker://20.10.5
k8s-worker-node2   Ready    worker   21h    v1.19.9   172.16.49.210   <none>        CentOS Linux 7 (Core)   3.10.0-957.el7.x86_64   docker://20.10.11
k8s-worker-node3   Ready    worker   21h    v1.19.9   172.16.49.211   <none>        CentOS Linux 7 (Core)   3.10.0-957.el7.x86_64   docker://20.10.11
k8s-worker-node4   Ready    worker   21h    v1.19.9   172.16.49.212   <none>        CentOS Linux 7 (Core)   3.10.0-957.el7.x86_64   docker://20.10.11
说明:
k8s-worker-node{2,3,4}每个节点上面都一块vdb的数据盘
部署rook和Ceph集群
从github获取指定版本的rook
[root@k8s-master-node1 /opt]# git clone -b release-1.4 https://github.com/rook/rook.git
正克隆到 'rook'...
remote: Enumerating objects: 91504, done.
remote: Counting objects: 100% (389/389), done.
remote: Compressing objects: 100% (237/237), done.
remote: Total 91504 (delta 176), reused 327 (delta 144), pack-reused 91115
接收对象中: 100% (91504/91504), 45.43 MiB | 4.41 MiB/s, done.
处理 delta 中: 100% (63525/63525), done.
进入rook的ceph目录,部署rook以及ceph集群
cd rook/cluster/examples/kubernetes/ceph
kubectl create -f common.yaml -f operator.yaml
kubectl create -f cluster.yaml
说明:
comm.yaml里面主要是权限控制以及CRD资源定义operator.yaml是rook-ceph-operator的deloymentcluster.yaml是cephclusters.ceph.rook.io这个CRD资源的使用,即部署一个完整的ceph集群- 默认不做定制, 集群默认会启动3个mon,带有空闲裸盘的节点,会自动为这个盘进行OSD初始化.(默认至少需要有3个节点,且每个节点至少有一个空闲盘)
部署完成之后,可以通过kubectl在rook-ceph空间下查看pod的状态
[root@k8s-master-node1 /tmp/rook/cluster/examples/kubernetes/ceph]# kubectl get pods -n rook-ceph  -o wide
NAME                                                         READY   STATUS      RESTARTS   AGE     IP               NODE               NOMINATED NODE   READINESS GATES
csi-cephfsplugin-4q4j5                                       3/3     Running     0          21h     172.16.49.211    k8s-worker-node3   <none>           <none>
csi-cephfsplugin-c8sdw                                       3/3     Running     0          21h     172.16.8.82      k8s-master-node3   <none>           <none>
csi-cephfsplugin-provisioner-56d8446896-4c68j                6/6     Running     0          21h     10.244.91.69     k8s-worker-node4   <none>           <none>
csi-cephfsplugin-provisioner-56d8446896-rq2j2                6/6     Running     0          21h     10.244.219.71    k8s-worker-node2   <none>           <none>
csi-cephfsplugin-r9cqt                                       3/3     Running     0          21h     172.16.8.80      k8s-master-node1   <none>           <none>
csi-cephfsplugin-sdxm5                                       3/3     Running     0          21h     172.16.49.212    k8s-worker-node4   <none>           <none>
csi-cephfsplugin-sntm4                                       3/3     Running     0          21h     172.16.49.210    k8s-worker-node2   <none>           <none>
csi-cephfsplugin-stkg4                                       3/3     Running     0          21h     172.16.8.83      k8s-worker-node1   <none>           <none>
csi-cephfsplugin-v88d6                                       3/3     Running     0          21h     172.16.8.81      k8s-master-node2   <none>           <none>
csi-rbdplugin-bnmhp                                          3/3     Running     0          21h     172.16.8.82      k8s-master-node3   <none>           <none>
csi-rbdplugin-grw9c                                          3/3     Running     0          21h     172.16.8.80      k8s-master-node1   <none>           <none>
csi-rbdplugin-p47n6                                          3/3     Running     0          21h     172.16.49.210    k8s-worker-node2   <none>           <none>
csi-rbdplugin-provisioner-569c75558-4hw9d                    6/6     Running     0          21h     10.244.198.197   k8s-worker-node3   <none>           <none>
csi-rbdplugin-provisioner-569c75558-62ds8                    6/6     Running     0          21h     10.244.219.70    k8s-worker-node2   <none>           <none>
csi-rbdplugin-s56gp                                          3/3     Running     0          21h     172.16.49.211    k8s-worker-node3   <none>           <none>
csi-rbdplugin-vhjv7                                          3/3     Running     0          21h     172.16.49.212    k8s-worker-node4   <none>           <none>
csi-rbdplugin-xg48n                                          3/3     Running     0          21h     172.16.8.81      k8s-master-node2   <none>           <none>
csi-rbdplugin-zb6b9                                          3/3     Running     0          21h     172.16.8.83      k8s-worker-node1   <none>           <none>
rook-ceph-crashcollector-k8s-worker-node2-bbd9587f9-hvq92    1/1     Running     0          21h     10.244.219.74    k8s-worker-node2   <none>           <none>
rook-ceph-crashcollector-k8s-worker-node3-65bb549b8b-8z4q2   1/1     Running     0          21h     10.244.198.202   k8s-worker-node3   <none>           <none>
rook-ceph-crashcollector-k8s-worker-node4-8457f67c97-29wgn   1/1     Running     0          21h     10.244.91.72     k8s-worker-node4   <none>           <none>
rook-ceph-mgr-a-749575fc54-dtbpw                             1/1     Running     0          21h     10.244.198.198   k8s-worker-node3   <none>           <none>
rook-ceph-mon-a-59f6565594-nxlbv                             1/1     Running     0          21h     10.244.198.196   k8s-worker-node3   <none>           <none>
rook-ceph-mon-b-688948c479-j7hcj                             1/1     Running     0          21h     10.244.91.68     k8s-worker-node4   <none>           <none>
rook-ceph-mon-c-7b7c6fffd7-h5hk6                             1/1     Running     0          21h     10.244.219.69    k8s-worker-node2   <none>           <none>
rook-ceph-operator-864f5d5868-gsww8                          1/1     Running     0          22h     10.244.91.65     k8s-worker-node4   <none>           <none>
rook-ceph-osd-0-6b74867f6b-2qwnv                             1/1     Running     0          21h     10.244.219.73    k8s-worker-node2   <none>           <none>
rook-ceph-osd-1-65596bf48-6lxxv                              1/1     Running     0          21h     10.244.91.71     k8s-worker-node4   <none>           <none>
rook-ceph-osd-2-5bc6788b7f-z2rzv                             1/1     Running     0          21h     10.244.198.201   k8s-worker-node3   <none>           <none>
rook-ceph-osd-prepare-k8s-master-node1-4kxg8                 0/1     Completed   0          3h12m   10.244.236.163   k8s-master-node1   <none>           <none>
rook-ceph-osd-prepare-k8s-master-node2-tztm9                 0/1     Completed   0          3h12m   10.244.237.101   k8s-master-node2   <none>           <none>
rook-ceph-osd-prepare-k8s-master-node3-768v5                 0/1     Completed   0          3h12m   10.244.113.222   k8s-master-node3   <none>           <none>
rook-ceph-osd-prepare-k8s-worker-node1-dlljc                 0/1     Completed   0          3h12m   10.244.50.240    k8s-worker-node1   <none>           <none>
rook-ceph-osd-prepare-k8s-worker-node2-qszkt                 0/1     Completed   0          3h12m   10.244.219.79    k8s-worker-node2   <none>           <none>
rook-ceph-osd-prepare-k8s-worker-node3-krxqc                 0/1     Completed   0          3h12m   10.244.198.210   k8s-worker-node3   <none>           <none>
rook-ceph-osd-prepare-k8s-worker-node4-l77ds                 0/1     Completed   0          3h12m   10.244.91.78     k8s-worker-node4   <none>           <none>
rook-ceph-tools-5949d6759-lbj74                              1/1     Running     0          21h     10.244.50.234    k8s-worker-node1   <none>           <none>
rook-discover-cjpxh                                          1/1     Running     0          22h     10.244.198.193   k8s-worker-node3   <none>           <none>
rook-discover-lw96w                                          1/1     Running     0          22h     10.244.91.66     k8s-worker-node4   <none>           <none>
rook-discover-m7jzr                                          1/1     Running     0          22h     10.244.236.157   k8s-master-node1   <none>           <none>
rook-discover-mbqtx                                          1/1     Running     0          22h     10.244.237.95    k8s-master-node2   <none>           <none>
rook-discover-r4m6h                                          1/1     Running     0          22h     10.244.50.232    k8s-worker-node1   <none>           <none>
rook-discover-xwml2                                          1/1     Running     0          22h     10.244.113.216   k8s-master-node3   <none>           <none>
rook-discover-xzw2z                                          1/1     Running     0          22h     10.244.219.66    k8s-worker-node2   <none>           <none>
说明:
1.部署成功之后,会包含rook的组件以及ceph-csi相关的组件(rbd和cephfs的plugin同时都会部署)
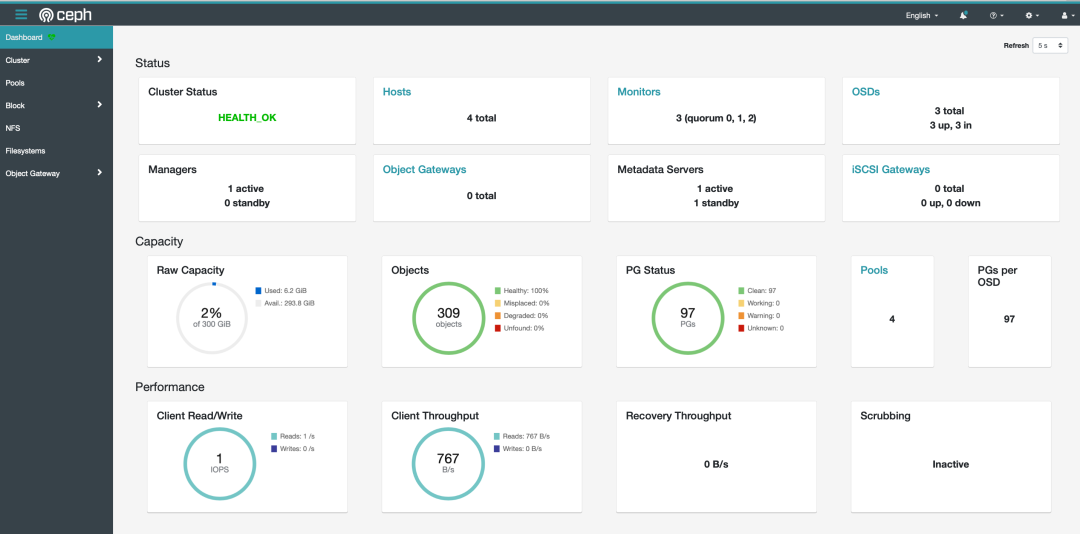
Ceph 面板
Ceph mgr组件里带有一个Dashboard 的插件,通过这个面板,我们可以在上面查看集群的状态,包括总体运行状态,mgr、osd 和其他 Ceph 进程的状态,查看存储池和 PG 状态,以及显示守护进程的日志等等.以下是cluster.yaml里的默认配置
  dashboard:
    enabled: true
    # serve the dashboard under a subpath (useful when you are accessing the dashboard via a reverse proxy)
    # urlPrefix: /ceph-dashboard
    # serve the dashboard at the given port.
    # port: 8443
    # serve the dashboard using SSL
    ssl: true
说明:
- 默认开启dashboard插件,在ceph里可以通过
ceph mgr module ls可以查看mgr各种插件状态 - 默认访问路径为
/,可通过urlPrefix指定路由访问路由前缀 - 默认开启ssl,且访问端口是
8443
rook部署成功后,可以查看到如下的 service 服务
[root@k8s-master-node1 /opt/rook/cluster/examples/kubernetes/ceph]# kubectl get service -n rook-ceph
NAME                         TYPE        CLUSTER-IP       EXTERNAL-IP   PORT(S)          AGE
rook-ceph-mgr                            ClusterIP   10.96.227.178   <none>        9283/TCP            3d16h
rook-ceph-mgr-dashboard                  ClusterIP   10.96.159.108   <none>        8443/TCP            3d16h
rook-ceph-mon-a                          ClusterIP   10.96.31.17     <none>        6789/TCP,3300/TCP   3d17h
rook-ceph-mon-b                          ClusterIP   10.96.176.163   <none>        6789/TCP,3300/TCP   3d17h
rook-ceph-mon-c                          ClusterIP   10.96.146.28    <none>        6789/TCP,3300/TCP   3d17h
其中rook-ceph-mgr 服务用于暴露 Prometheus metrics格式的监控指标,而rook-ceph-mgr-dashboard 服务即是ceph dashboard 服务。在集群内部可以通过 DNS 名称 https://rook-ceph-mgr-dashboard.rook-ceph:8443 或者 CluterIP https://10.96.159.108:7000 来进行访问。通常dashboard需要通过外部浏览器来进行访问,可以通过 Ingress 或者 NodePort 类型的 Service 来暴露服务。rook已经贴心地为我们准备好了相关的service。
[root@k8s-master-node1 /opt/rook/cluster/examples/kubernetes/ceph]# ll dashboard-*
-rw-r--r-- 1 root root 363 11月 30 14:10 dashboard-external-https.yaml
-rw-r--r-- 1 root root 362 11月 30 14:10 dashboard-external-http.yaml
-rw-r--r-- 1 root root 839 11月 30 14:10 dashboard-ingress-https.yaml
-rw-r--r-- 1 root root 365 11月 30 14:10 dashboard-loadbalancer.yaml
这里选择NodePort类型的service
[root@k8s-master-node1 /opt/rook/cluster/examples/kubernetes/ceph]# cat dashboard-external-https.yaml
apiVersion: v1
kind: Service
metadata:
  name: rook-ceph-mgr-dashboard-external-https
  namespace: rook-ceph
  labels:
    app: rook-ceph-mgr
    rook_cluster: rook-ceph
spec:
  ports:
  - name: dashboard
    port: 8443
    protocol: TCP
    targetPort: 8443
  selector:
    app: rook-ceph-mgr
    rook_cluster: rook-ceph
  sessionAffinity: None
  type: NodePort
创建成功之后, 就可查看相关的service了。如下所示, 其中49096就是NodePort的外部端口。浏览器通过https://<NodeIP>:49096可以访问到ceph dashboard了
[root@k8s-master-node1 /opt/rook/cluster/examples/kubernetes/ceph]# kubectl  get svc -n rook-ceph  | grep dash
rook-ceph-mgr-dashboard                  ClusterIP   10.96.159.108   <none>        8443/TCP            3d17h
rook-ceph-mgr-dashboard-external-https   NodePort    10.96.83.5      <none>        8443:49096/TCP      2m
注意:
- 由于是自签名证书,需要手动添加信任证书
- 不同ceph版本dashboard略有差异, 本环境的ceph版本为
ceph version 15.2.8 octopus (stable)
默认用户名为admin,密码是放rook-ceph空间下的rook-ceph-dashboard-password的secret里, 通过以下方式可以获取明文密码
[root@k8s-master-node1 /opt/rook/cluster/examples/kubernetes/ceph]#  kubectl -n rook-ceph get secret rook-ceph-dashboard-password -o jsonpath="{['data']['password']}" | base64 --decode && echo
xxxxxxx ##你的密码 ##
成功登陆之后,大屏展示如下:
Rook 工具箱
要验证集群是否处于正常状态,我们可以使用 Rook 工具箱 来运行 ceph -s 命令来查看集群整体状态。
Rook 工具箱是一个用于调试和测试 Rook 的常用工具容器,对应的toolbox的yaml文件如下所示:
[root@k8s-master-node1 /opt/rook/cluster/examples/kubernetes/ceph]# kubectl apply -f toolbox.yaml
deployment.apps/rook-ceph-tools created
部署成功之后,通过以下指令进入toolbox的pod环境,然后对ceph集群可以进行运维操作:
kubectl -n rook-ceph exec -it $(kubectl -n rook-ceph get pod -l "app=rook-ceph-tools" -o jsonpath='{.items[0].metadata.name}') -- bash
toolbox的base镜像是基于Centos8,因此要扩展一些工具,直接使用yum或者rpm工具就可以安装
[root@rook-ceph-tools-5949d6759-256c5 /]# cat /etc/redhat-release
CentOS Linux release 8.3.2011
Tip:
可以创建如下的命令别名,可以方便进入toolbox的环境
alias ceph-ops='kubectl -n rook-ceph exec -it $(kubectl -n rook-ceph get pod -l "app=rook-ceph-tools" -o jsonpath='{.items[0].metadata.name}') -- bash'
获取集群状态
[root@rook-ceph-tools-5949d6759-256c5 /]# ceph -s
  cluster:
    id:     a0540409-d822-48e0-869b-273936597f2d
    health: HEALTH_OK

  services:
    mon: 3 daemons, quorum a,b,c (age 23h)
    mgr: a(active, since 4h)
    osd: 3 osds: 3 up (since 23h), 3 in (since 23h)

  data:
    pools:   2 pools, 33 pgs
    objects: 17 objects, 21 MiB
    usage:   3.1 GiB used, 297 GiB / 300 GiB avail
    pgs:     33 active+clean
获取集群拓扑
与预期的一样,每块空闲盘都初始化成了OSD
[root@rook-ceph-tools-5949d6759-256c5 /]# ceph osd tree
ID  CLASS  WEIGHT   TYPE NAME                  STATUS  REWEIGHT  PRI-AFF
-1         0.29306  root default
-3         0.09769      host k8s-worker-node2
 0    hdd  0.09769          osd.0                  up   1.00000  1.00000
-7         0.09769      host k8s-worker-node3
 2    hdd  0.09769          osd.2                  up   1.00000  1.00000
-5         0.09769      host k8s-worker-node4
 1    hdd  0.09769          osd.1                  up   1.00000  1.00000
更多关于ceph架构及运维事宜请查看这里(https://docs.ceph.com/en/pacific/)
部署StorageClass
通过rook部署的Ceph-CSI,已经包含了rbdplugin和cephfs-plugin
rbd块存储
rbd属于块存储,通俗地理解,就是给使用方(这里指POD)挂载一块硬盘。在k8s里不适用多端同时(挂载)读写。Statefulset的应用中的volumeClaimTemplates会为每个pod都创建独立的pv(rbd)卷
[root@k8s-master-node1 /opt/rook/cluster/examples/kubernetes/ceph/csi/rbd]# cat storageclass.yaml
apiVersion: ceph.rook.io/v1
kind: CephBlockPool
metadata:
  name: replicapool   ## 指定的rados pool的名字 ##
  namespace: rook-ceph
spec:
  failureDomain: host  ## 故障域为host级 ##
  replicated:     ## 使用副本机制而非EC ##
    size: 3
    # Disallow setting pool with replica 1, this could lead to data loss without recovery.
    # Make sure you're *ABSOLUTELY CERTAIN* that is what you want
    requireSafeReplicaSize: true
    # gives a hint (%) to Ceph in terms of expected consumption of the total cluster capacity of a given pool
    # for more info: https://docs.ceph.com/docs/master/rados/operations/placement-groups/#specifying-expected-pool-size
    #targetSizeRatio: .5
---
apiVersion: storage.k8s.io/v1
kind: StorageClass
metadata:
   name: rook-ceph-block
# Change "rook-ceph" provisioner prefix to match the operator namespace if needed
provisioner: rook-ceph.rbd.csi.ceph.com
parameters:
    # clusterID is the namespace where the rook cluster is running
    # If you change this namespace, also change the namespace below where the secret namespaces are defined
    clusterID: rook-ceph

    # If you want to use erasure coded pool with RBD, you need to create
    # two pools. one erasure coded and one replicated.
    # You need to specify the replicated pool here in the `pool` parameter, it is
    # used for the metadata of the images.
    # The erasure coded pool must be set as the `dataPool` parameter below.
    #dataPool: ec-data-pool
    pool: replicapool   ## 使用的rados pool的名字 ##

    # RBD image format. Defaults to "2".
    imageFormat: "2"

    # RBD image features. Available for imageFormat: "2". CSI RBD currently supports only `layering` feature.
    imageFeatures: layering

    # The secrets contain Ceph admin credentials. These are generated automatically by the operator
    # in the same namespace as the cluster.
    csi.storage.k8s.io/provisioner-secret-name: rook-csi-rbd-provisioner
    csi.storage.k8s.io/provisioner-secret-namespace: rook-ceph
    csi.storage.k8s.io/controller-expand-secret-name: rook-csi-rbd-provisioner
    csi.storage.k8s.io/controller-expand-secret-namespace: rook-ceph
    csi.storage.k8s.io/node-stage-secret-name: rook-csi-rbd-node
    csi.storage.k8s.io/node-stage-secret-namespace: rook-ceph
    # Specify the filesystem type of the volume. If not specified, csi-provisioner
    # will set default as `ext4`. Note that `xfs` is not recommended due to potential deadlock
    # in hyperconverged settings where the volume is mounted on the same node as the osds.
    csi.storage.k8s.io/fstype: ext4  ## rbd卷的文件系统 ##
# uncomment the following to use rbd-nbd as mounter on supported nodes
# **IMPORTANT**: If you are using rbd-nbd as the mounter, during upgrade you will be hit a ceph-csi
# issue that causes the mount to be disconnected. You will need to follow special upgrade steps
# to restart your application pods. Therefore, this option is not recommended.
#mounter: rbd-nbd
allowVolumeExpansion: true
reclaimPolicy: Delete
说明:
spec.replicated.size表示存储池使用的副本,值为3且表示为3个副本。更多解释请点这里
创建storageclass
[root@k8s-master-node1 /opt/rook/cluster/examples/kubernetes/ceph/csi/rbd]# kubectl  apply -f storageclass.yaml
cephblockpool.ceph.rook.io/replicapool created
storageclass.storage.k8s.io/rook-ceph-block created
创建pvc和带有pvc的pod
[root@k8s-master-node1 /opt/rook/cluster/examples/kubernetes/ceph/csi/rbd]# cat pod.yaml
---
apiVersion: v1
kind: Pod
metadata:
  name: csirbd-demo-pod
spec:
  containers:
   - name: web-server
     image: nginx
     volumeMounts:
       - name: mypvc
         mountPath: /var/lib/www/html
  volumes:
   - name: mypvc
     persistentVolumeClaim:
       claimName: rbd-pvc
       readOnly: false
[root@k8s-master-node1 /opt/rook/cluster/examples/kubernetes/ceph/csi/rbd]# cat pvc.yaml
---
apiVersion: v1
kind: PersistentVolumeClaim
metadata:
  name: rbd-pvc
spec:
  accessModes:
  - ReadWriteOnce
  resources:
    requests:
      storage: 1Gi
  storageClassName: rook-ceph-block

[root@k8s-master-node1 /opt/rook/cluster/examples/kubernetes/ceph/csi/rbd]# kubectl  apply   -f pvc.yaml  -f pod.yaml
persistentvolumeclaim/rbd-pvc created
pod/csirbd-demo-pod created
查看pvc和pv的状态
[root@k8s-master-node1 /opt/rook/cluster/examples/kubernetes/ceph/csi/rbd]# kubectl  get pvc
NAME      STATUS   VOLUME                                     CAPACITY   ACCESS MODES   STORAGECLASS      AGE
rbd-pvc   Bound    pvc-a38b140d-cff8-4bfb-9fa6-141b207fe5f4   1Gi        RWO            rook-ceph-block   44s
[root@k8s-master-node1 /opt/rook/cluster/examples/kubernetes/ceph/csi/rbd]# kubectl  get pv
NAME                                       CAPACITY   ACCESS MODES   RECLAIM POLICY   STATUS   CLAIM             STORAGECLASS      REASON   AGE
pvc-a38b140d-cff8-4bfb-9fa6-141b207fe5f4   1Gi        RWO            Delete           Bound    default/rbd-pvc   rook-ceph-block            45s
进入pod,验证pv挂载,如下所示,在pod里可以找到rbd的挂载的卷
[root@k8s-master-node1 /opt/rook/cluster/examples/kubernetes/ceph/csi/rbd]# kubectl  get pods
NAME                           READY   STATUS    RESTARTS   AGE
csirbd-demo-pod                1/1     Running   0          87s


[root@k8s-master-node1 /opt/rook/cluster/examples/kubernetes/ceph/csi/rbd]# kubectl  exec -it csirbd-demo-pod -- bash
root@csirbd-demo-pod:/# df -Th
Filesystem              Type     Size  Used Avail Use% Mounted on
overlay                 overlay   47G  9.5G   38G  21% /
tmpfs                   tmpfs     64M     0   64M   0% /dev
tmpfs                   tmpfs    1.9G     0  1.9G   0% /sys/fs/cgroup
/dev/mapper/centos-root xfs       47G  9.5G   38G  21% /etc/hosts
shm                     tmpfs     64M     0   64M   0% /dev/shm
/dev/rbd0               ext4     976M  2.6M  958M   1% /var/lib/www/html
tmpfs                   tmpfs    1.9G   12K  1.9G   1% /run/secrets/kubernetes.io/serviceaccount
tmpfs                   tmpfs    1.9G     0  1.9G   0% /proc/acpi
tmpfs                   tmpfs    1.9G     0  1.9G   0% /proc/scsi
tmpfs                   tmpfs    1.9G     0  1.9G   0% /sys/firmware
cephfs文件存储
cephfs属于文件存储,通俗地理解为挂载一个远程目录(类似NFS),可实现多端同时读写。
默认rook只部署了mon/mgr/osd组件,cephfs需要额外的mds组件,需要如下的CRD资源部署
[root@k8s-master-node1 /opt/rook/cluster/examples/kubernetes/ceph]# cat filesystem.yaml   | grep -v "#"

apiVersion: ceph.rook.io/v1
kind: CephFilesystem
metadata:
  name: myfs
  namespace: rook-ceph
spec:
  metadataPool:    ## 元数据存储池 ##
    replicated:
      size: 3
      requireSafeReplicaSize: true
    parameters:
      compression_mode: none
  dataPools:  ## 数据存储池 ##
    - failureDomain: host
      replicated:
        size: 3
        requireSafeReplicaSize: true
      parameters:
        compression_mode: none
  preservePoolsOnDelete: true
  metadataServer:   ## 主备模式,1主1从 ##
    activeCount: 1
    activeStandby: true
    placement:
       podAntiAffinity:
          requiredDuringSchedulingIgnoredDuringExecution:
          - labelSelector:
              matchExpressions:
              - key: app
                operator: In
                values:
                - rook-ceph-mds
            topologyKey: kubernetes.io/hostname
          preferredDuringSchedulingIgnoredDuringExecution:
          - weight: 100
            podAffinityTerm:
              labelSelector:
                matchExpressions:
                - key: app
                  operator: In
                  values:
                  - rook-ceph-mds
              topologyKey: topology.kubernetes.io/zone
    annotations:
    labels:
    resources:
说明:
- 创建一个
myfs的cephfs的文件系统,分别定义了副本类型的元数据存储池和数据存储池,且副本数为3 - 创建2个mds, 为一主一从
- 可以通过亲和性设置,把mon pod调度到指定的节点上
创建cephfs文件系统,然后进入toolbox,验证cephfs状态
[root@k8s-master-node1 /opt/rook/cluster/examples/kubernetes/ceph]# kubectl apply -f filesystem.yaml
从集群状态可以看到有mds组件状态
[root@rook-ceph-tools-5949d6759-256c5 /]# ceph -s
  cluster:
    id:     a0540409-d822-48e0-869b-273936597f2d
    health: HEALTH_OK

  services:
    mon: 3 daemons, quorum a,b,c (age 35m)
    mgr: a(active, since 54m)
    mds: myfs:1 {0=myfs-a=up:active} 1 up:standby-replay  ##mds的状态,1主1从 ##
    osd: 3 osds: 3 up (since 24h), 3 in (since 24h)

  data:
    pools:   4 pools, 97 pgs
    objects: 41 objects, 21 MiB
    usage:   3.1 GiB used, 297 GiB / 300 GiB avail
    pgs:     97 active+clean

  io:
    client:   853 B/s rd, 1 op/s rd, 0 op/s wr
查看fs详情
[root@rook-ceph-tools-5949d6759-256c5 /]# ceph fs status  --format=json  | jq .
{
  "clients": [
    {
      "clients": 0,
      "fs": "myfs"
    }
  ],
  "mds_version": "ceph version 15.2.8 (bdf3eebcd22d7d0b3dd4d5501bee5bac354d5b55) octopus (stable)",
  "mdsmap": [
    {
      "dns": 10,
      "inos": 13,
      "name": "myfs-a",
      "rank": 0,
      "rate": 0,
      "state": "active"
    },
    {
      "dns": 5,
      "events": 0,
      "inos": 5,
      "name": "myfs-b",
      "rank": 0,
      "state": "standby-replay"
    }
  ],
  "pools": [
    {
      "avail": 100898840576,
      "id": 5,
      "name": "myfs-metadata",
      "type": "metadata",
      "used": 1572864
    },
    {
      "avail": 100898840576,
      "id": 6,
      "name": "myfs-data0",
      "type": "data",
      "used": 0
    }
  ]
}
说明:
- 元数据存储池的名字是
myfs-metadata - 数据存储池的名字是
myfs-data0
创建cephfs类型的storageclass
[root@k8s-master-node1 /opt/rook/cluster/examples/kubernetes/ceph/csi/cephfs]# cat storageclass.yaml

apiVersion: storage.k8s.io/v1
kind: StorageClass
metadata:
  name: rook-cephfs
provisioner: rook-ceph.cephfs.csi.ceph.com
parameters:
  # clusterID is the namespace where operator is deployed.
  clusterID: rook-ceph

  # CephFS filesystem name into which the volume shall be created
  fsName: myfs

  # Ceph pool into which the volume shall be created
  # Required for provisionVolume: "true"
  pool: myfs-data0

  # Root path of an existing CephFS volume
  # Required for provisionVolume: "false"
  # rootPath: /absolute/path

  # The secrets contain Ceph admin credentials. These are generated automatically by the operator
  # in the same namespace as the cluster.
  ## 使用到的相关的密钥 ##
  csi.storage.k8s.io/provisioner-secret-name: rook-csi-cephfs-provisioner
  csi.storage.k8s.io/provisioner-secret-namespace: rook-ceph
  csi.storage.k8s.io/controller-expand-secret-name: rook-csi-cephfs-provisioner
  csi.storage.k8s.io/controller-expand-secret-namespace: rook-ceph
  csi.storage.k8s.io/node-stage-secret-name: rook-csi-cephfs-node
  csi.storage.k8s.io/node-stage-secret-namespace: rook-ceph

  # (optional) The driver can use either ceph-fuse (fuse) or ceph kernel client (kernel)
  # If omitted, default volume mounter will be used - this is determined by probing for ceph-fuse
  # or by setting the default mounter explicitly via --volumemounter command-line argument.
  # mounter: kernel
reclaimPolicy: Delete   ## 回收策略 ##
allowVolumeExpansion: true
mountOptions:  ### 挂载定制参数 ##
  # uncomment the following line for debugging
  #- debug
说明:
fsName设置cephfs文件系统的名字,根据前文部署,指定为myfspool设置数据存储池的名字,根据前文部署,指定为myfs-data0
查看是否成功能创建storageclass
[root@k8s-master-node1 /opt/rook/cluster/examples/kubernetes/ceph/csi/cephfs]# kubectl  get sc
NAME              PROVISIONER                     RECLAIMPOLICY   VOLUMEBINDINGMODE   ALLOWVOLUMEEXPANSION   AGE
rook-ceph-block   rook-ceph.rbd.csi.ceph.com      Delete          Immediate           true                   19h
rook-cephfs       rook-ceph.cephfs.csi.ceph.com   Delete          Immediate           true                   12h
创建pvc和pod,并且把pvc挂载在pod里
[root@k8s-master-node1 /opt/rook/cluster/examples/kubernetes/ceph/csi/cephfs]# cat pod.yaml
---
apiVersion: v1
kind: Pod
metadata:
  name: csicephfs-demo-pod
spec:
  containers:
   - name: web-server
     image: nginx
     volumeMounts:
       - name: mypvc
         mountPath: /var/lib/www/html
  volumes:
   - name: mypvc
     persistentVolumeClaim:
       claimName: cephfs-pvc
       readOnly: false
[root@k8s-master-node1 /opt/rook/cluster/examples/kubernetes/ceph/csi/cephfs]# cat pvc.yaml
---
apiVersion: v1
kind: PersistentVolumeClaim
metadata:
  name: cephfs-pvc
spec:
  accessModes:
  - ReadWriteOnce
  resources:
    requests:
      storage: 1Gi
  storageClassName: rook-cephfs

[root@k8s-master-node1 /opt/rook/cluster/examples/kubernetes/ceph/csi/cephfs]# kubectl apply -f pvc.yaml   -f pod.yaml
persistentvolumeclaim/cephfs-pvc created
pod/csicephfs-demo-pod created
如果全部正常,pod应该是running状态,如下所示
[root@k8s-master-node1 /opt/rook/cluster/examples/kubernetes/ceph/csi/cephfs]# kubectl  get pod
NAME                                         READY   STATUS    RESTARTS   AGE
csicephfs-demo-pod                           1/1     Running   0          23m   ##  启动正常 ##
csirbd-demo-pod                              1/1     Running   0          25h
进入pod,查看挂载情况
[root@k8s-master-node1 /opt/rook/cluster/examples/kubernetes/ceph/csi/cephfs]# kubectl  exec -it  csicephfs-demo-pod -- df -Th
Filesystem                                                                                                                                           Type     Size  Used Avail Use% Mounted on
overlay                                                                                                                                              overlay   10G  6.0G  4.1G  60% /
tmpfs                                                                                                                                                tmpfs     64M     0   64M   0% /dev
tmpfs                                                                                                                                                tmpfs    1.9G     0  1.9G   0% /sys/fs/cgroup
/dev/mapper/vg_root-lv_root                                                                                                                          xfs       10G  6.0G  4.1G  60% /etc/hosts
shm                                                                                                                                                  tmpfs     64M     0   64M   0% /dev/shm
10.96.176.163:6789,10.96.146.28:6789,10.96.31.17:6789:/volumes/csi/csi-vol-e45c556b-528d-11ec-97cf-222a3fe2a760/69824d96-cdeb-4602-a770-1c4422db4a34 ceph     1.0G     0  1.0G   0% /var/lib/www/html
tmpfs                                                                                                                                                tmpfs    1.9G   12K  1.9G   1% /run/secrets/kubernetes.io/serviceaccount
tmpfs                                                                                                                                                tmpfs    1.9G     0  1.9G   0% /proc/acpi
tmpfs                                                                                                                                                tmpfs    1.9G     0  1.9G   0% /proc/scsi
tmpfs                                                                                                                                                tmpfs    1.9G     0  1.9G   0% /sys/firmware
如上所示,1G的pv已经成功挂载到指定的目录 ,挂载的文件系统类型为ceph,符合预期
S3对象存储
Rook可以直接在当前是的Ceph环境里部署RGW实例,也可以对接已经存在的外部的Ceph集群,详情点击查看
以下是rook提供的CephObjectStore类型的CRD资源yaml文件,通过kubectl apply 直接创建。
[root@k8s-master-node1 /opt/rook/cluster/examples/kubernetes/ceph]# cat object.yaml  | grep -v "#"

apiVersion: ceph.rook.io/v1
kind: CephObjectStore
metadata:
  name: my-store
  namespace: rook-ceph
spec:
  metadataPool:  ## 索引存储池配置 ##
    failureDomain: host  ## 故障域为host级 ##
    replicated:  ## 副本策略 ##
      size: 3    ## 副本数 ##
      requireSafeReplicaSize: true
    parameters:
      compression_mode: none
  dataPool:      ## 数据存储池配置 ##
    failureDomain: host
    replicated:
      size: 3
      requireSafeReplicaSize: true
    parameters:
      compression_mode: none
  preservePoolsOnDelete: false
  gateway:
    type: s3     ##网关类型是S3 ##
    sslCertificateRef:
    port: 80           ## rgw实例端口 ##
    instances: 1       ## 实例个数 ##
    placement:
    annotations:
    labels:
    resources:
  healthCheck:
    bucket:
      disabled: false
      interval: 60s
    livenessProbe:
      disabled: false
成功创建之后会有如下的service,通过service ip和端口验证S3服务.服务正常就会出现如下返回。
[root@k8s-master-node1 /opt/rook/cluster/examples/kubernetes/ceph]# kubectl -n rook-ceph get svc -l app=rook-ceph-rgw
NAME                     TYPE        CLUSTER-IP    EXTERNAL-IP   PORT(S)   AGE
rook-ceph-rgw-my-store   ClusterIP   10.96.57.91   <none>        80/TCP    174m

[root@k8s-master-node1 /opt/rook/cluster/examples/kubernetes/ceph]# curl 10.96.57.91
<?xml version="1.0" encoding="UTF-8"?><ListAllMyBucketsResult xmlns="http://s3.amazonaws.com/doc/2006-03-01/"><Owner><ID>anonymous</ID><DisplayName></DisplayName></Owner><Buckets></Buckets></ListAllMyBucketsResult>
至此, 基于ceph rgw的S3对象存储服务已经正常运行.传统模式下,可以通过radosgw-admin工具或者API创建相关的用户及密钥对。详情见 https://docs.ceph.com/en/pacific/radosgw/admin/
既然已经配置了对象存储,接下来我们需要创建一个存储桶(即bucket,下同),客户端可以在其中读写对象。可以通过定义StorageClass来创建存储桶,类似于块和文件存储使用的模式。首先,定义允许对象客户端创建存储桶的存储类。StorageClass定义了对象存储系统、存储桶保留策略以及管理员所需的其他属性。
以下是S3类型的storageclass。通过kubectl apply创建即可。
[root@k8s-master-node1 /opt/rook/cluster/examples/kubernetes/ceph]# cat storageclass-bucket-retain.yaml
apiVersion: storage.k8s.io/v1
kind: StorageClass
metadata:
   name: rook-ceph-retain-bucket
provisioner: rook-ceph.ceph.rook.io/bucket
# set the reclaim policy to retain the bucket when its OBC is deleted
reclaimPolicy: Retain  ## 回收策略 ##
parameters:
  objectStoreName: my-store # port 80 assumed
  objectStoreNamespace: rook-ceph
  region: us-east-1  ## 默认即可 ##
  # To accommodate brownfield cases reference the existing bucket name here instead
  # of in the ObjectBucketClaim (OBC). In this case the provisioner will grant
  # access to the bucket by creating a new user, attaching it to the bucket, and
  # providing the credentials via a Secret in the namespace of the requesting OBC.
  #bucketName:
说明:
- 定义的回收策略是持久化,不随申请者的生命周期终结而自动清除
objectStoreName指定CephObjectStore类型的CRD的名字
用户端要使用对象存储资源,可以通过创建ObjectBucketClaim(即OBC,可类比于PVC)类型的CRD资源进行申请。创建成功之后会在当前的命名空间下面一个对应名字的Secret,里面的包含用户需要密钥对(access_key和secret_key)。
[root@k8s-master-node1 /opt/rook/cluster/examples/kubernetes/ceph]# cat <<EOF | kubectl apply -f -
apiVersion: objectbucket.io/v1alpha1
kind: ObjectBucketClaim
metadata:
  name: ceph-bucket
spec:
  generateBucketName: ceph-bucket-demo
  storageClassName: rook-ceph-retain-bucket
EOF
注意:
storageClassName指向上文创建的StorageClass的名字generateBucketName指定创建的bucket前缀名
以下方式可以直接获取相关的密钥对
[root@k8s-master-node1 /opt/rook/cluster/examples/kubernetes/ceph]# kubectl -n default get secret ceph-bucket  -o jsonpath='{.data.AWS_ACCESS_KEY_ID}' | base64 -d
xxxxxxxxxxxxxx    ######## 这里是access_key ######

[root@k8s-master-node1 /opt/rook/cluster/examples/kubernetes/ceph]# kubectl -n default get secret ceph-bucket  -o jsonpath='{.data.AWS_SECRET_ACCESS_KEY}' | base64 -d
xxxxxxxxxxxxxx   ######## 这里secret_key #########
在这个命名空间下面还会成一个同名的ConfigMap,里面包含了bucket和endpoint的信息。
[root@k8s-master-node1 /opt/rook/cluster/examples/kubernetes/ceph]# kubectl -n default get cm  ceph-bucket -o jsonpath='{.data}' | jq .
{
  "BUCKET_HOST": "rook-ceph-rgw-my-store.rook-ceph.svc",
  "BUCKET_NAME": "ceph-bucket-demo-aaa69329-40db-467b-81d6-dd4f6585ebfa",  ## 符合预期 ##
  "BUCKET_PORT": "80",
  "BUCKET_REGION": "us-east-1",
  "BUCKET_SUBREGION": ""
}
注意:
- 关于bucket的详情,可以通过radosgw-admin进行查看
- 关于验证s3的使用,在此不再详细列举
小结
以上是我对Rook初次体验过程的简单记录,下面谈谈个人感受吧。
- Rook部署确实快, 一把梭各种组件直接都running了。但这只是理想状态,不同的环境都有差异,只要一个环节出现异常,整个排障周期会延长很多。(以上的体验过程中,遇到了各种小问题)
- 对于不熟悉的Ceph的人,重头开始部署一套的成本是很大的,有这样能够一键部署的工具(或者说方案),确实带来了很大的便利。但只是图部署快, 那只能是demo或者验证环境, 离真正的线上环境还差得很远。”部署一时爽,运维火葬场“,在没有真正理解整个Rook的内在运行逻辑及架构时,我是不会断然为云原生而上这套系统。作为存储管理员,应该有这个意识,存储是最核心的东西,数据的价值是最关键的。俗话说地好,“计算来了就走,存储一去不回”。计算任务(系统)可以重试、重启,但存储系统不能随意重试、重启操作,一但操作异常就有可能造不可挽回的损失,即数据丢失。
- Rook本身也有自己的管理端和agent端,再加上为配合PV/PVC实现的Ceph-CSI组件,非存储相关的组件就是一大堆。这大大增加了后期管理及维护成本。如果涉及到存储端的容器化(这里以Ceph为例),这对于存储系统来讲可能是雪上加霜。Ceph存储系统本身复杂程度已经非普通应用系统可比,自身组件就很多,比如MON、MGR、OSD、RGW、MDS等。容器化后,又要加上运行时环境,这个对于存储本身后期运维和排障又增加了负担。容器化对Ceph的是否有必要,其时社区也有激烈的讨论。详请见Why you might want packages not containers for Ceph deployments(https://lists.ceph.io/hyperkitty/list/ceph-users@ceph.io/thread/TTTYKRVWJOR7LOQ3UCQAZQR32R7YADVY/)
- 原来问题排障可以直接到固定的日志文件里搜寻线索。云原生之后日志都是标准输出,如果没有统一的日志平台,对于排查问题又会带来阻碍。对于习惯于从系统层面的日志里定位的Ceph存储管理员来讲,容器化之后找东西显得很是变扭。
- 对于要实现对于Ceph集群定制与优化,基于Rook部署之后, 这些都要通过符合Rook的规范及约束来实现。有些可能当前Rook不一定支持。所以,Rook对于Ceph存储的管理员来讲,又要增加新的学习成本,甚至需要对Rook进行定制,来达到符合自己的生产需求。
综上,个人觉得,如果你是云上的K8S集群,直接使用云厂商提供的PV/PVC就好。对于自建的集群,有持久化存储的需求,如果有专业的存储团队,可以把存储方案让他们来搞,至于是对接方式, 让存储团队来抉择,缓解K8S SRE的压力。专业的人干专业的事。
云原生是趋势,应用(不论是无状态还是有状态的)围绕着云原生建设是不可阻挡的洪流。Rook项目任重道远,革命尚未成功,同志仍需努力。
