Linux—shell脚本实例进阶篇
VSole2021-09-23 22:23:47
实验一
利用case语句编写脚本,满足下列要求
1.执行create时根据userfile和passfile建立用户
2.执行delete时根据userfile删除用户
1.编写脚本:
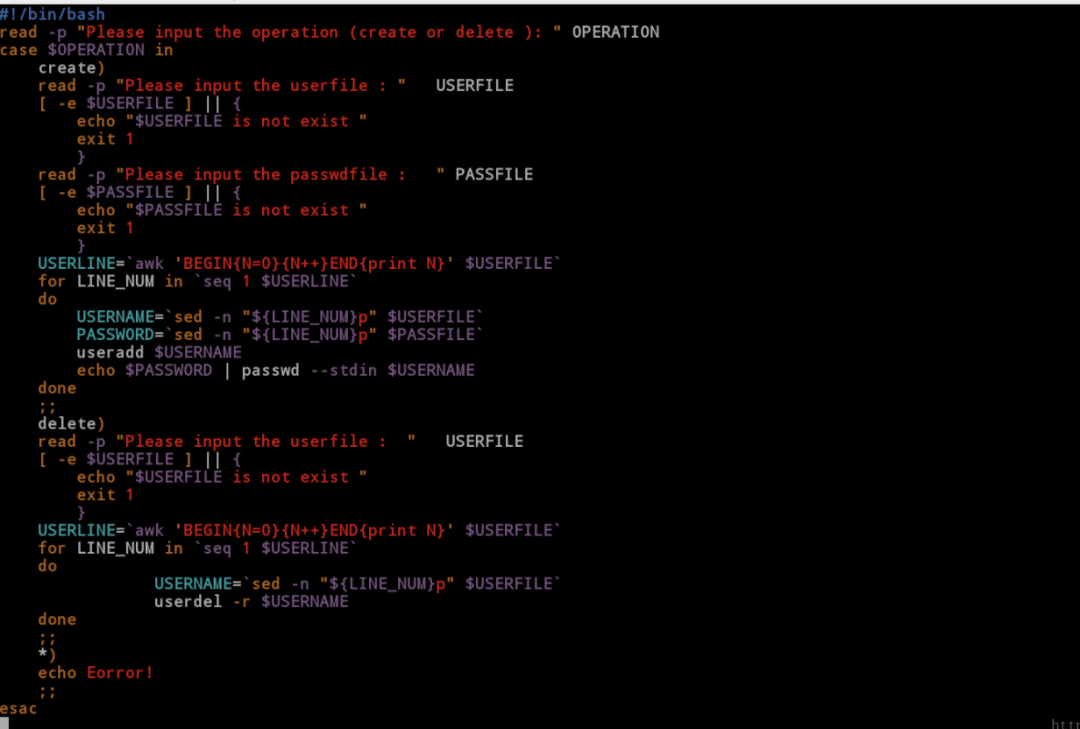
[root@localhost mnt]# vim user_ctrl.sh#!/bin/bashread -p "Please input the operation (create or delete ): " OPERATION //输入你要执行的动作case $OPERATION in create) //第一种情况:create read -p "Please input the userfile : " USERFILE //提示输入文件 [ -e $USERFILE ] || { //判断是否存在 echo "$USERFILE is not exist " exit 1 } read -p "Please input the passwdfile :" PASSFILE [ -e $PASSFILE ] || { echo "$PASSFILE is not exist " exit 1 } USERLINE=`awk 'BEGIN{N=0}{N++}END{print N}' $USERFILE` //计算userfile文件行数 for LINE_NUM in `seq 1 $USERLINE` //利用循环建立 do USERNAME=`sed -n "${LINE_NUM}p" $USERFILE` //截取userfile文件第一行内容 PASSWORD=`sed -n "${LINE_NUM}p" $PASSFILE` //截取passfile文件第一行内容 useradd $USERNAME //建立用户 echo $PASSWORD | passwd --stdin $USERNAME done ;; delete) //第二种情况:delete read -p "Please input the userfile :" USERFILE [ -e $USERFILE ] || { echo "$USERFILE is not exist " exit 1 } USERLINE=`awk 'BEGIN{N=0}{N++}END{print N}' $USERFILE` for LINE_NUM in `seq 1 $USERLINE` do USERNAME=`sed -n "${LINE_NUM}p" $USERFILE` userdel -r $USERNAME done ;; *) //第三种情况:其余各种情况 echo Eorror! ;;esac
2.执行:
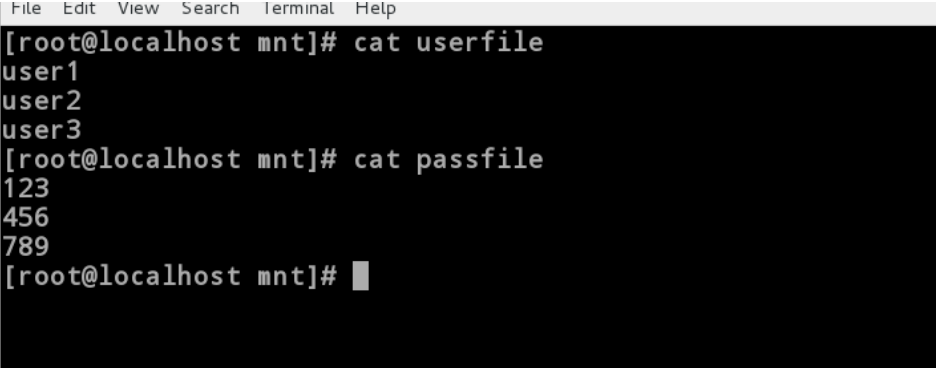
[root@localhost mnt]# cat userfile user1user2user3[root@localhost mnt]# cat passfile 123456789[root@localhost mnt]# sh user_ctrl.sh user Please input the operation (create or delete ): hello //输入错误动作Eorror![root@localhost mnt]# sh user_ctrl.sh user Please input the operation (create or delete ): createPlease input the userfile : user //输入错误文件user is not exist [root@localhost mnt]# sh user_ctrl.sh user Please input the operation (create or delete ): createPlease input the userfile : userfilePlease input the passwdfile :passfile //建立用户Changing password for user user1.passwd: all authentication tokens updated successfully.Changing password for user user2.passwd: all authentication tokens updated successfully.Changing password for user user3.passwd: all authentication tokens updated successfully.[root@localhost mnt]# sh user_ctrl.sh user Please input the operation (create or delete ): delete //删除用户Please input the userfile :userfile[root@localhost mnt]# id user1id: user1: no such user

实验二
编写脚本auto_connect.exp满足要求:
执行:/mnt/auto_connect.exp IP password 时 密码正确,则通过 ssh 连接到该 IP 主机,并保持登陆。
1.编写脚本:
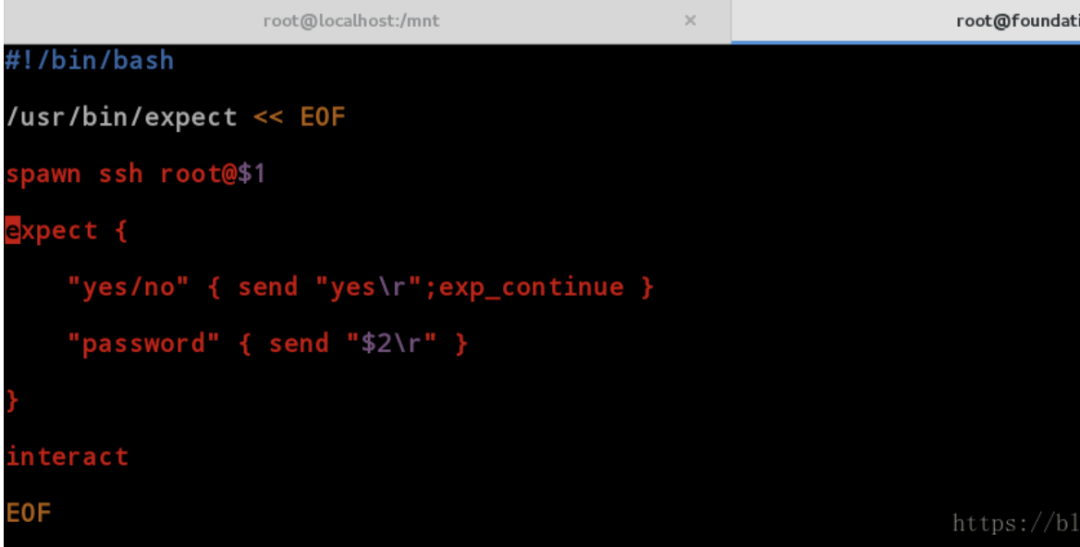
[root@foundation71 mnt]# vim auto_connect.sh #!/bin/bash/usr/bin/expect << EOF //切换到expect环境spawn ssh root@$1 //ssh连接IPexpect { "yes/no" { send "yes\r";exp_continue } //确认连接 "password" { send "$2\r" } //输入密码}Interact //保留EOF //退出
2.执行:
[root@foundation71 mnt]# chmod +x auto_connect.sh //添加可执行权限[root@foundation71 mnt]# sh auto_connect.sh 172.25.254.226 redhat //添加IP和密码spawn ssh root@172.25.254.226The authenticity of host '172.25.254.226 (172.25.254.226)' can't be established.ECDSA key fingerprint is eb:24:0e:07:96:26:b1:04:c2:37:0c:78:2d:bc:b0:08.Are you sure you want to continue connecting (yes/no)? yesWarning: Permanently added '172.25.254.226' (ECDSA) to the list of known hosts.root@172.25.254.226's password: [root@foundation71 mnt]# //自动化连接

实验三
编写脚本,当执行脚本host_ping.sh时,ping各个主机IP ,ping通,显示该IP的 hostname以及IP ,不能 ping 通,报错并显示 IP。
1.编写脚本:
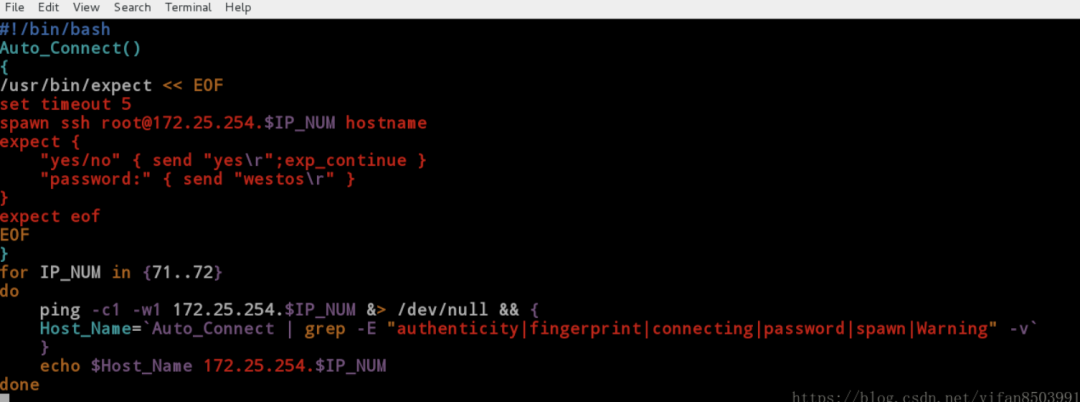
#!/bin/bashAuto_Connect(){/usr/bin/expect << EOFset timeout 5spawn ssh root@172.25.254.$IP_NUM hostnameexpect { "yes/no" { send "yes\r";exp_continue } "password:" { send "westos\r" }}expect eofEOF}for IP_NUM in {71..72}do ping -c1 -w1 172.25.254.$IP_NUM &> /dev/null && { Host_Name=`Auto_Connect | grep -E "authenticity|fingerprint|connecting|password|spawn|Warning" -v` //过滤掉警告等语句 } echo " $Host_Name 172.25.254.$IP_NUM"done
2.执行:
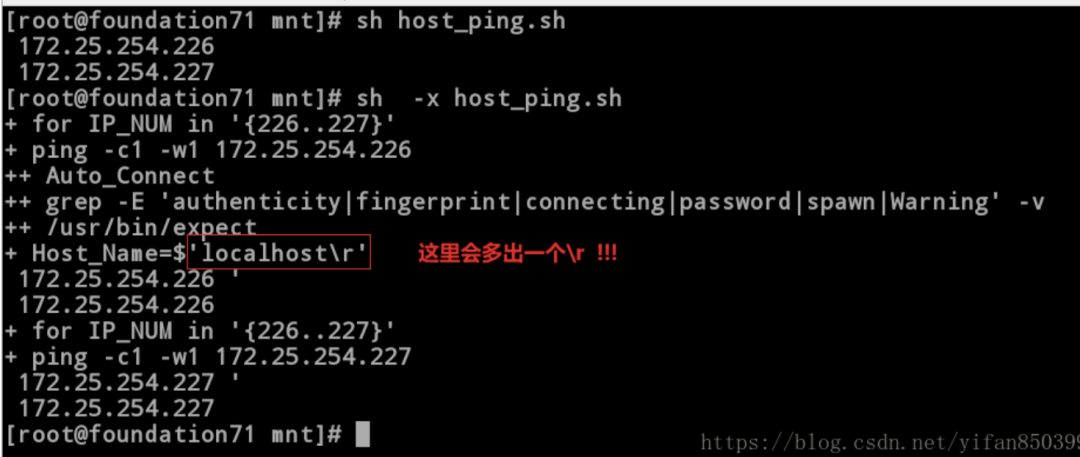
##注意此时会出现一个覆盖问题
[root@foundation71 mnt]# sh host_ping.sh //执行未显示主机名 172.25.254.226 172.25.254.227 [root@foundation71 mnt]# sh -x host_ping.sh + for IP_NUM in '{226..227}'+ ping -c1 -w1 172.25.254.226++ Auto_Connect++ grep -E 'authenticity|fingerprint|connecting|password|spawn|Warning' -v++ /usr/bin/expect+ Host_Name=$'localhost\r' //此时这里有主机名,但是后面自动加了/r,这是因为expect是unix工具,在unix系统中/r是换行,但在linux中成了回车,会覆盖之前内容。 172.25.254.226 ' 172.25.254.226 + for IP_NUM in '{226..227}'+ ping -c1 -w1 172.25.254.227 172.25.254.227 ' 172.25.254.227
3.我们将脚本做一个调整
#!/bin/bashAuto_Connect(){/usr/bin/expect << EOFset timeout 5spawn ssh root@172.25.254.$IP_NUM hostnameexpect { yes/no { send "yes\r";exp_continue } password { send "redhat\r" }}expect eofEOF}for IP_NUM in {226..227}do ping -c1 -w1 172.25.254.$IP_NUM &> /dev/null && { Host_Name=`Auto_Connect | grep -E "authenticity|fingerprint|connecting|password|spawn|Warning" -v` } echo "$Host_Name 172.25.254.$IP_NUM " | sed 's/\r//g' //将全文的/r换为空。done

4.此时执行
[root@foundation71 mnt]# sh host_ping.sh //成功localhost 172.25.254.226 localhost 172.25.254.227

实验四
利用case语句备份数据库,要求
1.执行db_dump.sh westos (数据库密码)
2.脚本执行后会备份数据库中的所有数据到/mnt/mysqldump目录下
3.备份文件名称为“库名称.sql”,当此文件存在是跳过,并询问动作
4.输入”s“跳过备份,输入”b“备份“库名称.sql”文件为”库名称_backup.sql”,输入”o“覆盖原文件
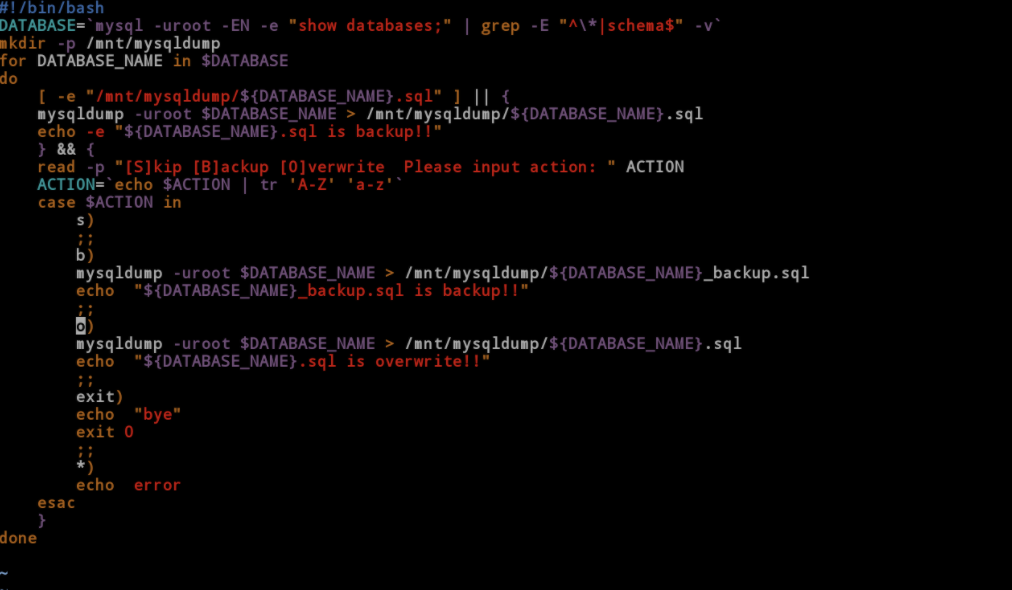
1.编写脚本:
#!/bin/bashDATABASE=`mysql -uroot -EN -e "show databases;" | grep -E "^\*|schema$" -v`mkdir -p /mnt/mysqldump //建立目录for DATABASE_NAME in $DATABASEdo [ -e "/mnt/mysqldump/${DATABASE_NAME}.sql" ] || { mysqldump -uroot $DATABASE_NAME > /mnt/mysqldump/${DATABASE_NAME}.sql echo -e "${DATABASE_NAME}.sql is backup!!" //文件不存在,备份 } && { //文件存在时询问动作 read -p "[S]kip [B]ackup [O]verwrite Please input action: " ACTION ACTION=`echo $ACTION | tr 'A-Z' 'a-z'` case $ACTION in s) //直接跳过 ;; b) //更新名字备份 mysqldump -uroot $DATABASE_NAME > /mnt/mysqldump/${DATABASE_NAME}_backup.sql echo "${DATABASE_NAME}_backup.sql is backup!!" ;; o) //覆盖备份 mysqldump -uroot $DATABASE_NAME > /mnt/mysqldump/${DATABASE_NAME}.sql echo "${DATABASE_NAME}.sql is overwrite!!" ;; exit) //退出 echo "bye" exit 0 ;; *) //其他显示错误 echo error esac }done
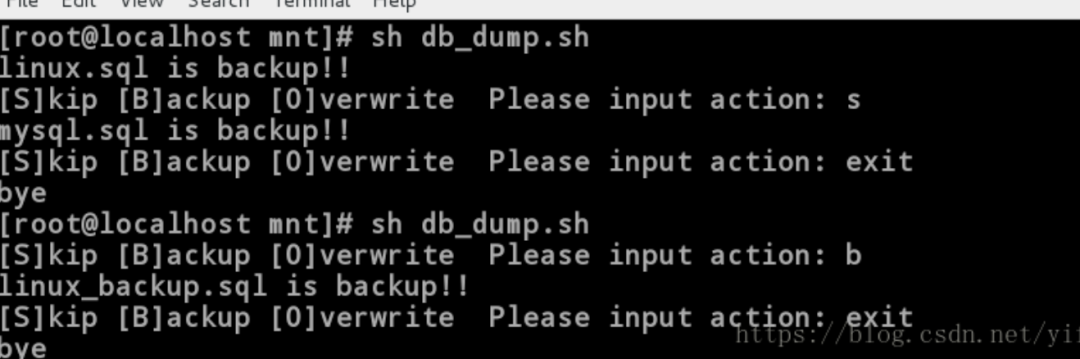
2.执行
[root@localhost mnt]# sh db_dump.sh linux.sql is backup!![S]kip [B]ackup [O]verwrite Please input action: smysql.sql is backup!![S]kip [B]ackup [O]verwrite Please input action: exitbye[root@localhost mnt]# sh db_dump.sh [S]kip [B]ackup [O]verwrite Please input action: blinux_backup.sql is backup!![S]kip [B]ackup [O]verwrite Please input action: exitbye[root@localhost mnt]# sh db_dump.sh [S]kip [B]ackup [O]verwrite Please input action: olinux.sql is overwrite!![S]kip [B]ackup [O]verwrite Please input action: exitbye
实验五
脚本要求:
1执行脚本 lamp.sh
2.脚本执行后部署好论坛,并设定 apache 的网络接口为 8080
1.编写脚本:
真机中执行脚本#!/bin/bashAuto_Discuz(){/usr/bin/expect << EOFset timeout 30spawn ssh root@$1expect { "yes/no" { send "yes\r";exp_continue } "password:" { send "westos\r" }}expect "]#" { send "yum install httpd -y\r" }expect "]#" { send "yum install mariadb-server -y\r"}expect "]#" { send "yum install php-mysql.x86_64 -y\r"}expect "]#" { send "systemctl start httpd\r" }expect "]#" { send "systemctl start mariadb\r" }expect eofEOF}Auto_Connect(){/usr/bin/expect << EOFset timeout 30spawn ssh root@$1expect { "yes/no" { send "yes\r";exp_continue } "password:" { send "westos\r" }}expect "]#" { send "cd /var/www/html/\r" }expect "]#" { send "unzip /var/www/html/Discuz_X3.2_SC_UTF8.zip >> /dev/null \r" }expect "]#" { send "chmod 777 /var/www/html/upload/ -R\r" }expect "]#" { send "systemctl restart httpd\r" }expect eofEOF}Auto_Httpd(){/usr/bin/expect << EOFset timeout 30spawn ssh root@$1expect { "yes/no" { send "yes\r";exp_continue } "password:" { send "westos\r" }}expect "]#" { send "sed "/^Listen/cListen 8080" -i /etc/httpd/conf/httpd.conf\r" }expect "]#" { send "yum restart httpd -y\r" }expect eofEOF}yum install expect -yAuto_Discuz $1scp /home/kiosk/Downloads/Discuz_X3.2_SC_UTF8.zip root@$1:/var/www/htmlAuto_Connect $1firefox -new-tab $1/upload/installAuto_Httpd $1

VSole
网络安全专家