DynamoRIO源码分析——劫持进程
一、前言
本系列将以官网资料为基础主要通过动态跟踪来解析DynamoRIO的源代码。因为如果不结合实例只是将各函数的作用写出来,实在无法很好的说明问题,我们将以代码覆盖工具drcov为例,分析DynamoRIO的执行流程。
本系列主要的参考资料是《Efficient, Transparent, and Comprehensive Runtime Code Manipulation》(一定要看这篇论文),本章主要讲述DynamoRIO如何劫持控制目标进程。
二、概述
DynamoRIO是一个运行时代码操作系统,支持在程序执行时对其任何部分进行代码转换。DynamoRIO输出了一个接口,用于建立动态工具,用途广泛:程序分析和理解、剖析、仪表、优化、翻译等。与许多动态工具系统不同,DynamoRIO并不局限于插入调用/中断,通过强大的IA-32/AMD64/ARM/AArch64指令操作库,允许对应用程序指令进行任意修改。
DynamoRIO提供了高效、透明和全面的操作,可以对运行在库存操作系统(Windows、Linux或Android,试验性支持Mac)和商品IA-32、AMD64、ARM和AArch64硬件上的未修改的应用程序进行操作。
我们希望有一个全面的工具平台,它能够系统地将自己置于运行中的应用程序执行的每条指令和底层硬件之间,如图所示:
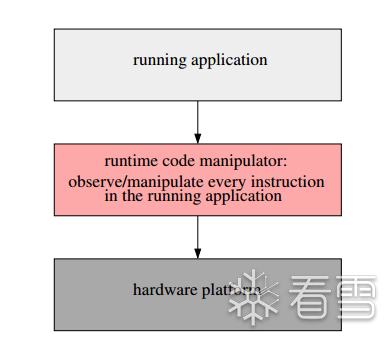
我们的目标是构建一个灵活的软件层,它将自己完全地插入到正在运行的应用程序和底层平台之间。该层充当运行时控制点,允许自定义工具嵌入其中。
三、准备工作
首先需要准备一个程序,因为我们主要以此程序为例分析DynamoRIO,所以程序不应太过复杂。我们使用的简单程序如下:
#include
#include
int main(int argc, char* argv[])
{
 int count = 0;
 for (int j = 0; j < 2; j++)
 {
 for (int i = 0; i < 60; i++)
 {
 if (i < 30)
 {
 count++;
 }
 else
 {
 count--;
 }
 }
 }
 printf("count:%d", count);
 return 0;
}
在命令行输入:
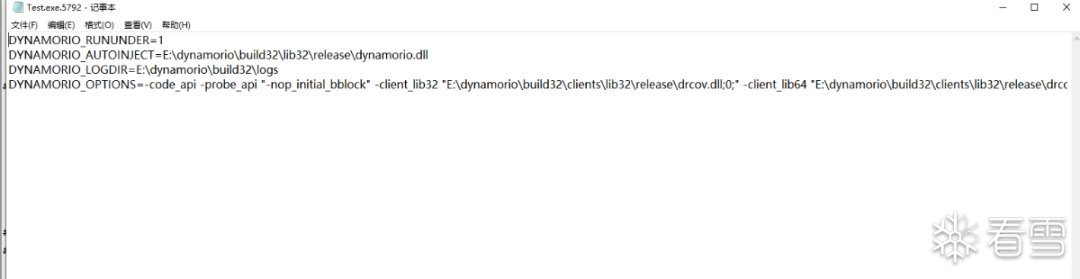
"E:\windbg\Debuggers\x86\windbg.exe" E:\dynamorio\build32\bin32\drrun.exe -t drcov --E:\test\Test.exe
开启子进程调试,下断并运行到主函数中,接下来我们开始。
int_tmain主函数
主函数在drdeploy.c中 我将把主函数简化保留关键的部分。主函数如下:
int_tmain(int argc, TCHAR* targv[])
{
 ...
 /* 开头主要进行读取参数 验证参数,初始化等操作 */
 /* 比如会找drcov.dll和dynamorio.dll的绝对路径等 */
 dr_inject_process_create(app_name, app_argv, &inject_data);
 ...
 /* 在C:\Users\Lenovo\dynamorio下创建并写入配置文件 */
 dr_inject_process_inject(inject_data, force_injection, drlib_path)
 dr_inject_process_run(inject_data)
}
可以看到主函数的关键就在于这三个函数,我们接下来逐个分析。
dr_inject_process_create
首先我们看看官网对此函数是如何进行解释的:为指定的可执行文件和命令行创建一个新进程。进程中的初始线程被暂停。
参数
[in] app_name 目标可执行文件的路径
[in] app_cmdline 一个以NULL结尾的字符串数组,代表应用程序的命令行
[out] data 一个不透明的指针,它应该被传递给后续的drinject*例程以引用这个进程。
简化后dr_inject_process_create主要执行流程如下:
int dr_inject_process_create(const char* app_name, const char** argv, void** data OUT)
{
 dr_inject_info_t* info = HeapAlloc(GetProcessHeap(), 0, sizeof(*info));
 ...
 /* 进行格式化参数,填充info等操作 */
 res = CreateProcess(wapp_name, wapp_cmdline, NULL, NULL, TRUE,
 CREATE_SUSPENDED |
 ((debug_stop_function && info->using_debugger_injection)
 ? DEBUG_PROCESS | DEBUG_ONLY_THIS_PROCESS
 : 0),
 NULL, NULL, &si, &info->pi);
 *data = (void*)info;
}
可以看到此函数主要是以暂停线程的方式创建了目标进程。我们跟踪进去看看info的结构,发现info主要保存一些进程信息。

在执行dr_inject_process_inject之前会在C:\Users\Lenovo\dynamorio目录下创建以进程名和pid命名的配置文件,我们可以查看此配置文件:
之后调用dr_inject_process_inject
dr_inject_process_inject
将DynamoRIO注入由dr_inject_process_create()创建的进程中。
参数
[in] data 由dr_inject_process_create()返回的指针。
[in] force_injection 即使进程被配置为不在DynamoRIO下运行,也会要求注入。
[in] library_path 要使用的DynamoRIO库的路径。如果为空,将使用目标进程所配置的库。
dr_inject_process_inject的主要执行流程如下:
bool dr_inject_process_inject(void* data, bool force_injection, const char* library_path)
{
 dr_inject_info_t* info = (dr_inject_info_t*)data;
 ...
 /* 如果library_path=NULL 就会从配置文件中读取dynamorio.dll的路径赋值给library_path */
 res = inject_into_new_process(info->pi.hProcess, info->pi.hThread,
 (char*)library_path, true /*map*/,
 INJECT_LOCATION_ThreadStart, NULL);
}
可以看到此函数是一个封装,主要实现在inject_into_new_process中
inject_into_new_process
简化后inject_into_new_process的主要实现流程如下:
#define EARLY_INJECT_HOOK_SIZE 14
bool
inject_into_new_process(HANDLE phandle, HANDLE thandle, char *dynamo_path, bool map,
uint inject_location, void *inject_address)
{
uint64 image_entry = 0;
uint64 hook_target = 0;
byte hook_buf[EARLY_INJECT_HOOK_SIZE];
uint old_prot;
switch (inject_location)
{
case INJECT_LOCATION_ThreadStart:
/* 此函数读取目标进程PE文件 最终将EntryPoint给image_entry */
image_entry = get_remote_process_entry(phandle, &x86_code);
if (thandle != NULL) {
if (IF_X64(!) is_32bit_process(phandle)) {
cxt.cxt.ContextFlags = CONTEXT_CONTROL;
/*通过NTGetContextThread函数获取目标进程主线程上下文*/
if (NT_SUCCESS(nt_get_context(thandle, &cxt.cxt)))
/*将目标进程主线程EIP赋值给hook_location */
hook_location = cxt.cxt.CXT_XIP;
}
}
/* 判断hook_location=0 所以下面一般不会执行 */
if (hook_location == 0) {
bool target_64 = !x86_code IF_X64(|| DYNAMO_OPTION(inject_x64));
uint64 ntdll_base = find_remote_dll_base(phandle, target_64, "ntdll.dll");
uint64 thread_start =
get_remote_proc_address(phandle, ntdll_base, "RtlUserThreadStart");
if (thread_start != 0)
hook_location = thread_start;
}
/* hook_location仍为0的情况下使用image_entry */
if (hook_location == 0) {
hook_location = image_entry;
}
}
/* 将hook_location 14字节的数据读到hook_buf */
/* 14字节是因为最大字节数是x64下 jmp (6 bytes) + target (8 bytes). */
read_remote_memory_maybe64(phandle, hook_location, hook_buf, sizeof(hook_buf),
&num_bytes_out)
/* 利用NtProtectVirtualMemory将hook_location 14个字节保护更改为可读可写可执行 */
remote_protect_virtual_memory_maybe64(phandle, hook_location, sizeof(hook_buf),
PAGE_EXECUTE_READWRITE, &old_prot)
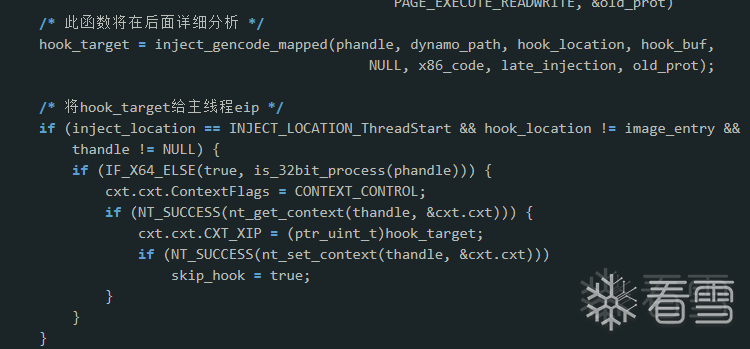
/* 此函数将在后面详细分析 */
hook_target = inject_gencode_mapped(phandle, dynamo_path, hook_location, hook_buf,
NULL, x86_code, late_injection, old_prot);
/* 将hook_target给主线程eip */
if (inject_location == INJECT_LOCATION_ThreadStart && hook_location != image_entry &&
thandle != NULL) {
if (IF_X64_ELSE(true, is_32bit_process(phandle))) {
cxt.cxt.ContextFlags = CONTEXT_CONTROL;
if (NT_SUCCESS(nt_get_context(thandle, &cxt.cxt))) {
cxt.cxt.CXT_XIP = (ptr_uint_t)hook_target;
if (NT_SUCCESS(nt_set_context(thandle, &cxt.cxt)))
skip_hook = true;
}
}
}
/* 恢复hook_location 但我感觉没有必要 因为没有改变过hook_location */
write_remote_memory_maybe64(phandle, hook_location, hook_buf, sizeof(hook_buf),
&num_bytes_out)
}
我们知道了此函数的大致流程,接下来我们来深入研究其各个参数和各函数的实现过程。
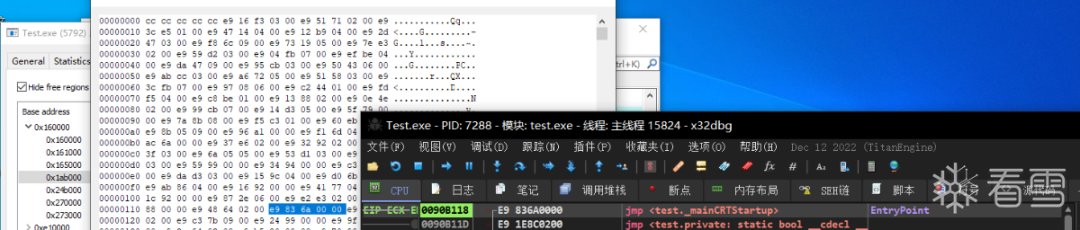
我们首先验证一下image_entry的值:
执行get_remote_process_entry后image_entry为0x1ab118,

可以看到实际上image_entry存放着EntryPoint:
接下来我们查看nt_get_context的实现过程:
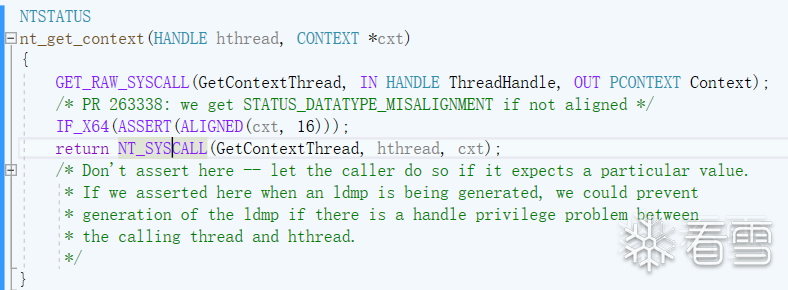

实际上nt_get_context的实现是通过变参宏调用NTGetContextThread函数。
查看hook_location
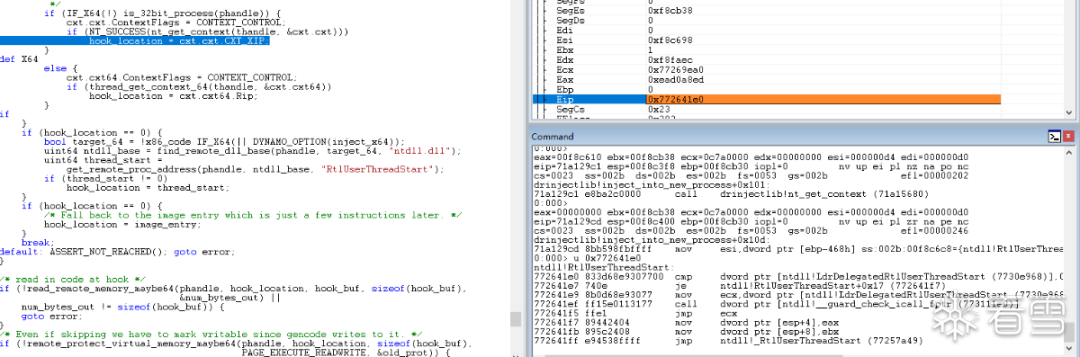
可以看到目标进程主线程的eip为RtlUserThreadStart赋值给hook_location。
分析inject_gencode_mapped
inject_gencode_mapped主要流程如下:
static uint64
inject_gencode_mapped(HANDLE phandle, char *dynamo_path, uint64 hook_location,
 byte hook_buf[EARLY_INJECT_HOOK_SIZE], void *must_reach,
 bool x86_code, bool late_injection, uint old_hook_prot)
{
 bool success = false;
 NTSTATUS res;
 HANDLE file = INVALID_HANDLE_VALUE;
 HANDLE section = INVALID_HANDLE_VALUE;
 byte *map = NULL;
 size_t view_size = 0;
 wchar_t dllpath[MAX_PATH];
 uint64 ret = 0;
 if (!convert_to_NT_file_path(dllpath, dynamo_path, BUFFER_SIZE_ELEMENTS(dllpath)))
 goto done;
 NULL_TERMINATE_BUFFER(dllpath);
 res = nt_create_module_file(&file, dllpath, NULL, FILE_EXECUTE | FILE_READ_DATA,
 FILE_ATTRIBUTE_NORMAL, FILE_SHARE_READ, FILE_OPEN, 0);
 if (!NT_SUCCESS(res))
 goto done;
 res = nt_create_section(§ion, SECTION_ALL_ACCESS, NULL, /* full file size */
 PAGE_EXECUTE_WRITECOPY, SEC_IMAGE, file,
 /* XXX: do we need security options to put in other process?*/
 NULL /* unnamed */, 0, NULL, NULL);
 if (!NT_SUCCESS(res))
 goto done;
 res = nt_raw_MapViewOfSection(section, phandle, &map, 0, 0 /* not page-file-backed */,
 NULL, (PSIZE_T)&view_size, ViewUnmap,
 0 /* no special top-down or anything */,
 PAGE_EXECUTE_WRITECOPY);
 if (!NT_SUCCESS(res))
 goto done;
 ret =
 inject_gencode_mapped_helper(phandle, dynamo_path, hook_location, hook_buf, map,
 must_reach, x86_code, late_injection, old_hook_prot);
done:
 if (ret == 0) {
 close_handle(file);
 close_handle(section);
 }
 return ret;
}
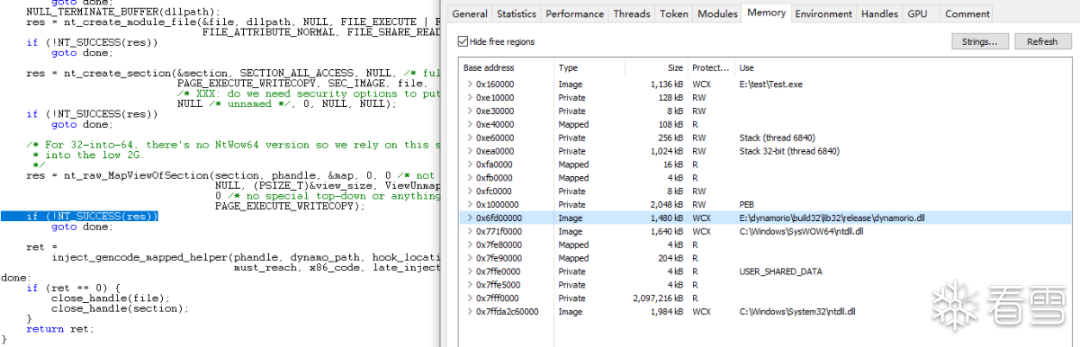
此函数利用NtCreateSection和NtMapViewOfSection将dynamorio.dll注入到目标进程中:
之后调用inject_gencode_mapped_helper函数。
inject_gencode_mapped_helper
inject_gencode_mapped_helper主要执行流程如下:
typedef struct {
 uint64 app_xax;
 uint64 dr_base;
 uint64 ntdll_base;
 uint64 tofree_base;
 uint64 hook_location;
 uint hook_prot;
 bool late_injection;
 char dynamorio_lib_path[MAX_PATH];
} earliest_args_t;
static uint64
inject_gencode_mapped_helper(HANDLE phandle, char *dynamo_path, uint64 hook_location,
 byte hook_buf[EARLY_INJECT_HOOK_SIZE], byte *map,
 void *must_reach, bool x86_code, bool late_injection,
 uint old_hook_prot)
{
 const size_t remote_alloc_sz = 2 * PAGE_SIZE;
 const size_t code_alloc_sz = PAGE_SIZE;
 earliest_args_t args;
 /* 使用NTAllocateVirtualMemory在目标进程的虚拟空间中申请2 page内存*/
 remote_code_buf =
 (uint64)allocate_remote_code_buffer(phandle, remote_alloc_sz, must_reach);
 /* 在本进程申请1 page内存 */
 local_code_buf = allocate_remote_code_buffer(NT_CURRENT_PROCESS, code_alloc_sz, NULL);
 /* hook_code_buf和remote_code_buf都指向目标进程第一个page */
 hook_code_buf = remote_code_buf;
 /* remote_data此时指向目标进程第二个page */
 remote_data = remote_code_buf + code_alloc_sz;
 args.dr_base = (uint64)map;
 args.ntdll_base = find_remote_dll_base(phandle, target_64, "ntdll.dll");
 if (args.ntdll_base == 0)
 goto error;
 args.tofree_base = remote_code_buf;
 args.hook_location = hook_location;
 args.hook_prot = old_hook_prot;
 args.late_injection = late_injection;
 strncpy(args.dynamorio_lib_path, dynamo_path,
 BUFFER_SIZE_ELEMENTS(args.dynamorio_lib_path));
 /* 将args写入到目标进程的第二个page也就是remote_data中 */
 write_remote_memory_maybe64(phandle, remote_data, &args, sizeof(args),
 &num_bytes_out)
 ...
 /* 这里会在local_code_buf 构造的代码 */
 构造的代码如下:
 mov dword ptr ds:[remote_data],eax ;也就是将eax存在args.app_xax
 mov eax,offset ntdll!RtlUserThreadStart (772641e0);hook_location(目标进程主线程eip)
 mov dword ptr [eax],0E9683D83h;恢复hook
 mov dword ptr [eax+4],74007730h
 mov dword ptr [eax+8],680D8B0Eh
 mov byte ptr [eax+0Ch],0E9h
 mov byte ptr [eax+0Dh],30h
 mov eax,remote_data
 push offset ntdll!RtlUserThreadStart (772641e0);hook_location
 jmp dynamorio.dll!dynamorio_earliest_init_takeover
 /* 将上面在local_code_buf 构造的代码 写入到remote_code_buf(hook_code_buf) */
 write_remote_memory_maybe64(phandle, hook_code_buf, local_code_buf,
 cur_local_pos - local_code_buf, &num_bytes_out)
 return hook_code_buf;
}
我们同样跟踪验证此函数。让大家对此过程更清晰。
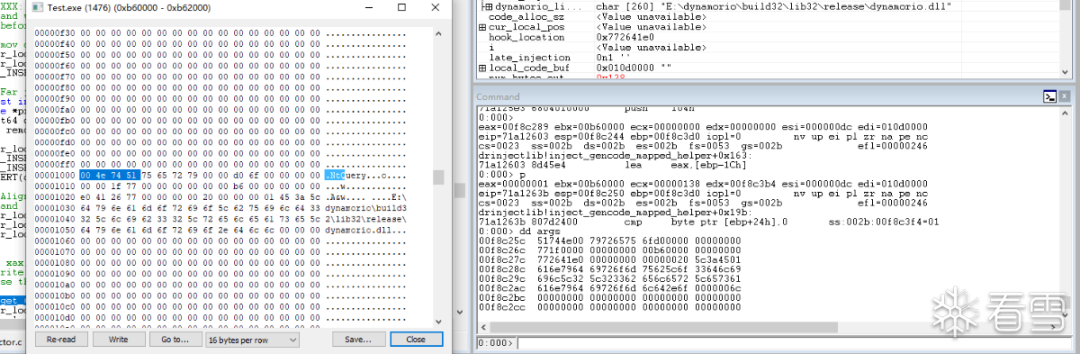
内存分配后各个参数
remote_code_buf = 0xb60000
remote_data = 0xb61000
local_code_buf = 0x010d0000
查看agrs:

args写入到目标进程的第二个page:
查看构造的代码:
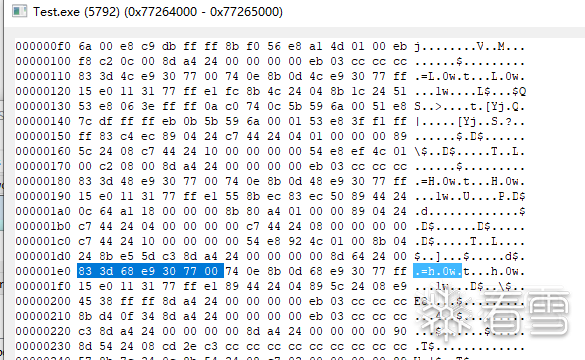
写入remote_code_buf:

我们现在已经分析完inject_gencode_mapped_helper,现在我们回到inject_into_new_process,hook_target就是我们的remote_code_buf:
执行后如下:
总结:可以看到我们劫持目标进程是通过修改目标进程主线程的eip到remote_code_buf来实现的,我们在整个过程中都没有修改hook_location里的值,所以我认为那些恢复hook的操作是没有必要的。
dr_inject_process_run
恢复由dr_inject_process_create()创建的进程中的暂停线程。
参数
[in] data 由dr_inject_process_create()返回的指针。
bool
dr_inject_process_run(void* data)
{
 dr_inject_info_t* info = (dr_inject_info_t*)data;
 if (info->attached == true) {
 /* detach the debugger */
 DebugActiveProcessStop(info->pi.dwProcessId);
 }
 /* resume the suspended app process so its main thread can run */
 /* 恢复主线程*/
 ResumeThread(info->pi.hThread);
 close_handle(info->pi.hThread);
 return true;
}
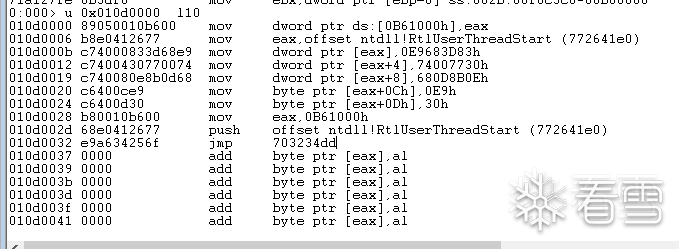
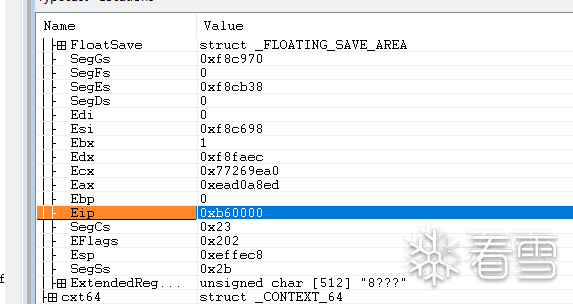
执行ResumeThread后,我们切换到子进程,记住此时的寄存器信息:


00b60000 89050010b600 mov dword ptr ds:[0B61000h],eax
00b60006 b8e0412677 mov eax,772641E0h
00b6000b c74000833d68e9 mov dword ptr [eax],0E9683D83h
00b60012 c7400430770074 mov dword ptr [eax+4],74007730h
00b60019 c740080e8b0d68 mov dword ptr [eax+8],680D8B0Eh
00b60020 c6400ce9 mov byte ptr [eax+0Ch],0E9h
00b60024 c6400d30 mov byte ptr [eax+0Dh],30h
00b60028 b80010b600 mov eax,0B61000h ;remote_data
00b6002d 68e0412677 push 772641E0h ;RtlUserThreadStart
00b60032 e9a634256f jmp dynamorio!dynamorio_earliest_init_takeover (6fdb34dd)
主函数已经分析完了,我们来总结一下这个过程,首先使用暂停线程的方式打开目标进程,将dynamorio.dll注入到目标进程空间中,在目标进程申请空间并写入跳转到dynamorio!dynamorio_earliest_init_takeover的代码,修改目标进程线程EIP到这段代码中。这样之后当恢复线程运行的时候,就会运行到dynamorio_earliest_init_takeover中。
dynamorio_earliest_init_takeover
dynamorio_earliest_init_takeover函数 是在x86.asm_core.s中用汇编写的,如下:
1:003> u 6fdb34dd l20
dynamorio!dynamorio_earliest_init_takeover [E:\dynamorio\build32\core\x86.asm_core.s @ 4381]:
6fdb34dd 50 push eax
6fdb34de 8d6424fc lea esp,[esp-4]
6fdb34e2 8da424a8fdffff lea esp,[esp-258h] ;提高栈顶
6fdb34e9 ffb42460020000 push dword ptr [esp+260h]
6fdb34f0 9c pushfd ;构建priv_mcontext_t结构
6fdb34f1 60 pushad
6fdb34f2 8d0424 lea eax,[esp]
6fdb34f5 50 push eax
6fdb34f6 e825fdfcff call dynamorio!get_simd_vals (6fd83220)
6fdb34fb 8d642404 lea esp,[esp+4]
6fdb34ff 8d842480020000 lea eax,[esp+280h]
6fdb3506 8944240c mov dword ptr [esp+0Ch],eax
6fdb350a 8d1424 lea edx,[esp]
6fdb350d 8b44240c mov eax,dword ptr [esp+0Ch]
6fdb3511 8d400c lea eax,[eax+0Ch]
6fdb3514 8944240c mov dword ptr [esp+0Ch],eax
6fdb3518 8b842484020000 mov eax,dword ptr [esp+284h]
6fdb351f 8b08 mov ecx,dword ptr [eax]
6fdb3521 894c241c mov dword ptr [esp+1Ch],ecx
6fdb3525 52 push edx ;mc
6fdb3526 50 push eax ;arg_ptr
6fdb3527 e82428f5ff call dynamorio!dynamorio_earliest_init_takeover_C (6fd05d50)
6fdb352c 8d642408 lea esp,[esp+8]
6fdb3530 61 popad
6fdb3531 9d popfd
6fdb3532 8da4245c020000 lea esp,[esp+25Ch]
6fdb3539 8d642408 lea esp,[esp+8]
6fdb353d c3 ret
此函数主要调用dynamorio!dynamorio_earliest_init_takeover_C,这之前的操作主要为了构建priv_mcontext_t结构。
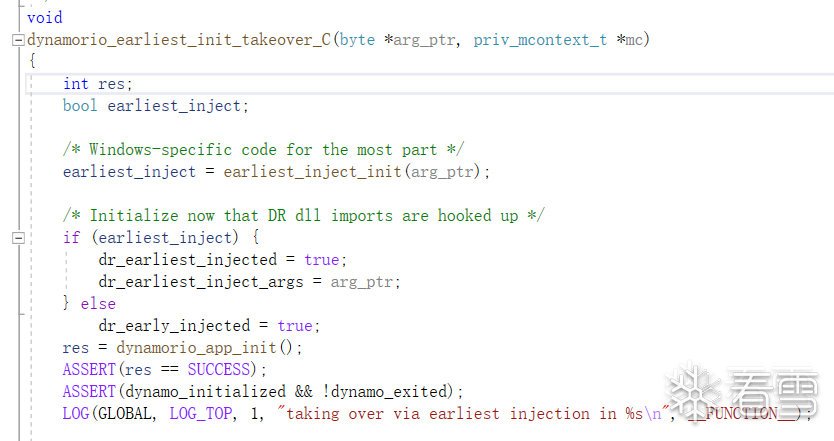
dynamorio_earliest_init_takeover_C
priv_mcontext_t结构保存了目标进程的上下文。对比刚切换子进程时的上下文,可以看到此时EIP为RtlUserThreadStart:

arg_ptr为remote_data

void
dynamorio_earliest_init_takeover_C(byte *arg_ptr, priv_mcontext_t *mc)
{
 int res;
 bool earliest_inject;
 /* Windows-specific code for the most part */
 earliest_inject = earliest_inject_init(arg_ptr);
 /* Initialize now that DR dll imports are hooked up */
 if (earliest_inject) {
 dr_earliest_injected = true;
 dr_earliest_inject_args = arg_ptr;
 } else
 dr_early_injected = true;
 res = dynamorio_app_init();
 ASSERT(res == SUCCESS);
 ASSERT(dynamo_initialized && !dynamo_exited);
 LOG(GLOBAL, LOG_TOP, 1, "taking over via earliest injection in %s", __FUNCTION__);
 /* earliest_inject_cleanup() is called within dynamorio_app_init() to avoid
 * confusing the exec areas scan
 */
 dynamorio_app_take_over_helper(mc);
}
此函数的关键在于dynamorio_app_init和dynamorio_app_take_over_helper。
dynamorio_app_init
由于初始化操作很多,当以后用到的时候我们再回头分析。
DYNAMORIO_EXPORT int
dynamorio_app_init(void)
{
 dynamorio_app_init_part_one_options();
 return dynamorio_app_init_part_two_finalize();
}
void
dynamorio_app_init_part_one_options(void)
{
 此函数主要读取配置文件
}
int
dynamorio_app_init_part_two_finalize(void)
{
 ...
 /* 加载client 这里我们使用的是drcov.dll */
 instrument_load_client_libs()
 /* 此函数很重要 之后会用到 */
 callback_interception_init_start()
 /* 加载与client相关的模块*/
 loader_init_prologue();
 /* 此函数初始化dcontext 和dstack*/
 dynamo_thread_init(NULL, NULL, NULL, false);
 /* 这个函数主要执行client的主函数*/
 instrument_init();
}
此函数执行了很多初始化操作,我先贴出对现在有用的操作,当在之后用到的时候再回头分析。现在instrument_init是关键,我们进入查看其实现。
void
instrument_init(void)
{
 for (i = 0; i < num_client_libs; i++) {
 /* 将init赋值成drcov!dr_client_main */
 void (*init)(client_id_t, int, const char **) =
 (void (*)(client_id_t, int, const char **))(
 lookup_library_routine(client_libs[i].lib, INSTRUMENT_INIT_NAME));
 if (init != NULL)
 /* 调用dr_client_main */
 (*init)(client_libs[i].id, client_libs[i].argc, client_libs[i].argv);
 }
}
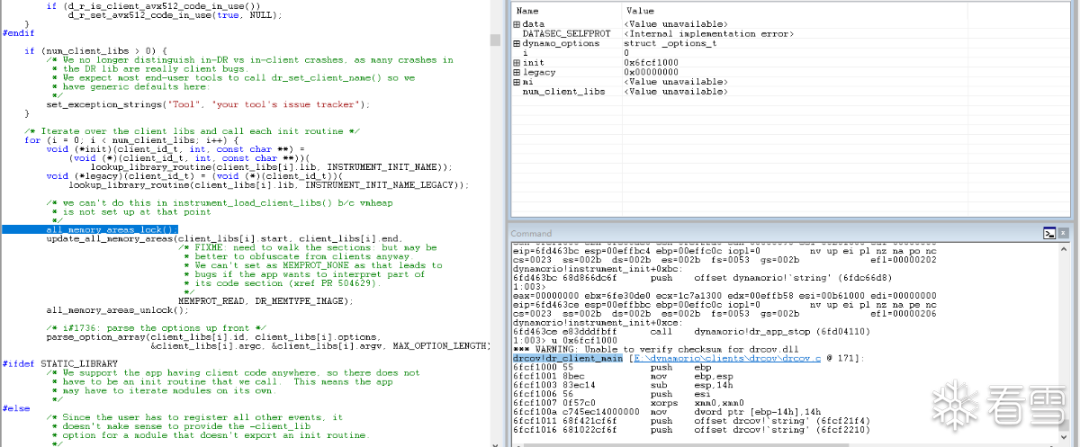
可以看到此函数调用了drcov!dr_client_main,让我们接着深入看看覆盖率信息是怎么收集的。
dr_client_main
DR_EXPORT void
dr_client_main(client_id_t id, int argc, const char *argv[])
{
 drcovlib_options_t ops = {
 sizeof(ops),
 };
 dr_set_client_name("DrCov", "http://dynamorio.org/issues");
 client_id = id;
 /* 验证参数 */
 options_init(id, argc, argv, &ops);
 /* 一旦调用此例程,drcovlib 的操作就会生效并开始收集覆盖率信息。*/
 if (drcovlib_init(&ops) != DRCOVLIB_SUCCESS) {
 NOTIFY(0, "fatal error: drcovlib failed to initialize");
 dr_abort();
 }
 if (!dr_using_all_private_caches()) {
 const char *logname;
 if (drcovlib_logfile(NULL, &logname) == DRCOVLIB_SUCCESS)
 NOTIFY(1, "", logname);
 }
 if (nudge_kills) {
 drx_register_soft_kills(event_soft_kill);
 dr_register_nudge_event(event_nudge, id);
 }
 /* 为进程退出事件注册一个回调函数。*/
 dr_register_exit_event(event_exit);
}
/* event_exit回调如下 当进程退出的时候会调用drcovlib_exit */
static void
event_exit(void)
{
 drcovlib_exit();
}
options_init
此函数的作用是验证参数,比如-logdir可以指定覆盖率文件路径。由于我们没有指定参数,所以此函数ops输出如下:

之后调用drcovlib_init。
drcovlib_init
官方解释如下:初始化drcovlib扩展。必须在任何其他例程之前调用。可以多次调用(通常由不同的组件调用),但每次调用必须与相应的drcovlib_exit()的调用配对。
一旦这个例程被调用,drcovlib的操作就会生效,并开始收集覆盖信息。
参数
[in] ops 指定控制drcovlib操作方式的可选参数。
typedef struct _per_thread_t {
 void *bb_table;
 file_t log;
 char logname[MAXIMUM_PATH];
} per_thread_t;
static per_thread_t *global_data;
drcovlib_status_t
drcovlib_init(drcovlib_options_t *ops)
{
 ...
 /* 读取ops的值 */
 drmgr_init();
 drx_init();
 /* 注册创建线程回调 */
 drmgr_register_thread_init_event(event_thread_init);
 /* 注册了线程退出事件的回调函数。*/
 drmgr_register_thread_exit_event(event_thread_exit);
 /* 此函数是收集覆盖率信息的关键 */
 /* event_basic_block_analysis此回调函数是如何收集覆盖率信息的,我们将在后续的章节中介绍 */
 /* 我们主要查看drmgr_register_bb_instrumentation_event这个回调注册函数 */
 drmgr_register_bb_instrumentation_event(event_basic_block_analysis, NULL, NULL);
 dr_register_filter_syscall_event(event_filter_syscall);
 drmgr_register_pre_syscall_event(event_pre_syscall);
 /* 此函数创建覆盖率文件,并创建global_data结构 */
 return event_init();
}
drmgr_register_bb_instrumentation_event
这个回调注册函数到底将回调注册到了哪里,到底在什么时候会调用我们的回调函数,我们接着深入研究。
typedef struct _cb_list_t {
 union { /* array of callbacks */
 cb_entry_t *bb;
 generic_event_entry_t *generic;
 byte *array;
 } cbs;
 size_t entry_sz; /* size of each entry */
 size_t num_def; /* defined (may not all be valid) entries in array */
 size_t num_valid; /* valid entries in array */
 size_t capacity; /* allocated entries in array */
 /* We support only keeping events when a user has requested them.
 * This helps with things like DR's assert about a filter event (i#2991).
 */
 void (*lazy_register)(void);
 void (*lazy_unregister)(void);
} cb_list_t;
static cb_list_t cblist_instrumentation;
DR_EXPORT
bool
drmgr_register_bb_instrumentation_event(drmgr_analysis_cb_t analysis_func,
 drmgr_insertion_cb_t insertion_func,
 drmgr_priority_t *priority)
{
 if (analysis_func == NULL && insertion_func == NULL)
 return false; /* invalid params */
 return drmgr_bb_cb_add(&cblist_instrumentation, (void *)analysis_func,
 (void *)insertion_func, priority, NULL /* no user data */,
 cb_entry_set_fields_instrumentation);
}
drmgr_bb_cb_add
static bool
drmgr_bb_cb_add(cb_list_t *list, void *func1, void *func2, drmgr_priority_t *priority,
 void *user_data, /*passed at registration */
 void (*set_cb_fields)(cb_entry_t *e, void *f1, void *f2))
{
 cb_entry_t *new_e = &list->cbs.bb[idx];
 set_cb_fields(new_e, func1, func2);
}
此函数调用了set_cb_fields,set_cb_fields是一个函数指针参数,实际调用的是cb_entry_set_fields_instrumentation
static void
cb_entry_set_fields_instrumentation(cb_entry_t *new_e, void *func1, void *func2)
{
 new_e->has_pair = true;
 new_e->cb.pair.analysis_cb = (drmgr_analysis_cb_t)func1;
 new_e->cb.pair.insertion_cb = (drmgr_insertion_cb_t)func2;
}
我们现在知道注册drmgr_analysis_cb_t回调就是将回调函数地址赋值给new_e->cb.pair.analysis_cb。但是什么时候调用它将在之后的章节中分析。

总结
drcov首先创建log文件,之后注册收集覆盖率信息的回调函数和进程退出回调,在进程退出的时候会将覆盖率信息写入log文件中。此过程会在之后的章节中分析。
dynamorio_app_init分析完毕,接下来分析dynamorio_app_take_over_helper。
dynamorio_app_take_over_helper
void
dynamorio_app_take_over_helper(priv_mcontext_t *mc)
{
 /* 主要调用dynamo_start */
 dynamo_start(mc);
}
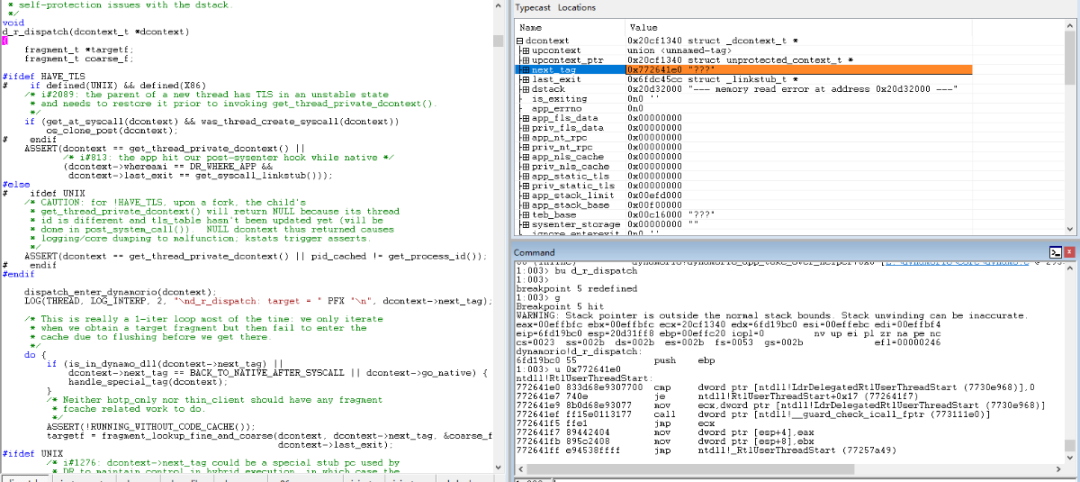
dynamo_start
void
dynamo_start(priv_mcontext_t *mc)
{
 priv_mcontext_t *mcontext;
 /* 得到dcontext结构 此结构已在上面初始化函数中完成初始化 */
 dcontext_t *dcontext = get_thread_private_dcontext();
 /* 这里很关键将dcontext->next_tag赋值 */
 dcontext->next_tag = mc->pc;
 /* 将目标进程上下文结构赋值给dcontext中的mcontext */
 mcontext = get_mcontext(dcontext);
 *mcontext = *mc;
 /* 清零pc */
 mcontext->pc = 0;
 /* dcontext->dstack也在上面初始化函数中完成初始化 */
 call_switch_stack(dcontext, dcontext->dstack, (void (*)(void *))d_r_dispatch,
 NULL /*not on d_r_initstack*/, true /*return on error*/);
}
static INLINE_FORCED priv_mcontext_t *
get_mcontext(dcontext_t *dcontext)
{
 return &(dcontext->upcontext.upcontext.mcontext);
}
调用call_switch_stack
 call_switch_stack PROC
 mov eax, esp ;用eax找参数
 push ebx
 mov ebx, eax
 push edi ;保存此时的edi
 mov edi, esp ;将esp保存在edi中
 mov edx, [3*4 + eax] ;d_r_dispatch函数赋值给edx
 mov ecx, [1*4 + eax] ;dcontext赋值给ecx
 mov esp, [2*4 + eax] ;切换成dstack的堆栈
 cmp dword ptr [4*4 + eax], 0 ;参数4为0
 je call_dispatch_alt_stack_no_free ;跳转
 mov eax, [4*4 + eax]
 mov dword ptr [eax], 0
call_dispatch_alt_stack_no_free:
 push ecx
 call edx ;调用d_r_dispatch 参数为dcontext
 lea esp, [4*1 + esp]
 mov esp, edi
 mov eax, ebx
 cmp byte ptr [5*4 + eax], 0
 je unexpected_return
 pop edi
 pop ebx
 mov esp, eax
 ret
 call_switch_stack ENDP
可以看到此函数将堆栈切换到dstack,之后调用d_r_dispatch。

四、总结
我们成功劫持控制了目标程序,并且注册了收集覆盖率信息的回调函数,最后以一个干净的堆栈调用d_r_dispatch。
d_r_dispatch是DynamoRIO控制管理的中心,下一章我们将分析d_r_dispatch。请记住一点DynamoRIO永远不会运行目标程序代码,而是让目标程序代码以一个基本块复制到代码缓存中,然后在本地执行缓存的代码。此过程将在下一章详细分析。
