Kubernetes之CNI之Cilium的实践
ubuntu20.04,单网卡,能访问互联网,
切换到阿里云的源,
sudo mv /etc/apt/sources.list /etc/apt/sources.list.bak,
sudo vim /etc/apt/sources.list,
deb http://mirrors.aliyun.com/ubuntu/ focal main restricted universe multiverse
deb-src http://mirrors.aliyun.com/ubuntu/ focal main restricted universe multiverse
deb http://mirrors.aliyun.com/ubuntu/ focal-security main restricted universe multiverse
deb-src http://mirrors.aliyun.com/ubuntu/ focal-security main restricted universe multiverse
deb http://mirrors.aliyun.com/ubuntu/ focal-updates main restricted universe multiverse
deb-src http://mirrors.aliyun.com/ubuntu/ focal-updates main restricted universe multiverse
deb http://mirrors.aliyun.com/ubuntu/ focal-backports main restricted universe multiverse
deb-src http://mirrors.aliyun.com/ubuntu/ focal-backports main restricted universe multiverse
deb http://mirrors.aliyun.com/ubuntu/ focal-proposed main restricted universe multiverse
deb-src http://mirrors.aliyun.com/ubuntu/ focal-proposed main restricted universe multiverse
sudo apt update,sudo apt dist-upgrade,
安装docker,
sudo apt install docker.io,sudo systemctl enable docker,
sudo gpasswd -a master docker,newgrp docker,
安装kubernetes,
sudo su root,
curl https://mirrors.aliyun.com/kubernetes/apt/doc/apt-key.gpg | apt-key add -,
sudo vim /etc/apt/sources.list.d/kubernetes.list,
deb https://mirrors.aliyun.com/kubernetes/apt/ kubernetes-xenial main,
sudo apt update,
sudo apt install kubelet=1.19.16-00 kubeadm=1.19.16-00 kubectl=1.19.16-00,
sudo swapoff -a,
sudo kubeadm init --pod-network-cidr=10.0.0.0/8 --image-repository registry.aliyuncs.com/google_containers --kubernetes-version=v1.19.16,
mkdir -p $HOME/.kube,
sudo cp -i /etc/kubernetes/admin.conf $HOME/.kube/config,
sudo chown $(id -u):$(id -g) $HOME/.kube/config,
kubectl taint nodes --all node-role.kubernetes.io/master-,
安装cilium,
sudo mount bpffs /sys/fs/bpf -t bpf,
wget https://raw.githubusercontent.com/cilium/cilium/v1.9/install/kubernetes/quick-install.yaml,
kubectl create -f quick-install.yaml,
接下来要安装cilium的流量可视化组件,
wget https://raw.githubusercontent.com/cilium/cilium/v1.9/install/kubernetes/quick-hubble-install.yaml,
kubectl apply -f quick-hubble-install.yaml,
当前hubble版本应该是有bug,无法正常完成,改成安装低版本的,
下载安装helm,
wget https://get.helm.sh/helm-v3.7.1-linux-amd64.tar.gz,
tar -zxvf helm-v3.7.1-linux-amd64.tar.gz,
sudo mv linux-amd64/helm /usr/local/bin/,
下载低版本hubble,
git clone https://github.com/cilium/hubble.git -b v0.5,
cd hubble/install/kubernetes,
helm template hubble --namespace kube-system --set metrics.enabled="{dns,drop,tcp,flow,port-distribution,icmp,http}" --set ui.enabled=true > /home/master/hubble.yaml,
kubectl apply -f hubble.yaml,
需要手动创建service,vim hubble-service.yaml,
apiVersion: v1
kind: Service
metadata:
name: hubble-ui-node
namespace: kube-system
spec:
ports:
- name: http
port: 12000
protocol: TCP
targetPort: 12000
nodePort: 32000
selector:
k8s-app: hubble-ui
sessionAffinity: None
type: NodePort
kubectl apply -f hubble-service.yaml,
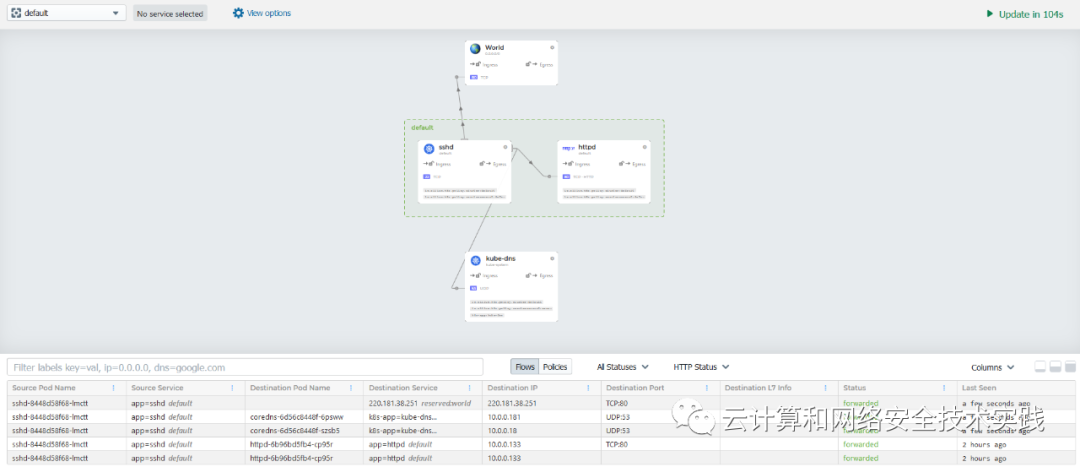
创建两个测试应用,访问一下产生流量,hubble界面上能看到效果,