利用Goblin搭建仿真钓鱼网站/蜜罐实例
今天安利一款仿真钓鱼网站和仿真蜜罐工具——Goblin,也称哥布林。
项目地址:https://github.com/xiecat/goblin
0x01 工具效果
Goblin 可通过反向代理,在不影响用户操作的情况下无感知的获取用户的信息,或者诱导用户操作;也可以通过使用代理方式达到隐藏服务端的目的。且工具内置插件,可通过简单的配置,快速调整网页内容以达到更好的演练效果。该款工具可以说是减少了红蓝对抗人员对红蓝对抗中钓鱼环境部署的难度。
0x02 搭建仿真钓鱼网站
1. 搭建环境
以linux为例,搭建FLASH钓鱼网站。
1.1 下载goblin
git clone https://github.com/xiecat/goblin.git
1.2 下载flash的demo
git clone https://github.com/xiecat/goblin-demo.git
1.3 将goblin文件放入goblin-demo文件夹下
1.4 修改goblin.yaml配置文件
因为默认demo是本地,所以这里需要配置一下代理服务器信息。
Loglevel: 5 #日志等级 1级:全部日志;2级:POST请求日志;3级:记录转储登录规则;4级:记录错误日志;5级:记录异常退出日志
Server: # 服务器一些超时设置默认值即可
  IdleTimeout: 3m0s
ReadTimeout: 5m0s
WriteTimeout: 5m0s
ReadHeaderTimeout: 30s
ProxyHeader: RemoteAddr # 获取真实 IP 默认是访问 IP
  StaticDir: static  #本地静态文件目录可以放一些工具,方便使用
StaticURI: /zz118smee/ #静态文件服务器的访问目录
Proxy: # 代理一些配置默认即可
MaxIdleConns: 512
IdleConnTimeout: 2m0s
TLSHandshakeTimeout: 1m0s
ExpectContinueTimeout: 1s
maxcontentlength: -1 # 处理响应数据最大值默认 20M,超过这个值,插件中需要读取 body 的操作会被取消
ProxyServerAddr: "" # 设置代理,设置后通过代理进行网页请求
ProxyCheckURL: https://myip.ipip.net/ # 访问此地址检查代理设置是否正确
PluginDir: plugins #插件目录
Site:
    127.0.0.1:8083: #需要修改的监听地址,可以是域名:port;IP:port
      Listen: 0.0.0.0 #不需要动
StaticPrefix: czjv8kmton # 这个是 插件模块使用。
SSL: false #ssl开关
CAKey: "" #证书key路径
      CACert: "" #证书pem路径
      ProxyPass: https://www.flash.cn/ # 要代理的地址
Plugin: "flash" # 需要使用的插件,目前只能为一个
127.0.0.1:8084: #需要修改的监听地址,可以是域名:port;IP:port
Listen: 0.0.0.0
StaticPrefix: nmnckbsfkq
SSL: false
CAKey: ""
CACert: ""
ProxyPass: https://soft.flash.cn/ # 要代理的地址
Plugin: soft.flash # 需要使用的插件,目前只能为一个
127.0.0.1:8085: #需要修改的监听地址,可以是域名:port;IP:port
Listen: 0.0.0.0
StaticPrefix: nmnckbsfkb
SSL: false
CAKey: ""
CACert: ""
ProxyPass: https://static.flash.cn/ # 要代理的地址
Plugin: static.flash #需要使用的插件,目前只能为一个
127.0.0.1:8086: #需要修改的监听地址,可以是域名:port;IP:port
Listen: 0.0.0.0
StaticPrefix: nmnckbsfkb
SSL: false
CAKey: ""
CACert: ""
ProxyPass: https://api.flash.cn/
Plugin: api.flash
Notice:
dingtalk:
    DingTalk: "" #dingding提醒key
iplocation:
type: qqwry  # 地理位置查询数据库
geo_license_key: ""
log_file: goblin.log
cache:
type: self # 可使用的缓存类型 [redis,none,self] self 缓存到本地,redis 缓存到 redis 。none 不使用缓存
expire_time: 10m0s # 缓存失效时间
redis:
host: 127.0.0.1
port: 6379
password: IMrvElmuMG
db: 0
CacheType: # 可缓存的路径后缀。目前带有参数的静态文件不做缓存
- png
- jpg
- js
- jpeg
- css
- otf
- ttf
CacheSize: 12582912 # 最大缓存大小
1.5 把需要修改的监听地址改一下,然后修改插件配置。
插件配置在plugins目录下

修改api.flash. yaml:
Name: api.flash #插件名称
Version: 0.0.1  #插件版本号
Description: this is a description #插件描述
WriteDate: "2021-09-08" #插件生成日期
Author: goblin #作者
Rule: #规则
- url: /frontend/js/index20210429.js # 匹配的路径
  Match: prefix # 匹配方式 [word,prefix,Suffix] word 是全匹配,prefix 是匹配前缀 suffix 是匹配后缀。这里没有使用正则
Replace: # 替换模块
- Request:
Method: # 匹配到 GET POST 方可执行替换
- GET
Response:# 替换的响应内容
Header:
          GoblinServer: 0.0.1 #header标签选项
Body:
ReplaceStr: # 替换字符串
- Old: "hm.baidu.com"
New: "/"
Count: -1
- url: /config/flashVersion
Match: prefix
Replace:
- Request:
Method:
- GET
Response:
Header:
GoblinServer: 0.0.1
Body:
File: static/flashVersion
修改flash.yaml:
Name: flash
Version: 0.0.1
Description: this is a description
WriteDate: "2021-09-08"
Author: goblin
Rule:
- url: /
Match: prefix
Replace:
- Request:
Method:
- GET
Response:
Body:
ReplaceStr:
- Old: https://soft.flash.cn
          New: 127.0.0.1:8084 #修改自己的网站和端口
Count: -1
- Old: soft.flash.cn
New: 127.0.0.1:8084 #修改自己的网站和端口
Count: -1
- Old: https://static.flash.cn
New: 127.0.0.1:8085 #修改自己的网站和端口
Count: -1
- Old: static.flash.cn
New: 127.0.0.1:8085 #修改自己的网站和端口
Count: -1
- Old: https://www.flash.cn
New: http://127.0.0.1:8083 #修改自己的网站和端口
Count: -1
- Old: www.flash.cn
New: 127.0.0.1:8083 #修改自己的网站和端口
Count: -1
- url: /config/flashVersion
Match: prefix
Replace:
- Request:
Method:
- GET
Response:
Location: "//127.0.0.1:8086/config/flashVersion #我的网站插件所在路径,带上域名
⚠️注意://是根据网站走的,网站是https它就用https
修改soft插件:
Name: soft.flash
Version: 0.0.1
Description: this is a description
WriteDate: "2021-09-08"
Author: goblin
Rule:
- url: /
  Match: prefix
Replace:
    - Request:
        Method:
        - GET
        - POST
        Header:
          X-Forwarded-For: 127.0.0.1
          X-Real-IP: 127.0.0.1
      Response:
Body:
          ReplaceStr:
            - Old: "hm.baidu.com"
New: "/"
Count: -1
            - Old: https://soft.flash.cn
              New: 127.0.0.1:8084 #修改为自己的域名加端口
Count: -1
            - Old: soft.flash.cn
New: 127.0.0.1:8084 #修改为自己的域名加端口
Count: -1
            - Old: https://static.flash.cn
New: 127.0.0.1:8085 #修改为自己的域名加端口
Count: -1
            - Old: static.flash.cn
New: 127.0.0.1:8085 #修改为自己的域名加端口
Count: -1
            - Old: https://www.flash.cn
New: http://127.0.0.1:8083 #修改为自己的域名加端口
Count: -1
            - Old: www.flash.cn
New: 127.0.0.1:8083 #修改为自己的域名加端口
Count: -1
- url: /flashcenter/js/index.js
Match: prefix
Replace:
  - Request:
      Method:
      - GET
      - POST
      Header:
        X-Forwarded-For: 127.0.0.1
        X-Real-IP: 127.0.0.1
    Response:
Body:
        ReplaceStr:
        - Old: "api.flash.cn"
New: "127.0.0.1:8086" #修改为自己的域名加端口
Count: -1
- url: /cdm/latest
Match: prefix
Replace:
    - Request:
        Method:
          - GET
          - POST
        Header:
          X-Forwarded-For: 127.0.0.1
          X-Real-IP: 127.0.0.1
      Response:
⚠️注意:如果设置域名+tls模式,不需要加端口和https://,直接写域名。
修改static插件:
Name: static.flash
Version: 0.0.1
Description: this is a description
WriteDate: "2021-09-08"
Author: goblin
Rule:
- url: /frontend/js/index20210429.js
Match: prefix
Replace:
- Request:
Method:
- GET
Response:
Header:
GoblinServer: 0.0.1
Body:
ReplaceStr:
- Old: "hm.baidu.com"
New: "/"
Count: -1
- url: /frontend/js/download.js
Match: prefix
Replace:
- Request:
Method:
- GET
Response:
Body:
ReplaceStr:
- Old: "api.flash.cn"
New: "127.0.0.1:8086" #修改为自己的域名和端口
Count: -1
1.6 启动调试Goblin
www.flash.cn(首页)
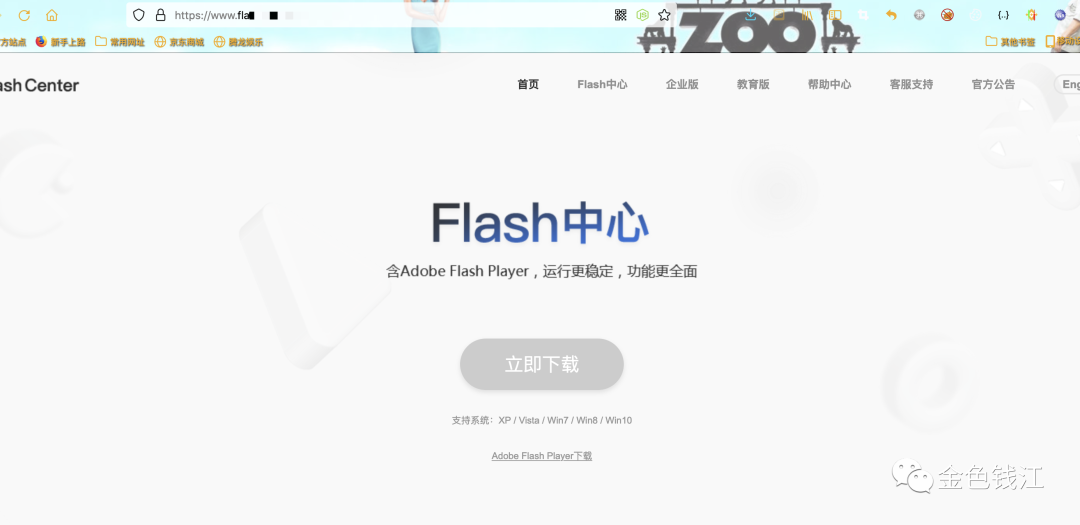
static.flash.cn

api.flash.cn

至此,我们已成功模仿Flash网站!
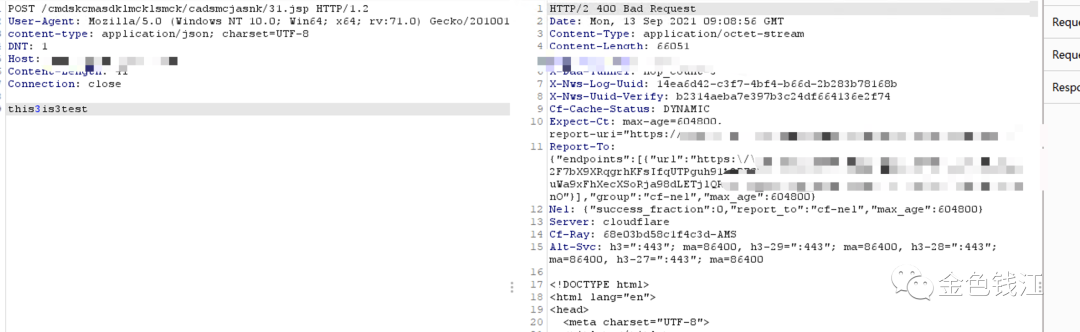
2. 用RedTeam手段进行红蓝对抗
2.1 在关闭Goblin时发现不能正常关闭,需要用kill命令关闭
kill -9 pid号

2.2 修改flashVersion中alert为xxx.exe或者修改alert.html内容
_flash_install_packages_({
"activex": {
"date": "2021-08-10",
"version": "34.0.0.184",
"size": "19.8MB",
    "downloadURL": "{{ .Static }}alert.html", #修改alert.html文件或者替换alert.html为xxx.exe
"downloadURLForNotSource": "{{ .Static }}alert.html",
"downloadURLForWin8": "{{ .Static }}alert.html",
"downloadURLForWin8NotSource": "{{ .Static }}alert.html"
  },
"ppapi": {
"date": "2021-08-10",
"version": "34.0.0.184",
"size": "20.1MB",
"downloadURL": "{{ .Static }}alert.html",
"downloadURLForNotSource": "{{ .Static }}alert.html"
  },
"npapi": {
"date": "2021-08-10",
"version": "34.0.0.184",
"size": "20.3MB",
"downloadURL": "{{ .Static }}alert.html",
"downloadURLForNotSource": "{{ .Static }}alert.html"
  },
"mac-ppapi": {
"date": "2021-08-10",
"version": "34.0.0.184",
"size": "21MB",
"downloadURL": "{{ .Static }}alert.html",
"downloadURLForNotSource": "{{ .Static }}alert.html"
  },
"mac-npapi": {
"date": "2021-08-10",
"version": "34.0.0.184",
"size": "21MB",
"downloadURL": "{{ .Static }}alert.html",
"downloadURLForNotSource": "{{ .Static }}alert.html"
  },
"linux-64-tar-npapi": {
"date": "2021-04-13",
"version": "34.0.0.137",
"size": "9MB",
"downloadURL": "{{ .Static }}alert.html",
"downloadURLForNotSource": "{{ .Static }}alert.html"
  },
"linux-64-rpm-npapi": {
"date": "2021-04-13",
"version": "34.0.0.137",
"size": "8.6MB",
"downloadURL": "{{ .Static }}alert.html",
"downloadURLForNotSource": "{{ .Static }}alert.html"
  },
"linux-32-rpm-npapi": {
"date": "2021-04-13",
"version": "34.0.0.137",
"size": "8.1MB",
"downloadURL": "{{ .Static }}alert.html",
"downloadURLForNotSource": "{{ .Static }}alert.html"
  },
"linux-64-tar-ppapi": {
"date": "2021-04-13",
"version": "34.0.0.137",
"size": "9MB",
"downloadURL": "{{ .Static }}alert.html",
"downloadURLForNotSource": "{{ .Static }}alert.html"
  },
"linux-32-tar-ppapi": {
"date": "2021-04-13",
"version": "34.0.0.137",
"size": "8.2MB",
"downloadURL": "{{ .Static }}alert.html",
"downloadURLForNotSource": "{{ .Static }}alert.html"
  },
"linux-64-rpm-ppapi": {
"date": "2021-04-13",
"version": "34.0.0.137",
"size": "9MB",
"downloadURL": "{{ .Static }}alert.html",
"downloadURLForNotSource": "{{ .Static }}alert.html"
  },
"linux-32-rpm-ppapi": {
"date": "2021-04-13",
"version": "34.0.0.137",
"size": "8.1MB",
"downloadURL": "{{ .Static }}alert.html",
"downloadURLForNotSource": "{{ .Static }}alert.html"
  },
"linux-32-tar-npapi": {
"date": "2021-04-13",
"version": "34.0.0.137",
"size": "8.1MB",
"downloadURL": "{{ .Static }}alert.html",
"downloadURLForNotSource": "{{ .Static }}alert.html"
  },
"fc-ppapi": {
"date": "2021-08-10",
"downloadURL": "{{ .Static }}alert.html"
  },
"fc-activex": {
"date": "2021-08-10",
"downloadURL": "{{ .Static }}alert.html"
  },
"fc-npapi": {
"date": "2021-08-10",
"downloadURL": "{{ .Static }}alert.html"
  },
"fc-activeX": {
"date": "2021-08-10",
"downloadURL": "{{ .Static }}alert.html"
  },
"fc-ppax": {
"date": "2021-08-10",
"downloadURL": "{{ .Static }}alert.html"
  }
});
以上就是搭建仿真钓鱼网站的方式和方法(仅供学习,禁止侵权!)。
0x03 搭建仿真蜜罐
1. 替换想要伪装的目标网站
修改flash.yaml文件:
Loglevel: 1
Server:
IdleTimeout: 3m0s
ReadTimeout: 5m0s
WriteTimeout: 5m0s
ReadHeaderTimeout: 30s
ProxyHeader: RemoteAddr
StaticDir: static
StaticURI: /zz118smee/
Proxy:
MaxIdleConns: 512
IdleConnTimeout: 2m0s
TLSHandshakeTimeout: 1m0s
ExpectContinueTimeout: 1s
maxcontentlength: -1
ProxyServerAddr: ""
ProxyCheckURL: https://myip.ipip.net/
PluginDir: plugins
Site:
127.0.0.1:8083:
Listen: 0.0.0.0
StaticPrefix: czjv8kmton
SSL: false
CAKey: ""
CACert: ""
      ProxyPass: https://www.flash.cn/ #修改需要伪造的网站
Plugin: "flash"
127.0.0.1:8084:
Listen: 0.0.0.0
StaticPrefix: nmnckbsfkq
SSL: false
CAKey: ""
CACert: ""
ProxyPass: https://soft.flash.cn/ #修改需要伪造的网站
Plugin: soft.flash
127.0.0.1:8085:
Listen: 0.0.0.0
StaticPrefix: nmnckbsfkb
SSL: false
CAKey: ""
CACert: ""
ProxyPass: https://static.flash.cn/ #修改需要伪造的网站
Plugin: static.flash
127.0.0.1:8086:
Listen: 0.0.0.0
StaticPrefix: nmnckbsfkb
SSL: false
CAKey: ""
CACert: ""
ProxyPass: https://api.flash.cn/ #修改需要伪造的网站
Plugin: api.flash
Notice:
dingtalk:
DingTalk: ""
iplocation:
type: qqwry
geo_license_key: ""
log_file: goblin.log
cache:
type: self
expire_time: 10m0s
redis:
host: 127.0.0.1
port: 6379
password: IMrvElmuMG
db: 0
CacheType:
- png
- jpg
- js
- jpeg
- css
- otf
- ttf
CacheSize: 12582912
⚠️注意:建议把日志等级调整为1级,收集全部日志变化,通过dingding可实时查看别人访问web蜜罐的信息。
2. 修改日志文件存放路径
geo_license_key: ""log_file: goblin.logcache:type: self
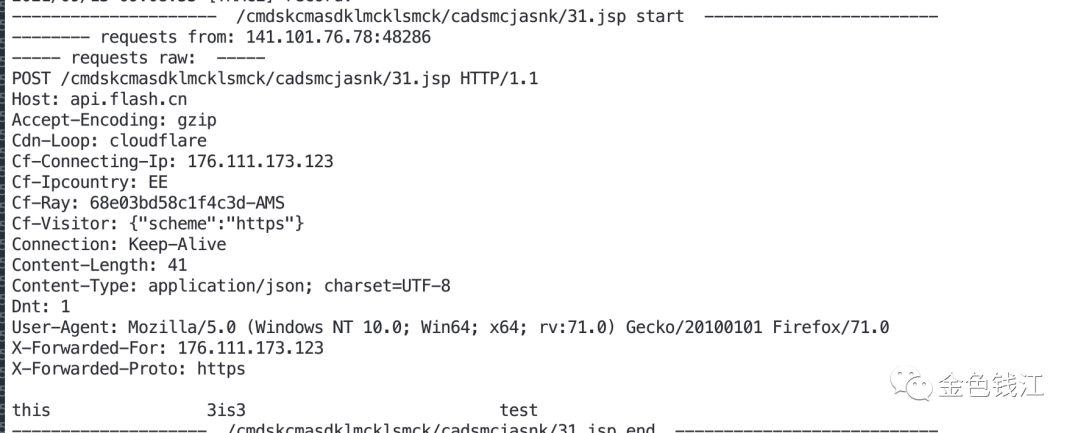
3. 启动调试
访问日志收集结果:
这款工具由@金色钱江_becivells @金色钱江_Vanilla等编写,该软件仅供学习,既可以当红队钓鱼工具,又可以当蓝队的防守蜜罐,滥用出事,后果自负!
如果师傅们想加入Goblin群进行指导和交流,请加微信Becivells,留言goblin。
end
